background image

13

Appendix A: Service Information

Repair

Service for TAPCO mixers is available at our factory, 

located in sunny Woodinville, Washington. Service for 
TAPCO mixers living outside the United States can be 
obtained through local dealers or distributors.

If your mixer needs service, follow these instructions:

1. Review the preceding troubleshooting suggestions. 

Please.

2. Call Tech Support at 1-877-827-2669, 7 am to 5 pm 

PST, to explain the problem and request an RA 
(Return Authorization) number. Have your mixer’s 
serial number ready. You must have an RA number 
before you can obtain service at the factory.

3. Keep this owner’s manual. We don’t need it to 

repair the mixer.

4. Pack the mixer in its original package, including 

endcaps and box. This is very important. When 
you call for the RA number, please let Tech 
Support know if you need new packaging. LOUD 
Technologies is not responsible for any damage 
that occurs due to non-factory packaging.

5. Include a legible note stating your name, shipping 

address (no P.O. boxes), daytime phone number, 
RA number, and a detailed description of the 
problem, including how we can duplicate it.

6. Write the RA number in 

BIG PRINT

 on top of the box. 

BIG PRINT

BIG PRINT

Units sent to us without the RA number will be refused.

7. Ship the mixer to us. We suggest insurance for all 

forms of cartage. Ship to this address:

TAPCO

SERVICE DEPARTMENT

16220 Wood-Red Road NE

Woodinville, WA 98072

8. We’ll try to fi x the mixer within three to fi ve business 

days. Ask Tech Support for the latest turn-around 
times when you call for your RA number. The mixer 
must be packaged in its original packing box, 
and must have the RA number on the box. Once 
it’s repaired, we’ll ship it back the same way in 
which it was received. This paragraph does not 
necessarily apply to non-warranty repair.

Warranty Service

Details concerning Warranty Service are spelled 

out in the Warranty section on page 19.

If you think your TAPCO Blend 6 has a problem, 

please do everything you can to confi rm it before 
calling for service. Doing so might save you from the 
deprivation of your mixer and the associated suffering.

These may sound obvious to you, but here are 

some things you can check. Read on.
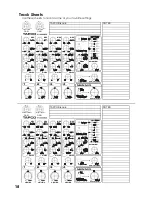
Troubleshooting

Bad Channel

• Is the channel GAIN turned up?
• Is the channel LEVEL turned up?
• Try the same source signal in another channel, set 

up exactly like the suspect channel.

Bad Output

• IS the 

MAIN MIX

 control turned up? 

MAIN MIX

MAIN MIX

• If it’s a stereo pair, try switching them around. For 

example, if a left output is presumed dead, switch 
the left and right cords, at the mixer end. If the left 
speaker is still dead, it’s not the mixer.

Noise

• Turn the channel LEVEL, 

AUX RETURN

, and 

AUX

SEND 

controls down, one by one. If the noise 

disappears, it’s either that channel or whatever is 
plugged into it, so unplug whatever that is.

Power

• Our favorite question: Is the 

POWER

 switch on?

• Is the external power supply securely plugged into 

the 

POWER IN

 connector on the back of the Blend 6?

• Is the external power supply plugged into an AC 

power strip? Make sure the power to the power 
strip is turned on.

• Are all the lights out in your building?

Lonely? Looking for that special someone? Do you have a question about 

your TAPCO Mixer?

Please call our Technical Support chaps at 

1-877-827-2669

, Monday to Friday, from 7 am to 5 pm PST.

After hours, visit www.tapcogear.com and look under 

Support

, or e-mail us at techmail@tapcogear.com

Summary of Contents for BLEND6

Page 1: ......

Page 2: ...from digital apparatus as set out in the radio interference regulations of the Canadian Department of Communications ATTENTION Le pr sent appareil num rique n met pas de bruits radio lectriques d pas...

Page 3: ...eep your receipt in a safe place and not a bad idea to write your product information here for future reference i e insurance claims tech support return authorization etc Contents Safety Instructions...

Page 4: ...ST input Make some noise If it s a microphone sing at your normal singing volume If it s an instrument play it at its normal output level 2 While making noise turn up that channel s GAIN until the adj...

Page 5: ...rs Before making connections to an external amplifier or reconfiguring an amp s routing turn the amp s level gain controls down turn the power off make the changes turn the power back on and then turn...

Page 6: ...tor Inter Planetary Space Drive control OK we made that last one up but we can pencil it in for next time Introduction Thank you for choosing a TAPCO Blend 6 mixer by Mackie The TAPCO family of mixers...

Page 7: ...UNBAL L R LINE IN 5 6 BAL UNBAL L R LINE IN 1 2 MONO MONO MIC INPUT MIC INPUT INST INPUT IN OUT L R PHONES L R L R R AUX SENDS IN OUT OUT AUX RETURN MAIN MIX CTRL ROOM FX MON CD TAPE MONO L LEVEL SET...

Page 8: ...ary 3 GAIN CONTROL If you haven t already please read SET THE LEVELS on page 4 The GAIN control adjusts the input sensitivity of the MIC and INST inputs This allows signals from the outside world to b...

Page 9: ...of the channel s stereo signals For instance channel 3 L and 4 R mix together to feed that channel s AUX send knobs 8 AUX 1 MON AUX 1 MON is designed to send a separate mono mix to your stage monitor...

Page 10: ...to howl as loud as the speakers ouch 15 CD TAPE INPUTS This is where you connect the outputs of your intermission entertainment Any line level mono or stereo device can be used such as tape DVD CD pl...

Page 11: ...a CD or Tape Deck connected to the CD TAPE inputs push down this switch to add the CD TAPE signal to the main mix This is useful if you want to play some entertainment while the band is taking a break...

Page 12: ...el EQ and LEVEL it is not used as a traditional stage monitor cue It is intended to patch into an effects device s input hence the name FX 28 TAPE OUTPUTS Use these jacks to capture the entire perform...

Page 13: ...packing box and must have the RA number on the box Once it s repaired we ll ship it back the same way in which it was received This paragraph does not necessarily apply to non warranty repair Warranty...

Page 14: ...Stereo Headphones 1 4 TRS Stereo Unbalanced Wiring 1 4 TRS Stereo Unbalanced Wiring Sleeve Shield Tip Left Ring Right 1 4 TS Phone Plugs and Jacks TS stands for Tip Sleeve the two connections availabl...

Page 15: ...els Mic Input 18 dBu Gain 3 dB Inst Input 18 dBu Gain 22 dB Stereo Line Input Tape Input and Aux Return 18 dBu Maximum Voltage Gain Mic Input to Main Output 74 dB Tape Output 74 dB Aux Sends 74 dB Con...

Page 16: ...hange these specifications at any time without notice During a recent Garden Fete put on by the Society for the Prevention of Misunderstandings SRSoF this mixer was accidentally awarded first prize in...

Page 17: ...O BLEND 6 BLOCK DIAGRAM SSE 01 04 L L R R PAN AUX 2 FX SUM THING SUM THING ELSE AUX RETURN TO MAIN MIX AUX RETURN TO AUX 1 MON AUX 1 MON L R L R LEFT MAIN BUS RIGHT MAIN BUS AUX 1 MON BUS AUX 2 FX BUS...

Page 18: ...18 Track Sheets Use these sheets to record some of your favorite settings 22dB 25dB 3 50 22dB 25dB 3 50 TAPCO Blend 6 NOTES 22dB 25dB 3 50 22dB 25dB 3 50 TAPCO Blend 6 NOTES...

Page 19: ...nologies to any location within the boundaries of the USA G LOUD Technologies warrants all repairs performed for 90 days or for the remainder of the warranty period This warranty does not extend to da...

Page 20: ......

Reviews: