background image

12

MAIN SECTION

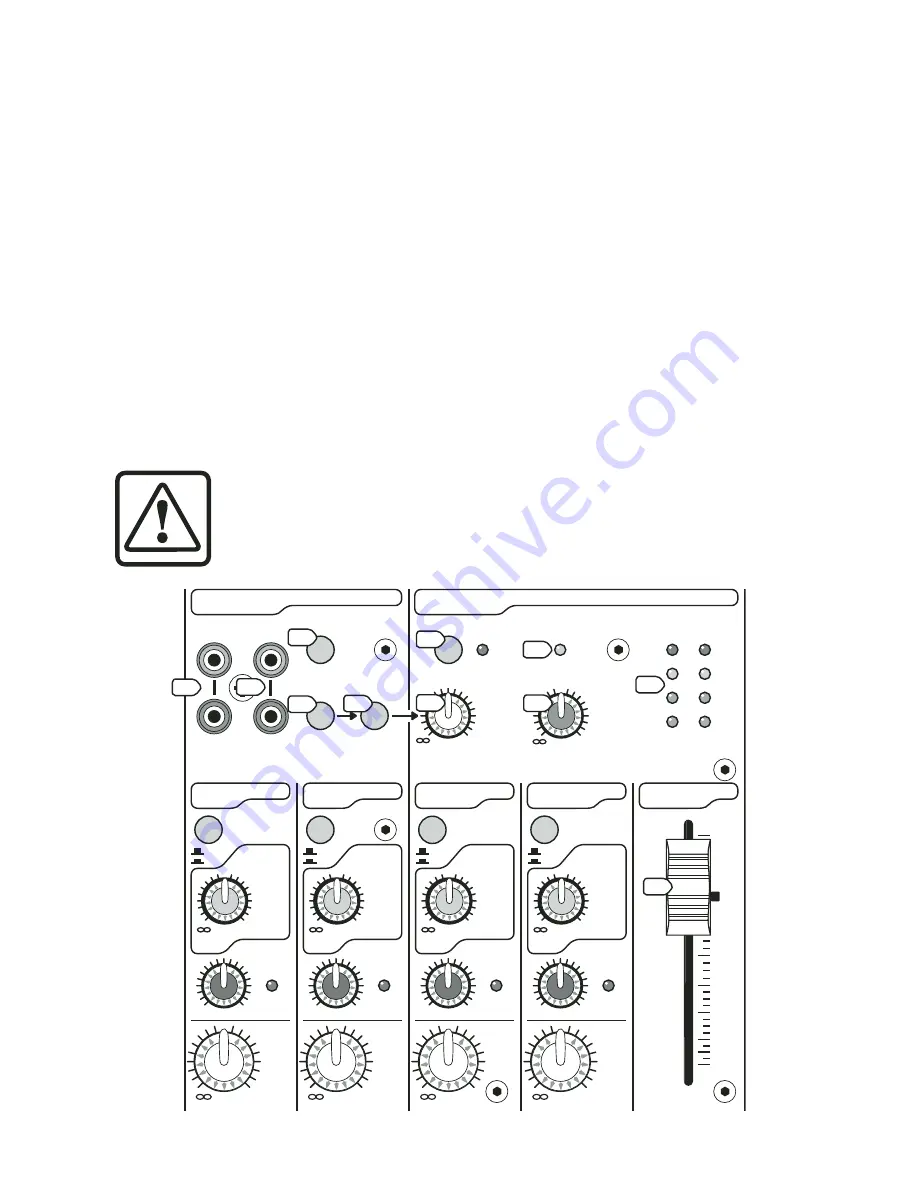
18. POWER LED

This LED turns on when the mixer’s power cord is 

plugged into an AC outlet. Since there is no power 
switch on the MIX Series mixers, the mixer is always 
on when it is connected to AC power.

19. PHANTOM 48V Switch and LED

Push in this switch to provide phantom power 

to the MIC (1) input XLR jacks. Phantom power is 
required to operate most condenser microphones 
(some condenser microphones are battery-powered). 
With the switch pushed in, the mixer pr48 
VDC phantom powering on XLR pins 2 and 3.

If you have ribbon mics, tube mics, or dynamic 

mics that do not require phantom power, leave the 
PHANTOM POWER switch out. If you are using both 
condenser and dynamic mics, don’t worry. Phantom 
power will not hurt most dynamic mics. Check the 
microphone’s user manual if you’re not sure.

Caution:

 Turn all output levels down 

before operating this switch to avoid 
the possibility of a “pop” in your 
speakers. Do not use phantom power 
with tube or ribbon microphones, as 
this may cause damage.

20. METERS 

These left and right meters have four LEDs each, 

with thresholds ranging from –20 dBu up to +18 
dBu (OL = overload).

The 0 dB LED corresponds to an output level of 0 

dBu (0.775 V RMS). The OL LEDs turn on when the 
output r18 dBu. There is a fair margin of 
safety before actual clipping distortion occurs, but 
you should turn things down if the OL LEDs come on.

Normally, the meters display the level of the main 

mix, after the MAIN MIX (23) control.

If the TAPE TO CTRL RM/PHONES (16) switch 

is pushed in, the meters display the level of the CD/
TAPE signal, and not the main mix.

You can get a good mix with the meter’s peaks 

fl ashing anywhere between –20 and +6 dB. Most 
amplifi ers clip at about +10 dB, and some recorders 
aren’t so forgiving either. For best real-world results, try 
to keep your peaks between “0” and “+6.”

If your meters are too high, you will get distortion. 

If they are too low, then your signal-to-noise will 
suff er. Use the meters to help you adjust the mixer for 
optimum performance without distortion or noise. 
Then you can adjust your amplifi er’s level controls 
for good overall volume. This will give you the best 
overall signal-to-noise ratio for your system.

MAIN

TAPE

MAIN

MIX

5/6

7/8

9/10

11/12

FX TO

FX TO

CTRL

CTRL

ROOM

ROOM

AUX

SEND

SEND

CTRL ROOM/

PHONES

POWE

POWER

PHANTOM 48

PHANTOM 48V

INPU

INPUT/OUTPU

T/OUTPUT

IN

IN

OUT

OUT

L

R

CD/TAPE

TAPE

TAPE TO

 TO

CTRL

CTRL RM /

 RM /

PHONES

PHONES

TAPE

TAPE

TO

TO

MIX

MIX

OL

+6

-2

-20

0

L

R

AUX

SEND

SEND

+15

+15

BAL

U

+4

+4
-10

-10

AUX

SEND

SEND

+15

+15

BAL

U

+4

+4
-10

-10

AUX

SEND

SEND

+15

+15

BAL

U

+4

+4
-10

-10

AUX

SEND

SEND

+15

+15

BAL

U

+4

+4
-10

-10

MAX

MAX

+15

+15

U

U

O

O

dB

30

30

20

20

10

10

40

40

50

50

5

5

60

60

10

10

R

L

PEA

PEAK

+15

+15

LEVEL

U

R

L

PEA

PEAK

+15

+15

LEVEL

U

R

L

PEA

PEAK

+15

+15

LEVEL

U

R

L

PEA

PEAK

+15

+15

LEVEL

U

15

14

18

16

17

19

20

21

27

22

23

Summary of Contents for Mix 120

Page 1: ......

Page 2: ...y to noise induced hearing loss but nearly everyone will lose some hearing if exposed to su ciently intense noise for a period of time The U S Government s Occupational Safety and Health Administratio...

Page 3: ...our product information here for future reference i e insurance claims tech support return authorization etc CONTENTS SAFETY INSTRUCTIONS 2 GETTING STARTED 4 INTRODUCTION 6 HOOKUP DIAGRAMS 7 MIX SERIE...

Page 4: ...ck position for the Mix 50 and Mix 60 or to the 10 mark for the Mix 100 and Mix 120 for now We ll crank it up later on 10 Now you are ready to set the levels SET THE LEVELS Mic Line Channels 1 Choose...

Page 5: ...BAL UNBAL MONO MONO L R LINE FX TO FX TO CTRL CTRL ROOM ROOM L R MAIN OUT OUT L R CTRL RM OUT OUT 1 TAPE MAIN 2 AUX SEND SEND 5 6 3 4 7 8 9 10 MAIN MIX U O O dB 30 30 20 20 10 10 40 40 50 50 5 5 60 6...

Page 6: ...Tape to Phones on Mix 50 FX to Control Room switch Mix 100 Mix 120 only Tape to Mix switch Power LED indicator Inter Planetary Space Drive control OK we made that last one up but we can pencil it in...

Page 7: ...UNBA L UNBAL MIC INPUT INPUT BA BAL UNBA L UNBAL 2 LINE MIC INPUT INPUT 3 4 MONO MONO L R LINE 5 6 MONO MONO L R LINE BA BAL UNBA L UNBAL BA BAL UNBA L UNBAL BA BAL UNBA L UNBAL MONO MONO CTRL RM OUT...

Page 8: ...d plug nothing into the right input A trick called jack normalling causes the signal to appear on both sides 3 GAIN CONTROL If you haven t already please read SET THE LEVELS on page 4 The GAIN control...

Page 9: ...ies below 75 Hz We recommend that you use the Low Cut switch on every microphone application except kick drum bass guitar bassy synth patches or recordings of earthquakes These aside there isn t much...

Page 10: ...rotary one it would be called a fader It still serves as the reference point when talking about pre fader and post fader AUX RETURN SECTION 13 STEREO AUX RETURN INPUTS Mix 60 only Connect the outputs...

Page 11: ...al source for the CONTROL ROOM outputs PHONES and METERS When the switch is up they all receive the main mix signal tapped after the MAIN MIX control When the switch is pushed in they all receive the...

Page 12: ...tortion occurs but you should turn things down if the OL LEDs come on Normally the meters display the level of the main mix after the MAIN MIX 23 control If the TAPE TO CTRL RM PHONES 16 switch is pus...

Page 13: ...nters the real world Connect these outputs to the inputs of your ampli ers powered speakers or serial e ects processor graphic equalizer for example 25 CTRL ROOM OUT These 1 4 TRS jacks can be used to...

Page 14: ...e you connect the supplied external AC power supply to provide AC power to the mixer Connect the external power supply to the MIX Series mixer rst then plug the power supply into a suitable and proper...

Page 15: ...it s repaired we ll ship it back the same way in which it was received This paragraph does not necessarily apply to non warranty repair Note You must have a sales receipt from an Authorized TAPCO Dea...

Page 16: ...tereo headphones Balanced Mono 1 4 TRS Balanced Mono wiring Sleeve Shield Tip Hot Ring Cold Stereo Headphones 1 4 TRS Stereo Unbalanced Wiring Sleeve Shield Tip Left Ring Right 1 4 TS Phone Plugs and...

Page 17: ...Low 15 dB 80 Hz Mono Channel EQ Mix 60 Mix 100 Mix 120 Stereo Channel EQ Mix 60 High 15 dB 12 kHz Mid 15 dB 2 5 kHz Low 15 dB 80 Hz Mixer Rated Output Main Aux Control Room 4 dBu Maximum Rated Output...

Page 18: ...5H 75Hz AUX SEND SEND 15 15 PAN U AUX SEND SEND 15 15 BAL U 4 4 10 10 AUX SEND SEND 15 15 BAL U 4 4 10 10 AUX SEND SEND 15 15 BAL U 4 4 10 10 AUX SEND SEND 15 15 BAL U 4 4 10 10 R L PEA PEAK R L PEA P...

Page 19: ...EL MAIN MIX STEREO CHANNELS 2 3 and 4 5 TAPCO MIX 50 BLOCK DIAGRAM 05 09 05 L L R R PAN L R LEFT MAIN BUS RIGHT MAIN BUS HEADPHONE OUTPUT LEFT RIGHT METERS AND PATENTED HAMPSTER HYPNOTIZER TAPE TO PHO...

Page 20: ...VEL LEVEL AUX MAIN MIX STEREO CHANNELS AUX RETURNS 3 4 and 5 6 TAPCO MIX 60 BLOCK DIAGRAM 05 09 05 L L R R PAN AUX AUX RETURN TO MAIN MIX L R L R LEFT MAIN BUS RIGHT MAIN BUS AUX BUS AUX SEND HEADPHON...

Page 21: ...IN MIX STEREO CHANNELS 3 4 5 6 7 8 and 9 10 TAPCO MIX 100 BLOCK DIAGRAM 05 09 05 L L R R PAN AUX L R LEFT MAIN BUS RIGHT MAIN BUS AUX BUS AUX SEND HEADPHONE OUTPUT LEFT RIGHT METERS AND PATENTED HAMPS...

Page 22: ...AIN MIX STEREO CHANNELS 5 6 7 8 9 10 and 11 12 TAPCO MIX 120 BLOCK DIAGRAM 05 09 05 L L R R PAN AUX L R LEFT MAIN BUS RIGHT MAIN BUS AUX BUS AUX SEND HEADPHONE OUTPUT LEFT RIGHT METERS AND PATENTED HA...

Page 23: ...logies factory authorized service centers and deemed eligible for repair or replacement under the terms of this warranty will be repaired or replaced within thirty days of receipt LOUD Technologies an...

Page 24: ......

Reviews: