7.
MAINTENANCE
Tapflo LPX series
39
1.
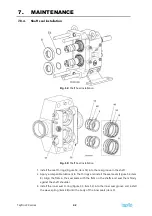
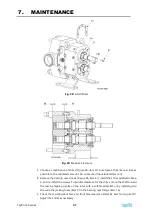
Press the rear bearing cup (Figure 46, item 17) into the bearing case (item 14) using a
pusher tool (item A).
2.
Heat the bearing cone to 120°C and place it on the shaft.
Alternate method: Press the front bearing cone (Figure 45, item 16) onto the shafts (items
6-7). The bearing cone must seat squarely against the shaft shoulder.
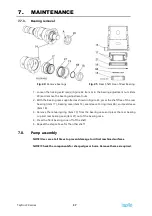
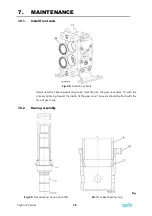
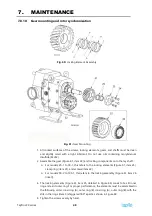
Fig. 47:
Bearing Assembly
3.
Install the front bearing cup (Figure 47, item 16a) onto the mounted cone (item 16b),
followed by the bearing case (item 14).
4.
Press the rear bearing cone (item 17b) onto the shaft and into the cone.
5.
Press the rear seal (item 27) into the bearing case (item 14) with the primary lip facing
away from the bearing and install the retaining ring (item 19). Orient the seal as shown
and make sure it does not interfere with the bearing.
6.
Install the O-ring (item 68) and seal sleeve (item 18) onto the shaft as shown in Figure
47. Orient the seal sleeve with the groove toward the bearing.
7.
Install the bearing adjustment nut (item 20) and tighten “hand tight.” Do not tighten
the locking setscrews at this time.
8.
Install the O-ring (item 67) into the groove of the bearing case (item 14).
Summary of Contents for LPX Series
Page 59: ...9 PARTS LISTS Tapflo LPX series 59 9 3 Model 25 1 to 50 1 Pump Parts B exploded view ...
Page 61: ...9 PARTS LISTS Tapflo LPX series 61 9 5 Model 50 2 to 100 1 Pump Parts A exploded view ...
Page 63: ...9 PARTS LISTS Tapflo LPX series 63 9 7 Model 50 2 to 100 1 Pump Parts B exploded view ...
Page 69: ...Tapflo LPX series 69 ...


