7.
MAINTENANCE
Tapflo LPX series
43
4.
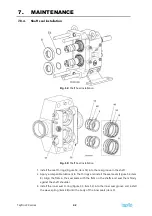
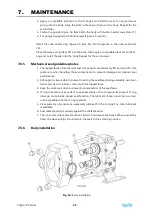
Apply a compatible lubricant to the O-rings and install the seal, O-ring, and wave
spring into the body. Align the slots in the seal with pins in the body. Repeat for the
second seal.
5.
Fasten the guards (Figure 53, item 56) to the body with button head screws (item 57).
6.
For pumps equipped with double seals (Figure 53, inset A):
Install the outer seal O-ring (Figure 53, item 54) into the groove in the outer seal (item
10).
Place the wave spring (item 49) into the bore, then apply a compatible lubricant to the O-
ring and install the seal into the body. Repeat for the second seal.
7.8.5.
Mechanical seal guidelines/notes
1.
The lapped faces of mechanical seal components are extremely flat and smooth. Use
great care when handling these components to prevent damage and reduced seal
performance.
2.
Although it is impossible to prevent touching the seal faces during assembly, use clean
hands and try to minimize contact with the lapped faces.
3.
Keep the work area clean to prevent contamination of the seal faces.
4.
O-ring lubrication is important to ease assembly of the components, prevent O-ring
damage, and provide proper seal function. The lubricant chosen must be non-toxic
and compatible with the O-ring material.
5.
Clean water can be used as an assembly lubricant for the O-rings if no other lubricant
is available.
6.
Seal seats should sit squarely against the shaft shoulder.
7.
The inner and outer seals should not bind in their respective bores. When pushed by
hand, the wave springs should return the seals to their starting position.
7.8.6.
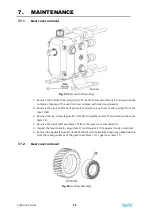
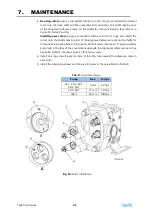
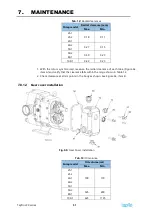
Body installation
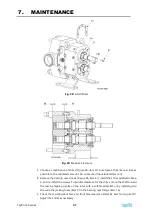
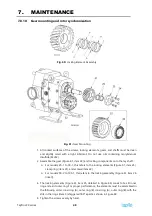
Fig. 54:
Body Installation
Summary of Contents for LPX Series
Page 59: ...9 PARTS LISTS Tapflo LPX series 59 9 3 Model 25 1 to 50 1 Pump Parts B exploded view ...
Page 61: ...9 PARTS LISTS Tapflo LPX series 61 9 5 Model 50 2 to 100 1 Pump Parts A exploded view ...
Page 63: ...9 PARTS LISTS Tapflo LPX series 63 9 7 Model 50 2 to 100 1 Pump Parts B exploded view ...
Page 69: ...Tapflo LPX series 69 ...


