background image

6

IMPORTANT:  READ AND SAVE THESE INSTRUCTIONS.

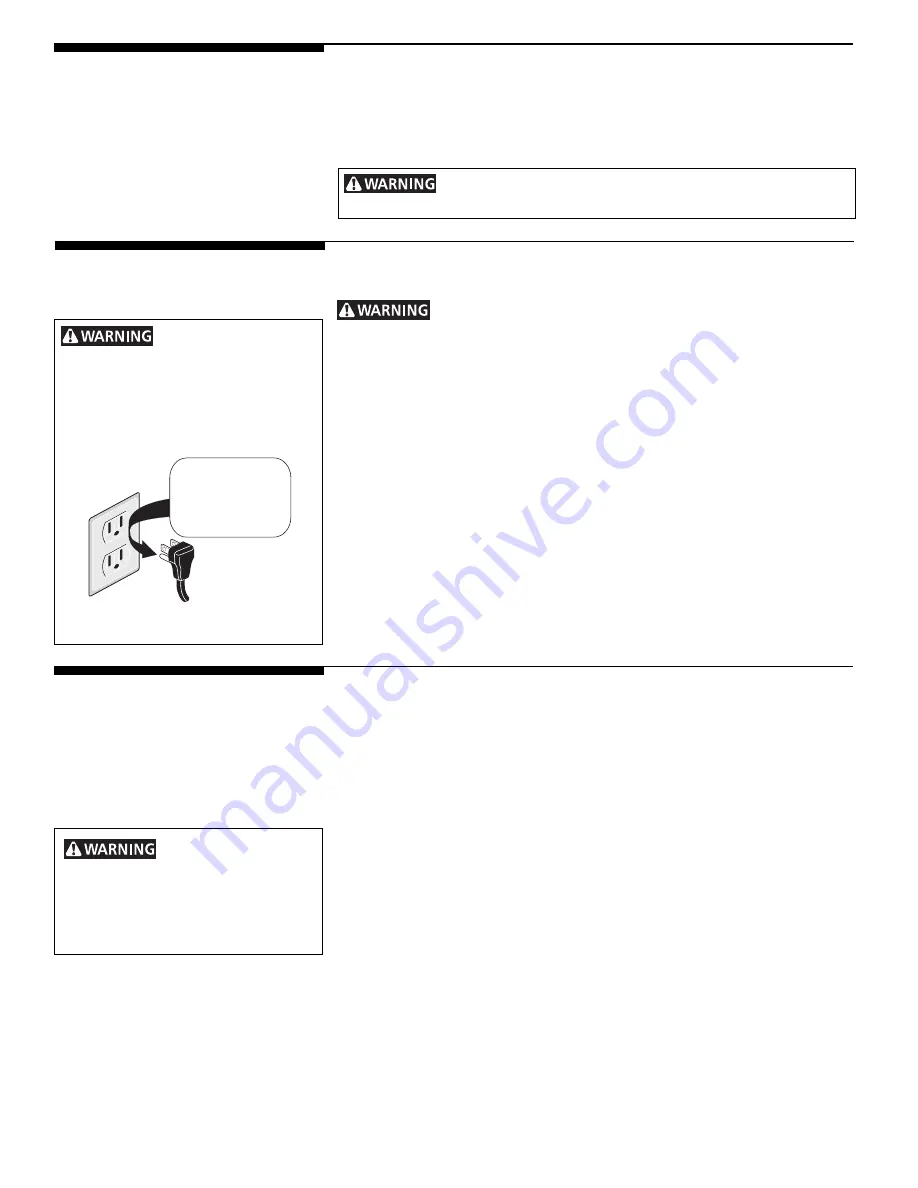
  This appliance is equipped with a 3-prong grounding plug for your

protection against shock hazard and should be plugged directly into a properly
grounded receptacle. 

DO NOT

 cut or remove the grounding prong from this plug.

For personal safety, this oven must be properly grounded.  For maximum safety, the
power cord must be plugged into a 120V—60 Hz. outlet that is correctly polarized
and properly grounded.

If a two-prong wall receptacle is the only available outlet, it is the personal
responsibility of the consumer to have it replaced with a properly grounded three-
prong wall receptacle installed by a qualified electrician.

DO NOT UNDER ANY CIRCUMSTANCES CUT OR REMOVE THE THIRD ROUND
GROUNDING PRONG FROM THE POWER CORD PLUG. SEE THE INSTALLATION
INSTRUCTIONS PACKAGED WITH THIS APPLIANCE FOR COMPLETE INSTALLATION
AND GROUNDING INSTRUCTIONS. DO NOT OPERATE THE APPLIANCE USING A
TWO-PRONG ADAPTER OR AN EXTENSION CORD.

Cooktop and
Oven Ignition

To Manually Light Cooktop Burners with Spark Ignition

When you turn the control knob to LITE, all ignitors make an electric spark (a ticking
sound) which lights the selected burner.

During a power failure, the burners will not light automatically. In an emergency,
a cooktop burner may be lit with a match by following the steps below:

1.

Light a match and hold the flame near the burner you want to light. Wooden
matches work best.

2.

Push in and turn the control knob slowly. Be sure you are turning the correct
knob for the burner you are lighting.

Note:  If the burner does not light within 5 seconds, turn the knob off
and wait one minute before trying again.

Oven Ignition

When you turn the oven on, the glow bar igniter begins to heat. When the lighter
is hot enough, in about 1 minute, the gas flows into the burner and is ignited.

The igniter glows bright orange when hot. It cycles on and off with the thermostat
and will glow whenever the burner is on.

  During a power failure,

the oven burners cannot be lit and you
should not try to do so. The oven burner
valves will not open up and will prevent
the gas from flowing through the burner
valves to the burners.

  Avoid fire hazard or

electrical shock. Do not use an adaptor
plug, an extension cord, or remove
grounding prong from electrical power
cord. Failure to follow this warning can
cause serious injury, fire or death.

Liquefied Petroleum
(Propane) Gas
Conversion

This appliance can be used with Natural Gas or Liquefied Petroleum (Propane) Gas.
It is shipped from the factory for use with Natural Gas.

Refer to the Installation Instructions for conversion from Natural Gas to Propane Gas,
or from Propane Gas to Natural Gas.

  Severe shock or damage to the appliance may occur if the

appliance is not installed by a qualified installer.

Grounding Instructions

(electric ignition models only)

Do not, under any
circumstances, cut,
remove, or bypass
the grounding
prong.

Power supply cord with 3-

prong grounding plug

Grounding
type wall
receptacle

Summary of Contents for 318200753

Page 1: ...Recycled paper P N 318200753 0203 Rev C P N 318200753 0609 Rev E...

Page 2: ...k to learn more about your new appliance Record Your Model and Serial Numbers Recordinthespaceprovidedbelowthemodelandserialnumbersfoundontheserial plate located under the lift up cooktop ModelNumber...

Page 3: ...climb or play around the range The weight of a child on an opendoormaycausetherangetotip resultinginseriousburns or other injury Do not use the oven for storage Storage in or on Appliance Flammable m...

Page 4: ...lovers cause smoking and greasy spillovers that may ignite or a pan that has boiled dry may melt ProtectiveLiners Donotusealuminumfoiltolinesurface burnerpans ovenbottomoranyotherpartoftherange Use of...

Page 5: ...rer s recommended directions for use Be aware that excess residue from cleaners and aerosols may ignite causing damage and or injury CONTINUOUS CLEANING OVENS some models Do not use oven cleaners on t...

Page 6: ...nt to light Wooden matches work best 2 Push in and turn the control knob slowly Be sure you are turning the correct knob for the burner you are lighting Note If the burner does not light within 5 seco...

Page 7: ......

Page 8: ...xtend beyond the burner unit may also be used The metalringwasdesignedtosupportthe wok safely when it is filled with large amounts of liquids soup making or fat frying Wire trivets Do not use wire tri...

Page 9: ...dspoonscouldcatchfire if placed too close to a flame Griddle some models Your non stick griddle must first be conditioned to insure non stick cooking Remove the enamel griddle cover Wipe a teaspoon of...

Page 10: ...roasting cooking casseroles or broiling most foods 4 When cooking is finished turn the Temperature Control knob to OFF To Broil Broilingisdoneinthecompartmentbelowtheovencavity Foodisbroiledbythesame...

Page 11: ...l permit 2 4 5 10 cm of air space on all sides when placed in the oven Use a medium weight aluminum baking sheet Allow oven to preheat to the selected temperature before placing food in the oven Use p...

Page 12: ...lowing precautions when using oven cleaners 1 DO NOT spray on the electrical controls or switches because it could cause a short circuit and result in sparking or fire 2 DO NOT allow a film from the c...

Page 13: ...o450 F 230 C 5 Operate oven for 15 minutes 6 Remaining soil will fade with continued oven use Cleaning the Oven Bottom The oven bottom is not a continuous cleaning finish Oven cleaners can be used on...

Page 14: ...mild abrasive cleaner following manufacturer s instructions Rinse with clean water and dry If the racks are cleaned in the self clean cycle their color will turn slightly blue and the finish will be d...

Page 15: ...1 5...
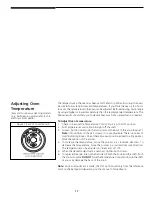
Page 16: ...while it is still warm The griddle can be removed for easier cleaning The griddle canbewashedinthesinkwithamilddetergentandplasticscouringpad Forgreasy residue use a grease dissolving dishwashing liq...

Page 17: ...ustable There is a series of smallindicatorgrooves Oneofthesegroovesispositionednexttoatinypointer Note the position of the pointer 4 To increase the temperature move the pointer in a clockwise direct...

Page 18: ...t Contact a cabinet maker to correct the problem Contact builder or installer to make appliance accessible Carpeting interferes with range Provide sufficient space so range can be lifted over carpet G...

Page 19: ...use the broiler pan without grid or cover grid with foil Broiler drawer door open Make sure drawer door is closed when broiling Broiler drawer door needs cleaning Excessive smoke is caused by old gre...

Page 20: ...e companies or external causes such as abuse misuse inadequate power supply accidents fires or acts of God DISCLAIMER OF IMPLIED WARRANTIES LIMITATION OF REMEDIES CUSTOMER S SOLE AND EXCLUSIVE REMEDY...

Reviews: