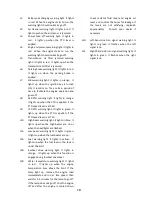
SECTION 3. FUNCTIONS AND USAGE OF PARTS
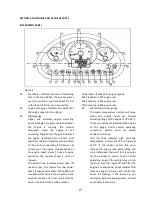
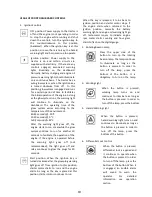
INSTRUMENT PANEL
S1:
Fuel Meter. Indicates the rate of remaining
fuel in the tank. When the pointer comes
over the red zone, you have about 4lt fuel
in the tank, fill fuel as soon as possible.
S2:
Engine rpm gauge. Indicates one percent of
the engine speed in r/min (rpm).
S3:
Digital gauge.
Upper line indicates engine operating
hours. Blinking hour glass symbol indicates
the engine is running, this symbol
disappears when the engine is not
operating. Digits before the point indicates
the engine operating time in hours. First
digit after the point indicates the one-tenth
of the one-hour operation (1/10 hours = &
minutes) of the engine. Independently of
the engine speed, every 1 hour of engine
operation, the counter shows 1 units of
increase.
The bottom line indicates power take off
speed in rpm. The tractor has two power
take off speeds as standard. When 540 rpm
is selected, this value is shown with a turtle
symbol and when 750 rpm is selected the
value is indicated with a rabbit symbol.
Power take off speeds for engine speeds:
540 Standard = 2540 engine rpm
540 Economy = 1875 engine rpm
750 Economy = 2600 engine rpm
S4:
Water temperature gauge.
The water temperature pointer will move
when the engine heats up. Normal
operating range of the engine is 75°C-95°C.
These two values are indicated with a point
on the gauge. Under normal operating
conditions, pointer must be placed
between this range.
The red zone indicates high operating
temperature. It starts at 115°C and ends at
125°C. If the pointer enters this zone,
remove the engine load immediately and
run at idle speed, then wait for 3-5 minutes
for the pointer to return to the normal
operating range; if the pointer stays in the
red zone, shut the engine off and after the
engine is cooled down, check radiator fluid
level and engine oil level, and control the
hoses for leakage, if the levels are not
satisfying, replenish appropriately. Consult
your dealer if necessary.
Figure 4
17
Summary of Contents for 850
Page 1: ......
Page 2: ......
Page 7: ......
Page 12: ......
Page 24: ...12 ...
Page 28: ...16 ...
Page 50: ...38 ...
Page 54: ...42 ...
Page 78: ...PROPER BATTERY SERVICE AND TIPS FOR SAFETY Table 7 66 ...
Page 86: ...74 ...
Page 87: ...SECTION 7 TECHNICAL SPECIFICATIONS Figure 83 Table 8 Technical Specs 75 ...
Page 89: ...Figure 84 Table 11 Turning Radius 77 ...
Page 94: ...82 ...
Page 100: ...88 ...
Page 101: ......

