9
C
E
D
A
B
F
BASIC CONNECTION
IMPORTANT !
Before connecting the AC power to the wall outlet,
ensure
that all other connections have been made.
Never make or change any connections with the power
switched on.
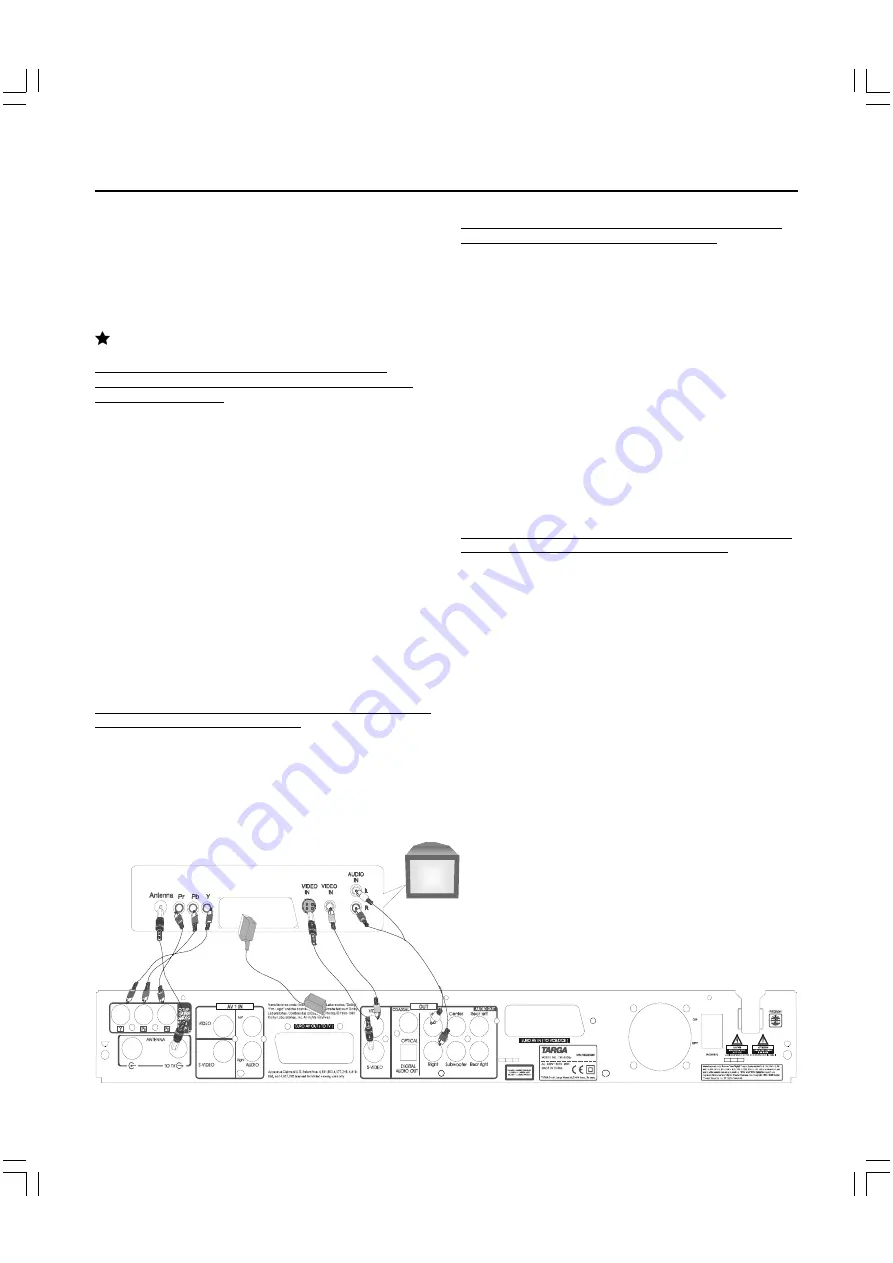
Connect your DVD recorder to TV set
If your TV set have the COMPONENT VIDEO OUT
socket, connect your TV with Component video cables
.
(Configuration C+D+E)
1.
Insert ANTENNA cable into ANTENNA socket at the back of the
DVD recorder.
2.
Insert one end of the supplied aerial cable to the ANTENNA OUT at
the back of the DVD recorder and the other end into the aerial input
socket at the back of the TV set.
3.
Plug one end of the Video cable into the Green /Blue/ Red Component
Video output socket at the back of the DVD recorder and the other
end into the Video in or AV in socket on the TV set .
4.
Insert one end of the supplied Audio cable into the Red/White socket
OUT L AUDIO R at the back of the DVD recorder and the other end
into the Audio input (usually red/white )socket on the TV set.
5.
If your TV supports progressive scan, switch the recorder in OSD
to progressive scan. Attention: If the TV doesn’ t support
progressive scan maybe the picture is dark or with a double picture.
In this case switch the recorder off and again on.
If your TV set have the SCART socket , connect your TV
with a Scart cable .(Configuration F)
1.
Insert ANTENNA cable into ANTENNA socket at the back of the
DVD recorder.
2.
Insert one end of the supplied aerial cable to the TV socket at the
back of the DVD recorder and the other end into the aerial input
socket at the back of the TV set.
3.
Plug scart cable into the corresponding scart socket at the back of
the TV set and the scart socket (SCART OUT)
4.
If your TV supports RGB switch the recorder in OSD to Scart.
If your TV set have the S-Video socket , connect your TV
with a S-Video cable .(Configuration B+D+E)
1.
Insert ANTENNA cable into ANTENNA socket at the back of the
DVD recorder.
2.
Insert one end of the supplied aerial cable to the ANTENNA OUT at
the back of the DVD recorder and the other end into the aerial input
socket at the back of the TV set.
3.
Plug one end of a S-Video cable into the S-Video 1 output socket
at the back of the DVD recorder and the other end into the S-
Video input socket on the TV set .
4.
Insert one end of the supplied Audio cable into the Red/White
socket OUT L AUDIO R at the back of the DVD recorder and the
other end into the Audio input (usually red/white )socket on the TV
set.
5.
Switch the recorder in OSD to S-Video
If your TV set have the VIDEO OUT socket , connect your
TV with a Video cable . (Configuration A+D+E )
1.
Insert ANTENNA cable into ANTENNA socket at the back of the
DVD recorder.
2.
Insert one end of the supplied aerial cable to the ANTENNA OUT at
the back of the DVD recorder and the other end into the aerial input
socket at the back of the TV set.
3.
Plug one end of the supplied Video cable into the yellow Video
(CVBS) output socket at the back of the DVD recorder and the
other end into the Video in or AV in socket on the TV set .
4.
Insert one end of the supplied Audio cable into the Red/White socket
OUT L AUDIO R at the back of the DVD recorder and the other end
into the Audio input (usually red/white) socket on the TV set.
5.
If your TV supports progressive scan, switch the recorder in OSD to
progressive scan. Attention: If the TV doesn't support progressive
scan maybe the picture is dark or with a double picture. In this case
switch the recorder off and again on.
Rear panel of TV set
(example only)
TV SET


