background image

EN-16

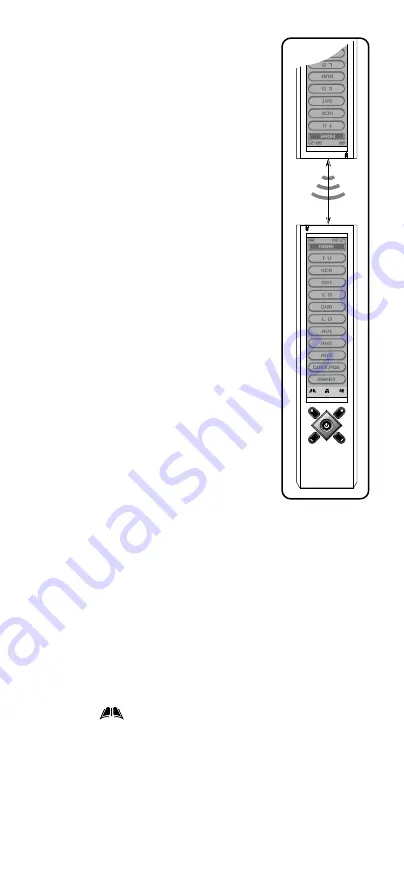
3.5.1. Copy one Device 

 copy

all user settings of a single
device from the sender to the
receiver unit

• On the receiver unit, tap

“ Receive ”.

• On the sender unit, tap “ Copy

one Device ”, then tap to select
a device (e.g.  TV).  All  user
settings  in  the selected device
will be sent out via the IR
linking  from  the  sender  to
the receiver unit.

Note: Press "Home" to exit
menu.

3.5.2. Copy all Devices 

 copy all

user settings of all devices from
the sender to the receiver unit

• On the receiver unit, tap

“ Receive ”.

• On  the  sender  unit,  tap

“ Copy all Devices ”, all user
settings will be sent out via the
IR linking from the sender to
the receiver unit.

• All user settings except

 Clock ” and “ Password  ”

will be sent out via IR linking.

Note: Press "Home" to exit
menu.

3.5.3. Receive 

– receive data for

Clone function (receiver unit
has to select this function in
order to start cloning)

• Press ”Yes” to enter receiving

mode ready for receiving
incoming  data  of  copy

mode.

Note:
1. Please note that all user settings will be

overwritten when data has been fully received.

2. Do not interrupt the linking during sending and

receiving data.

3. Be sure to keep the two remotes within 5cm to

8cm distance during the copy process for better
performance.

3.6 PC Link 

— connect with computer for

download/upload data

Tap “ 

 MENU ”, then choose “ PC Link ”.

For PC-to-remote data upload/download function, you
must  purchase the TARGA RT 7100 Docking package.
You cannot perform this function without the original
docking station.

Voltage surges in the domestic power supply can
interrupt the programming via PC. In this case you
must turn the remote control off and back on. Next,
repeat the programming.

Summary of Contents for RT 7100

Page 1: ...TARGA RT 7100 Universal Touch Screen Remote Control Owner s Manual...

Page 2: ...lete key device label 10 Preference 11 Remote Setting 12 Smart create a chain or multiple commands 14 Clone copy user settings to another remote control 15 PC Link 16 Interactive Help Screen 18 Troubl...

Page 3: ...batteries HOME MUTE Docking charger for quick battery charging Computer link PC link for special key layout and function via USB connection to PC Perform PC software upload and download Note This equi...

Page 4: ...ur TARGA RT 7100 Remote 1 Infra red lens 2 Green LED indicator 3 Battery level meter 4 Current time 5 Current mode 6 Touch Screen panel 7 Short cut keys 8 Hard keys 9 Connection jack 10 Battery compar...

Page 5: ...wer adaptor DC 9V 400mA 3 6VA x 1 Connector x 1 for charging purpose 4 x AAA NiMH size rechargeable batteries Docking Charger PC Link software for MS Windows ME 2000 XP USB Cable For improvement purpo...

Page 6: ...CD shows a remote key platform Tap a key directly to send out the corresponding infra red command Tap PAGE at the bottom of screen to change command pages Tap HOME to return to main page There will be...

Page 7: ...its for LCD screen and hard keys and will be turned on separately Backlit will be turned on for 5 seconds factory default setting after a key is pressed This function can be disabled by the User For d...

Page 8: ...the command keys e g TV Tap a key to be learnt from the TARGA RT 7100 Aim the original remote to the front of the TARGA RT 7100 Press and hold the key of the original remote until TARGA RT 7100 gives...

Page 9: ...code list for your devices Tap Enter Code from Setup menu Select a device e g TV Tap numeric digit to enter code number check your code from the code list e g 0021 Tap Delete to delete the last entere...

Page 10: ...d exit editing Tap another key to be edited or Home to exit the Edit function Remarks number of characters input depends on the corresponding key size 3 1 2 Device Name rename device label Tap Device...

Page 11: ...gh from Preference menu Select a source device e g TV Select a target device e g DVD Note For punch through Vol Vol and Mute will be punched through to the selected device 3 2 2 Custom Page set up a u...

Page 12: ...ep sound Tap Disable to turn off beep sound Tap Home to exit 3 3 3 LCD set up LCD related function Light Auto Off set auto off time of backlit Select back light auto turn off to 5 Sec 10 Sec or 15 Sec...

Page 13: ...of a device Tap to select a device Tap Yes to confirm or tap No to abort All Devices restore all user renamed key labels of all devices Tap All Devices Tap Yes to confirm or tap No to abort Note Press...

Page 14: ...abort All Devices restore all deleted keys of all devices Tap All Devices Tap Yes to confirm or tap No to abort Note Press Home to exit menu All to Default restore all user settings to factory default...

Page 15: ...p MENU then tap Clone and choose any one of the following items Note Before you perform this function please make sure that you have 2 TARGA RT 7100 remotes You have to identify which unit is the send...

Page 16: ...me to exit menu 3 5 3 Receive receive data for Clone function receiver unit has to select this function in order to start cloning Press Yes to enter receiving mode ready for receiving incoming data of...

Page 17: ...to Search to locate another possible code Or you can simply learn the original remote to your TARGA RT 7100 by learning function For details please refer to 2 7 Configuration Setting Up the Unit Q I h...

Page 18: ...ARGA RT 7100 which allows data to be transferred between 2 TARGA RT 7100 remotes In order to perform this function you must have 2 Home Theatre Master remotes so that you can transfer the data from th...

Page 19: ...EN 19 EN TARGA RT 7100 Owner s Manual Docking Charger Universal Touch Screen Remote Control Please download the latest software from www remotec com hk eng tech htm...

Page 20: ...gital device pursuant to Part 15 of the FCC Rules These limits are designed to provide reasonable protection against harmful interference in a residential installation This equipment generates radio f...

Page 21: ...ry cover 1 2 3 4 6 7 1 3 Specifications Design for TARGA RT 7100 Universal Touch Screen Remote Control Power requirement DC 9V 400mA 3 6VA Charging time 3 4 hours Dimensions 225 x 100 x 45mm Weight 13...

Page 22: ...e that your computer is loaded with one of the following operating system Windows 98SE Windows 2000 Windows NT or Windows XP 2 Download the REMOTE ENGINE software from the suggested website Install th...

Page 23: ...ns carefully 2 Please keep this User s Guide for later use 3 Follow all warnings 4 Proceed exactly as described in the instructions 5 Never use the device near water 6 Only use a dry and soft cloth fo...

Page 24: ...damage to the unit please follow the instructions listed below when using the product s remote control Install all batteries correctly with and signs matching the marks indicated Do not mix batteries...

Page 25: ...ded so as to provide some protection against voltage surges and built up static charges Ground clamps Antenna lead Antenna discharge unit Grounding conductors Ground clamps Power service ground servic...

Reviews: