background image

E-4

OPERATING INSTRUCTIONS

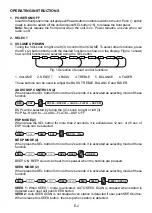
1. POWER ON/OFF

Insert the front panel in the unit and push Power button in order to switch on the unit. Push 

button

newly in order to switch off the unit and push REL button (15)  to release the front panel.

Note: 

Never release the front panel when the unit is on. Power remains on even when car

radio is off.

2. SELECT

3. VOLUME UP/DOWN

Turing the VOL knob to right or left (3) to control the VOLUME. To select other functions, press
the SEL (2) button shortly until the desired functions is shown on the display. Figure 1 shows
how control functions are selected using the SEL button.

Fig. 1 Selection of sound control functions

1. VOLUME      2. SELECT      3. BASS      4. TREBLE      5. BALANCE      6. FADER

These buttons can be used to adjust the BASS, TREBLE, BALANCE and FADER.

AUDIO DSP CONTROLS (2)

When press the SEL button for more than 2 seconds, it is activated as selecting mode of these
function.

DSP can be selected by turing the VOL knob to right or left (3)
POP M---ROCK M---CLASS---FLAT M---DSP OFF

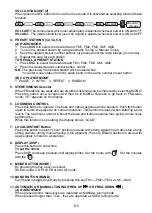
ESP MODE (2)

When press the SEL button for more than 2 seconds, it is activated as 12 sec. or 45 sec. of
ESP mode can be selected.

BEEP MODE (2)

When press the SEL button for more than 2 seconds, it is activated as selecting mode of these
function.

BEEP ON: BEEP sound can hear from speaker when the buttons are pressed.

SEEK MODE (2)

When press the SEL button for more than 2 seconds, it is activated as selecting mode of these
function.

SEEK 1:

 When SEEK 1 mode is activated, AUTO SEEK SCAN is stopped when station is

detected even user still push SEEK button.

SEEK 2:

 Auto SEEK SCAN is not stopped even station is detected if user push SEEK button.

When release this SEEK button, then stop when station is detected.

1

3

2

4

2

5

2

6

2

2

DSP

SEL

2 sec.

POP M --- ROCK M --- CLASS --- FLAT M --- DSP OFF

VOL

ESP 12s. / 45s.

DSP

SEL

2 sec.

SEL

ESP

VOL

ON/OFF

DSP

SEL

2 sec.

SEL

BEEP

ESP

SEL

VOL

ESP

SEL

DSP

SEL

SEEK

SEL

2 sec.

SEL

BEEP

SEEK1 / SEEK 2

VOL

Summary of Contents for TAG-1900

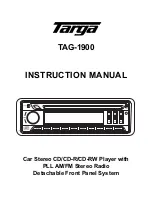
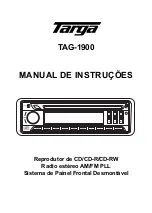
Page 1: ...LD ST LOC TAG 1900 INSTRUCTION MANUAL Car Stereo CD CD R CD RW Player with PLL AM FM Stereo Radio Detachable Front Panel System ...

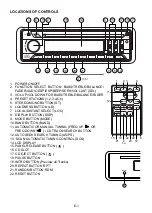
Page 2: ...UTTON BAND 11 AUTOMATIC OR MANUAL TUNING FREQ UP OR FREQ DOWN CD TRACK SEARCH BUTTON 12 AUTO SEEK SEARCH TUNING AS PS 13 SCAN AUTOMATIC TUNING CONTROL SCN 14 LCD DISPLAY 15 PANEL RELEASE BUTTON 16 CD SLOT 17 CD EJECT BUTTON 18 PAUSE BUTTON 19 INTRO BUTTON Preview all Tracks 20 REPEAT BUTTON RPT 21 RANDOM BUTTON RDM 22 RESET BUTTON 22 RESET 14 6 15 7 17 11 1 9 2 16 3 8 21 20 19 18 10 13 12 5 4 1 6 ...

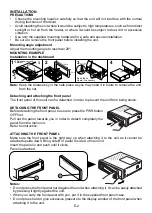
Page 3: ...nel of this unit can be detached in order to prevent the unit from being stolen DETACHING THE FRONT PANEL Before detaching the front panel be sure to press the PWR button OFF first Pull out the panel towards you in order to detach completely the panel from the main unit Refer to instruction ATTACHING THE FRONT PANEL Make sure the front panel is the right way up when attaching it to the unit as it ...

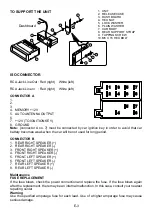
Page 4: ...IGHT SPEAKER 5 FRONT LEFT SPEAKER 6 FRONT LEFT SPEAKER 7 REAR LEFT SPEAKER 8 REAR LEFT SPEAKER Maintenance FUSE REPLACEMENT If the fuse blows check the power connection and replace the fuse If the fuse blows again after the replacement there may be an internal malfunction In this case consult your nearest repairing center Warning Use the specified amperage fuse for each lead Use of a higher ampera...

Page 5: ...ivated as selecting mode of these function DSP can be selected by turing the VOL knob to right or left 3 POP M ROCK M CLASS FLAT M DSP OFF ESP MODE 2 When press the SEL button for more than 2 seconds it is activated as 12 sec or 45 sec of ESP mode can be selected BEEP MODE 2 When press the SEL button for more than 2 seconds it is activated as selecting mode of these function BEEP ON BEEP sound can...

Page 6: ...to go back to FM stereo mode ST appears on the display 6 LOUDNESS CONTROL Press this button to operate The bass and treble response will be boosted Push this button again to return the player to its normal operation This function is useful when listening at low levels The loudness control will boost the bass and treble response thus giving a more lively performance While this function is operating...

Page 7: ... go to the desired track song REVERSE FORWARD Press and hold the SKIP button or during play to scan the disc at high speed When the desired music section of the disc is found release the button Normal play will resume 16 CD SLOT 17 CD EJECT BUTTON Press the EJECT button to remove the CD 18 PAUSE BUTTON During PLAY press 18 PAU button to PAUSE Press it again to resume play 19 INTRO BUTTON Preview a...

Page 8: ... ratio 50 dB Channel step 100 kHz Intermediate frequency 10 7 MHz TUNER AM Frequency range 530 1620 kHz Sensitivity 32dB at S N 20dB I F Frequency 450 kHz Image Rejection 50 dB LINE OUT Output 1000 mV Impedance 10 kOhm GENERAL Power Supply 12V DC 10 8 15 6V allowable Speaker impedance 4 or 8 ohm Output power 50W x 4CH Note Specifications and the design are subject to possible modification without ...

Page 9: ...LD ST LOC TAG 1900 MANUAL DE INSTRUCCIONES Reproductor estéreo de CD CD R CD RW para automóvil con Radio estéreo AM FM PLL Sistema de panel frontal desmontable ...

Page 10: ...ÁTICO O MANUAL AUMENTO DE FRECUENCIA O DISMINUCIÓN DE FRECUENCIA BOTÓN BÚSQUEDA PISTA CD 12 SINTONIZADOR DE BÚSQUEDA AUTOMÁTICA AS PS 13 CONTROL DE SINTONIZACIÓNAUTOMÁTICA SCAN SCN 14 DISPLAY LCD 15 BOTÓN RELEASE para liberar el panel desmontable 16 RANURA PARA CD 17 BOTÓN EXPULSOR DE CD 18 BOTÓN DE PAUSA 19 BOTÓN INTRO REPRODUCE LOS PRIMEROS SEGUNDOS DE CADA PISTA 20 BOTÓN REPETIR RPT 21 BOTÓN RA...

Page 11: ...er extraído para evitar que la unidad sea robada DESMONTAJE DEL PANEL FRONTAL Antes de desmontar el panel frontal asegúrese de presionar primero el botón de apagado PWR OFF Retire hacia usted el panel para extraerlo por completo de la unidad Refiérase a las instrucciones MONTAJE DEL PANEL FRONTAL Al montar el panel frontal asegúrese de que se encuentre la parte derecha hacia arriba ya que no puede...

Page 12: ... FRONTAL IZQUIERDO 6 PARLANTE FRONTAL IZQUIERDO 7 PARLANTE TRASERO IZQUIERDO 8 PARLANTE TRASERO IZQUIERDO Mantenimiento CAMBIO DE FUSIBLES Si se quema el fusible verifique la conexión de encendido y reemplace el fusible Si el fusible se quema nuevamente luego del cambio puede haber un mal funcionamiento interno En ese caso consulte al servicio técnico más cercano Atención Utilice el fusible con el...

Page 13: ...o izquierda 3 POP M ROCK M CLASS FLAT M DSP OFF MODALIDAD ESP 2 Anti CHOQUE Cuando pulsa la tecla SEL para más de 2 segundos se activa como modalidad ESP anti choque de12 seg o 45 seg MODO BEEP 2 Cuando presione el botón SEL por más de 2 segundos se activará como modo selector de esta función BEEP ENCENDIDO Se puede escuchar por el parlante un sonido BEEP cuando se presionan estos botones MODO BÚS...

Page 14: ...te botón para que funcione dicha función Se aumentará la respuesta de graves BASS y agudos TREBLE Presione nuevamente este botón para que el reproductor vuelva a su normal funcionamiento Esta función es útil al escuchar en niveles bajos La intensidad de sonidos aumentará la respuesta de graves y agudos dando una ejecución más vívida Al utilizar esta función el display muestra LOUD 7 Botón LOCAL DI...

Page 15: ...E RASTREO BÚSQUEDA BÚSQUEDA HACIA DELANTE O HACIA ATRÁS o cambio de canciones Presione el botón SALTEAR SKIP or durante la reproducción para llegar a la pista deseada canción REVERSE FORWARD Presione y mantenga presionado el botón SKIP or durante la reproducción para rastrear el disco a alta velocidad Cuando se encuentre la sección de música deseada suelte el botón Se reproducirá normalmente 16 RA...

Page 16: ...ONIZADOR FM Rango de Frecuencia 87 5 108 MHz Sensibilidad 2 8 µV Separación Estéreo 30 dB Índice Señal Ruido 50 dB Paso de Canal 100 kHz Frecuencia Intermedia 10 7 MHz SINTONIZADOR AM Rango de Frecuencia 530 1620 kHz Sensibilidad 32dB a Señal Ruido 20dB Frecuencia I F 450 kHz Rechazo de Imagen 50dB CONEXIÓN DE SALIDA Salida 1000 mV Impedancia 10 kOhm GENERAL Fuente de Alimentación 12V DC 10 8 15 6...

Page 17: ...LD ST LOC TAG 1900 MANUAL DE INSTRUÇÕES Reprodutor de CD CD R CD RW Radio estéreo AM FM PLL Sistema de Painel Frontal Desmontável ...

Page 18: ... MANUAL AUMENTO DE FREQÜÊNCIA OUDIMINUIÇÃO DE FREQÜÊNCIA BOTÃO DE BUSCA FAIXA CD 12 SINTONIZADOR DE BUSCA AUTOMÁTICA AS PS 13 CONTROLE DE SINTONIZAÇÃO AUTOMÁTICA SCAN SCN 14 DISPLAY LCD 15 BOTÃO RELEASE para liberar o painel desmontável 16 GAVETA DO CD 17 BOTÃO PARA EXPULSAR O CD 18 BOTÃO DE PAUSA 19 BOTÃO INTRO REPRODUZ OS PRIMEIROS SEGUNDOS DE CADA FAIXA 20 BOTÃO DE REPETIÇÃO RPT 21 BOTÃO RANDOM...

Page 19: ... O painel frontal pode ser extraído para evitar que a unidade seja roubada DESMONTAGEM DO PAINEL FRONTAL Antes de desmontar o painel frontal certifique se de pressionar primeiro o botão de desligar PWR OFF Puxe o painel do aparelho para poder extraí lo completamente da unidade Siga as instruções MONTAGEM DO PAINEL FRONTAL Quando montar o painel assegure se que a parte direita fique para cima já qu...

Page 20: ...6 ALTO FALANTE FRONTAL ESQUERDO 7 ALTO FALANTE TRASEIRO ESQUERDO 8 ALTO FALANTE TRASEIRO ESQUERDO Manutenção MUDANÇA DE FUSÍVEIS Se o fusível queimar verifique a conexão de acendido e substitua o fusível Se o fusível queimar mais uma vez possivelmente o aparelho esteja funcionando mal Neste caso chame ao serviço técnico mais próximo Atenção Use um fusível com a amperagem apropriada para cada fio S...

Page 21: ... esquerda POP M ROCK M CLASS FLAT M DSP OFF MODALITA ESP 2 Anti shock Se premete il tasto SEL per più di 2 secondi è possibile scegliere fra la modalità 12 sec o 45 sec di ESP MODO BEEP 2 Se pressionar o botão SEL durante mais de dois segundos se liga o seletor desta função BEEP LIGADO Quando pressionar estes botões pode se escutar um BEEP pelo alto falante MODO BUSCA SEEK 2 Se pressionar o botão ...

Page 22: ...otão para que o reprodutor volta ao funcionamento normal Esta função é útil quando escutar em níveis baixos A intensidade dos sons aumentará a resposta de graves e agudos gerando uma performance melhor Quando utilizar esta função o display mostra a palavra LOUD 7 Botão LOCAL DISTANTE Pressione este botão para escolher a posição LOCAL nas áreas com sinais fortes par que o rádio só se detenha nas em...

Page 23: ...e a reprodução para procurar a faixa desejada a alta velocidade Quando achar a seção de música desejada solte o botão Se reproduzirá normalmente 16 GAVETA DO CD 17 BOTÃO DE EXPULSÃO DE CD Pressione o botão EJECT para tirar o CD 18 BOTÃO PAUSA Durante a reprodução PLAY pressione o botão 18 PAU para fazer uma PAUSA Pressione mais uma vez o botão para que a reprodução volte a normal 19 BOTÃO INTRO Re...

Page 24: ... Passo do canal 100 kHz Freqüência intermédia 10 7 MHz SINTONIZADOR AM Gama de freqüências 530 1620 kHz Sensibilidade 32dB a Sinal Ruído 20dB Freqüência I F 450 kHz Rejeição da imagem 50 dB SAÍDA Saída 1000 mV Impedância 10 kOhm GERAL Fonte de energia 12V DC 10 8 15 6V aceitada Impedância do alto falante 4 ou 8 ohm Potência de saída 50W x 4CH NOTA O fabricante se reserva o direito de alterar as es...

Reviews: