11
3.
Check Before Starting
Take into account the working conditions
from the health and safety point of view
•
Fuel: Check the engine maintenance manual.
Gas Models: Unleaded gasoline is
recommended
WARNING!! Engine is shipped without
oil.
•
Check that the engine oil level is correct. Because
the engine often operates at an angle, check the
oil level (with engine horizontally) frequently to
ensure that the oil level never falls below the lower
mark on the dipstick. 10W30 oil is recommended.
•
Electric Models: Verify all electrical connections
are intact.
4.
To Start The Saw
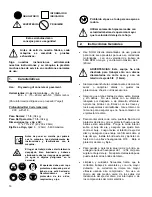
Always pay extreme care and attention to
the preparation of the machine before
starting.
Remove all wrenches and tools from the
floor and the machine.
Always keep the blade guard in place.
On Gasoline Models:
•
Place STOP/RUN switch located on the handle to
"RUN" position.
•
Start the engine by following the procedure in the
engine manual.
•
Let the engine warm up at half throttle.
•
Open the engine throttle to full open before
sawing. All sawing in done at full throttle.
DO NOT change the governor setting - it
is factory set for the correct speed.
On Electric Models:
Make sure that the saw is connected to a
properly grounded electrical outlet.
•
Check the electrical outlet voltage to be sure it is
115 volts, 60Hz fused (or breaker) at a minimum of
15 amps. The power supply voltage should not
vary more than +/- 10% from the name plate
voltage figure. A voltage variation of more than +/-
10% will cause a loss of power, overheating and
possible motor damage.
WARNING: Never connect the saw into
any external speed control device of any
kind!!
•
Extension cords up to 50 feet (15m), use #12GA
minimum wire size; and up to 100 feet (30m), use
#10GA and up to 150 feet (45m), use #8GA
minimum wire size. When cutting outdoors, use an
extension cored rated and marked for outdoor use.
5. Operating
Instructions
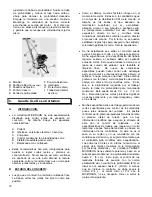
FIGURE A
A. Handle
F. Front Pointer
B. Lock Knob
(handle adjust)
G. Switch Assembly
C. Lock Pin
H. Blade Guard
D. Rear Pointer
I. Blade Guard Latch
E. Depth Stop
1. Extend the handle by rotating the handle assembly
to the vertical position and insert the lock pin
through the handle bracket and handle assembly.
Loosen the handle knob, extend the handle to its


