background image

B

racket Assembly

Mounting 

Ins

tallation


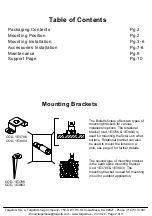
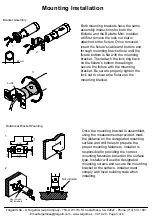
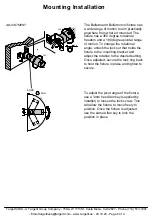
Both mounting brackets have the same 

assembly instructions for both the 

Bulletto and the Bul

l

etto Mini. Installer 

will first remove the

 lock nut that is 

attached to the fixture. Once removed, 

insert the fixture's cable and bottom end 

through mounting bracket hole until the 

fixture bottom is flat with the mounting 

bracket. Then attach the lock ring back 

on the fixture's bottom threading to 

secure the fixture with the mounting 

bracket. Be sure to properly tighten the 

lock nut to secure the fixture on the 

mounting bracket. 

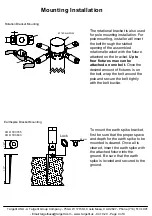
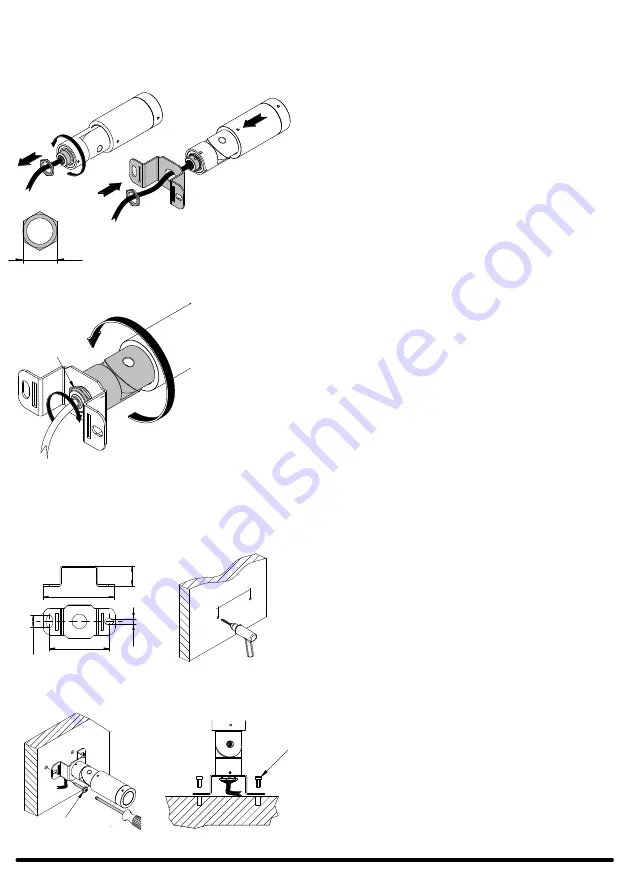
Once the mounting bracket is assembled, 

using the measurements provided, mark 

the distance on the designated mounting 

surface and drill holes to prepare the 

proper mounting fasteners. Installer is 

responsible for providing the correct 

mounting fasteners based on the surface 

type. Installer will use the designated 

mounting screws and secure the mounting 

bracket to the surface. Installer must 

comply with local building code when 

installing. 

Targetti USA - A Targetti Group Company - 750-A W 17th St. Costa Mesa, CA 92627 - Phone (714) 513-1991 

-


Email:targettiusa@targetti.com - www.targetti.us - 

04.10.20 - Page 3 of 9

Lock

1

2

3

24

 mm

3.54"

( X )

0.33"

0.73"

X

4.25"

1.18"

Non incluso

Not included

1

Not included

Rotation

al

 Bracket Mounting

2

Summary of Contents for BULLETTO MINI

Page 1: ...the power supply ground fixture s and make sure all electrical connections are correct and secured For use in IP67 installations Keep the label of the original packaging if any eventual future claims...

Page 2: ...10 Pg 2 The Bulletto fixture offers two types of mounting brackets for various installation options The rotational bracket cod 1E3786 1E3804 is used for mounting the fixture on a flat surface Rotation...

Page 3: ...n the mounting bracket Once the mounting bracket is assembled using the measurements provided mark the distance on the designated mounting surface and drill holes to prepare the proper mounting fasten...

Page 4: ...th the belt buckle To mount the earth spike bracket first be sure that the proper space and depth for the earth spike to be mounted is cleared Once all is cleared insert the earth spike with the attac...

Page 5: ...with 12 gauge wiring with a full load 96W fixture system Installer will wire the fixture s with the daisy chain connection as shown in the diagram below Installer must wire the fixture s system equal...

Page 6: ...ting Once adjusted secure the lock ring back to hold the fixture in place and tighten to secure To adjust the pivot angle of the fixture use a 3mm hex Allen key supplied by installer to loosen the loc...

Page 7: ...filter pick the desired position you want to add the blade of light and attach the filter in the same order as any other filter See chart below for different types of filters available 3 Once the filt...

Page 8: ...o ensure the maximum lifespan of this product we encourage our customer to provide a quality visual inspection of the fixture every six months If there are any visible sign of issues i e moisture or d...

Page 9: ...iusa targetti com www targetti us 04 10 20 Page 9 of 9 Support Any questions problems or comments you have please feel free to contact our Customer Service department during our business hours Monday...

Reviews: