background image

6

SAFETY AND INSTRUCTIONAL DECALS

ATTENTION! BECOME ALERT! YOUR SAFETY IS INVOLVED!

Replace Immediately if Damaged!

SAFETY AND INSTRUCTION DECALS

PFQA

PFQA12

1

2

4

3

4

1

Summary of Contents for PFQA

Page 1: ...12 TA R T E R U S A C O M PALLET FORK OPERATION AND ASSEMBLY MANUAL For more information and questions please contact Tarter Customer Service 1 800 RED GATE 1 800 733 4283 Monday Friday 8 00 4 30 EST PFQA PFQA12 ...

Page 2: ...y not meet standards required to insure dependable use and safe operation TA R T E R U S A C O M For more information and questions please contact Tarter Customer Service 1 800 RED GATE 1 800 733 4283 CUSTOMER INFORMATION Name___________________________________________________ Purchased From___________________________________________ Date Purchased___________________________________________ Model_...

Page 3: ... heavy duty and heat treated for superior strength and durability This do it all implement is the perfect companion to your loader equipped tractor Observe all safety precautions on the machine and as noted throughout this manual If any assistance or additional information is needed contact us at 1 800 RED GATE NOTICE All information illustrations and specifications in this manual are based on the...

Page 4: ...afety Description and Decals 6 Operating 11 Attaching 13 Adjusting 14 Load Handling 15 Detaching 16 Lubrication Maintenance 17 Product Specifications 18 Parts 20 Torque Specifications 22 Trouble Shooting 23 Warranty 24 Notes 26 TABLE OF CONTENTS ...

Page 5: ...an cause damage to equipment The terms CAUTION WARNING and DANGER are used in conjunction with the Safety Alert Symbol a triangle with an exclamation mark to indicate the degree of hazard for items of personal safety This Safety Alert Symbol indicates a hazard and means ATTENTION BECOME ALERT YOUR SAFETY IS INVOLVED Indicates an imminently hazardous situation that if not avoided will result in dea...

Page 6: ...6 SAFETY AND INSTRUCTIONAL DECALS ATTENTION BECOME ALERT YOUR SAFETY IS INVOLVED Replace Immediately if Damaged SAFETY AND INSTRUCTION DECALS PFQA PFQA12 1 2 4 3 4 1 ...

Page 7: ...RY OR DEATH Background Color White Clear July 19 2019 12 5 in 11 75 in 2 4000070_5 in x 4 in ANSI SAFETY COLORS X Designer BR 4 5 Please proof carefully Electronically sign PDF and return for approval Gray lines indicate the die cuts 19 Inches LOAD CENTER KEEP OTHERS CLEAR 3000 LBS MAXIMUM CAPACITY KEEP LOAD LEVEL DO NOT EXCEED 3000 LBS LIFTING CAPACITY AT 19 LOAD CENTER DO NOT EXCEED THE RECOMMEN...

Page 8: ... and trained in this Tarter attachment s operations Always use a power unit equipped with a Roll Over Protective System and seat belts ROPS Keep your seat belt securely fastened because falling off can result in your death from being run over or crushed Always keep a foldable ROPS system in the locked up position at all times Never exceed the limits of any piece of equipment whether the power unit...

Page 9: ...ys transport loads low to the ground to maintain stability of the power unit Be aware of overhead utility lines Avoid contact with any overhead utility lines or electrically charged conductors Watch for hidden hazards on the terrain during transport Do not operate or transport on steep slopes Do not stop start or change directions suddenly on slopes Use extreme care and reduce ground speed on slop...

Page 10: ...ed before approaching for service Before detaching the power unit from the Tarter attachment or performing any service or maintenance follow these steps disengage power to the power unit lower the front end loader attachment to the ground set parking brake stop engine remove key and unfasten seat belt Always secure attachment with solid supports Do not use concrete blocks logs buckets or any other...

Page 11: ...e to modify or alter the power unit the Tarter attachment or any of their components in any way except as outlined in this Manual STORAGE Always use a power unit to position a Tarter attachment for storage Remove any debris or dirt that may have accumulated on the Tarter attachment Inspect the pallet fork for damaged or worn parts and replace when needed Store the Tarter attachment away from human...

Page 12: ...ep the load centered on attachment and loader Unbalanced loads increase the possibility of tipping or rolling over Secure the load properly Unsecured loads can fall unexpectedly Make sure the weight of the load is centered between the forks Lift the load slightly to make sure the load is stable If the load appears to be unstable lower and reposition NEVER lift a load with one fork This will cause ...

Page 13: ...sure the locking pins on the loader are fully raised 2 Drive forward and adjust the loader height and position Tilt the loader slightly forward and place the top of the loader hitch under the top of the angle bars on the pallet fork 3 Slowly lift the loader until the loader and the pallet fork have come together 4 Slowly tilt the loader to align the bottom slots on the pallet fork with the locking...

Page 14: ...k along the upper carrying bar by pushing or pulling until desired location 4 Position the locking pin over desired notch and secure 5 Repeat these steps for second fork ADJUSTING CAUTION Be sure to check the locking pin and make sure it is secure and fork is attached CAUTION Please wear gloves when installing and adjusting forks Possible pinch points CAUTION Be sure to check the locking pin and m...

Page 15: ...never while traveling PLACING A LOAD 1 Stop in front of desired location 2 Carefully and slowly raise or lower the load to the desired height 3 Slowly move forward until the load is square and positioned straight above desired location 4 Make sure load is level for placement and lower the load to desired location 5 Once the load is settled back up slowly NOTE Leave enough clearance when turning to...

Page 16: ... the locking handles up to remove the pins from the bottom slots of the pallet fork 3 Return to the tractor and start the tractor Tilt the top of the loader slightly forward and slowly lower the pallet fork until the top angle bars and the loader have separated 4 Slowly back the tractor away from the pallet forks Make sure the loader does not interfere with the pallet fork ...

Page 17: ...NTENANCE 1 Check forks to make sure they are not damaged broken or worn excessively Repair or replace as needed 2 Replace any work damaged or illegible safety labels by obtaining new labels from your local Tarter dealer ...

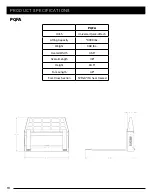
Page 18: ...DUCT SPECIFICATIONS PQFA PQFA Hitch Universal Quick Attach Lifting Capacity 3000 lbs Weight 368 lbs Overall Width 45 5 Overall Length 48 Height 34 5 Fork Length 42 Fork Cross Section 1 25 x4 ITA heat treated ...

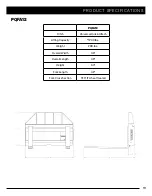
Page 19: ...RODUCT SPECIFICATIONS PQFA12 PQFA12 Hitch Universal Quick Attach Lifting Capacity 1200 lbs Weight 238 lbs Overall Width 46 Overall Length 49 Height 34 Fork Length 42 Fork Cross Section 1 x3 ITA heat treated ...

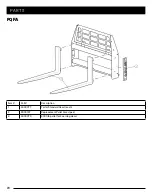
Page 20: ...20 PARTS PQFA Item Part Description 1 4000077 Tarter Standard Decal each 2 9000157 Replacement Pallet Forks pair 3 4000070 3000 lb pallet fork warning decal ...

Page 21: ...21 PQFA12 Item Part Description 1 4000077 Tarter Standard Decal each 2 9000953 Replacement Pallet Forks pair 3 4000363 1200 lb pallet fork warning decal PARTS ...

Page 22: ...3 15 16 5 8 11 UNC 97 131 150 203 212 287 15 16 5 8 18 UNF 110 149 170 230 240 325 1 1 8 3 4 10 UNC 144 195 266 360 376 509 1 1 8 3 4 16 UNF 192 260 297 406 420 569 1 5 16 7 8 9 UNC 166 225 430 583 606 821 1 5 16 7 8 14 UNF 184 249 474 642 668 905 1 1 2 1 8 UNC 250 339 644 873 909 1232 1 1 2 1 12 UNF 274 371 705 955 995 1348 1 1 2 1 14 UNF 280 379 721 977 1019 1381 1 11 16 1 1 8 7 UNC 354 480 795 ...

Page 23: ... of gravity is closer to the vertical faces Load is too heavy Reduce the load Load is shifting Load is not properly secured Secure the load Load is not centered Center the load Load is carried too high Recommended carrying load is 2 4 above the floor Forks are too close to each other Adjust forks an equal distance away from the center and as far apart as the pallets will allow Traveling with forks...

Page 24: ... limited warranty is extended solely to the original purchaser of the product Should the original purchaser sell or otherwise transfer this product to a third party this warranty does not transfer to the third party in any manner HOW TO MAKE A CLAIM To obtain warranty service through a local authorized retailer a customer must present the following within thirty 30 days of implement failure 1 Proo...

Page 25: ...g without limitation expenses incurred for substitute or replacement implement or for rental expenses to temporarily replace a warranted product Under no circumstance shall recovery of any kind be greater than the amount of the purchase price of the product purchased Customer assumes all risk and liability for loss damage or injury to customer or customer s property and or the property of others a...

Page 26: ...________________________________________________________________ ________________________________________________________________________________ ________________________________________________________________________________ ________________________________________________________________________________ ________________________________________________________________________________ ___________...

Page 27: ...________________________________________________________________ ________________________________________________________________________________ ________________________________________________________________________________ ________________________________________________________________________________ ________________________________________________________________________________ ___________...

Page 28: ...REV3 120621 P O BOX 10 10739 S HWY 127 DUNNVILLE KY 42528 1 800 REDGATE TARTERUSA COM ...

Reviews: