background image

12. DMX 512 channel

If all procedures have been correctly carried out to this point, your DMX 512 

functions

controller will have control over all the functions of the ProSpot, as shown in the table 
which follows. The difference between 16 or 8 bit operation depends upon what selec-
tion you made in section 11 of this manual.

channel

16 

bit

channel

bit

function

type 

of 

control

effect

decimal

1

1

Base 

(pan) 

coarse

proportional

coarse control of the base movement

0-255

2

2

Yoke 

(tilt) 

coarse

proportional

coarse control of the Yoke movement

0-255

3

Base 

(pan) 

fine

proportional

fine control of the base movement

0-255

4

Yoke 

(tilt) 

fine

proportional

fine control of the Yoke movement

0-255

5

3

Speed 

pan/tilt

movement

step

Max speed (tracking mode)

0

proportional

Max speed from max. to min. vector mode)

1-249

step

Max. 

speed, 

black-out 

while 

PAN,TILT

moving or color changes (tracking mode)

250-255

6

4

lamp 

on/off, 

reset,

fans 

speed 

control

step

open, max. speed of fan

0

proportional

open, 

min. 

speed 

of 

fan 

(silent 

operation)

from 0 to 127 decreasing speed of fan

127

step

Lamp ON, reset, open position

128-139

step

No function

140-229

step

Lamp Off after 3 sec.

230-239

step

No function

240-255

7

5

colours

proportional

Open/white

0

proportional

Turquoise

10

proportional

Red

21

proportional

Cyan

32

proportional

Green

42

proportional

Magenta

53

proportional

Light 

Blue

64

proportional

Yellow

74

proportional

Green

85

proportional

Pink

96

proportional

Blue

106

proportional

Orange

117

proportional

Forwards 

rainbow 

effect 

from 

fast 

to 

slow

128-190

step

No 

rotation

191-192

proportional

Backwards 

rainbow 

effect 

from 

slow 

to 

fast

193-255

8

6

no 

function

step

No function

0-255

9

7

effect-wheel

step

Open 

position 

(hole)

0-95

step

facet 

rotating 

prism

96-159

step

Prism/Gobo macros

160-255

step

Macro 1

160-167

step

Macro 2

168-175

step

Macro 3

176-183

step

Macro 4

184-191

step

Macro 5

192-199

step

Macro 6

200-207

step

Macro 7

208-215

step

Macro 8

216-223

step

Macro 9

224-231

step

Macro 10

232-239

step

Macro 11

240-247

step

Macro 12

248-255

www.carlosmendoza.com.mx

Summary of Contents for ProSpot

Page 1: ...TAS s r l Via Svizzera 7 46042 Castel Goffredo Mantova Italy tel 0376 780497 fax 0376 780844 1 edizione settembre 1999 1st edition september 1999 ProSpot...

Page 2: ...sima rapidit e precisione Please note in the space provided above the relative service information of the model and the retai ler from whom you purchased your ProSpot This information will assist us i...

Page 3: ...15 Gobo Replacement 16 Maintenance 17 Test 17 1 Manual testing of each motor MAnU 17 2 DMX level readout dMin 17 3 Internal temperature readout tEMP 18 Function settings 18 1 Turning off the display d...

Page 4: ...and procedures outlined in this manual will ensure the maximum efficiency of this product for years to come Open the packaging and ensure that no part of the equipment has suffered dama ge in transit...

Page 5: ...Never operate the unit without proper earth connection 5 The fixture should never be located in an exposed position or in areas of extre me humidity A steady supply of circulating air is essential Pr...

Page 6: ...allowed to stand and cool for 10 minutes prior to its removal MSD lamps are part of the mercury vapour family of discharge lamps and must be handled with great care The lamp operates at high pressure...

Page 7: ...distance between the lamp and the lense is 1 1 5 mm Should this not be the case use the adjusters located on the fixture to rectify this situation See chapter 14 Aligning the lamp in the optical path...

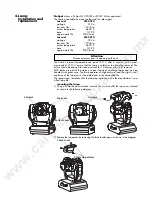
Page 8: ...eration of the projector 5 1 Setting the operating frequency on the ballast of the ProSpot 1 Remove the four screws A on the side plate of the projector s base using a Philips head screwdriver remove...

Page 9: ...d electronic components that must not come into contact with water oil or any other liquid movement The projector has a movement of 530 in the base and 280 in the yoke DO NOT place any obstructions in...

Page 10: ...he base of the unit under no circumstan ces should any of these points be obstructed Obstruction of any of these points will result in the overheating of the unit detrimen tally and seriously affectin...

Page 11: ...mains supply ensure that the model in your pos session correctly matches the mains supply available to you For connection purposes ensure your plug is of a suitable rating 3 amps Locate the mains cabl...

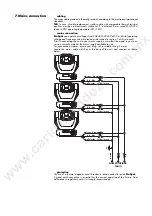
Page 12: ...production costs and to allow easy worldwide availability of parts tas utilises only XLR 3 plugs and sockets for signal connection Pin connection conforms to interna tional standards pin 1 screening 0...

Page 13: ...t connected pin 2 data pin 5 not connected pin 3 data Ensure that all data conductors are isolated from one another and the metal hou sing of the connector Note the housing of the cannon XLR 3 must be...

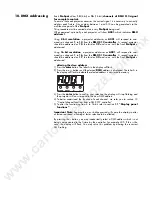
Page 14: ...rm a reset function on all the internal and external motors This will last some few seconds after which it will be subject to the external signal from the controller DMX reception The display will be...

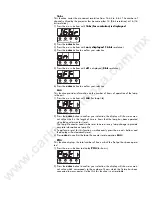
Page 15: ...til the final ProSpot is addressed altering the dmx address 1 Press the enter button The letter A in the display will flash 2 Press the or buttons until the desired DMX address is displayed The letter...

Page 16: ...enter button to confirm your selection the display will show off for clockwise standard operating mode 3 Press the or buttons the display will show on for counter clockwise 4 Press the enter button t...

Page 17: ...isplay will show a numeri cal value which is the length of time in hours that the lamp has been operated since the counter was last reset The lamp life counter needs to be reset to zero at every lamp...

Page 18: ...test single functions at the choice of the operator of the unit Mod 2 is used to run an automated test sequence of all the functions of the ProSpot 1 Press the or buttons to display dEMo for demonstr...

Page 19: ...n 15 All the gobos or effects in the gobo wheel will be displayed in turn Whilst this is being undertaken the display will show run 4 To return to normal operation press the menu button repeatedly Mod...

Page 20: ...ep open max speed of fan 0 proportional open min speedoffan silentoperation from 0 to 127 decreasing speed of fan 127 step Lamp ON reset open position 128 139 step No function 140 229 step Lamp Off af...

Page 21: ...rtional Gobo indexing 0 127 proportional Forwards gobo rotation from fast to slow 128 191 step Norotation 192 proportional Backwards gobo rotation from slow to fast 193 255 13 11 nofunction nofunction...

Page 22: ...eable This is a function of the lamp s positioning and the adjusters should be used to create a flat beam vertical adjustment Adjuster A acts on a lever and spring assembly to position the lamp via a...

Page 23: ...obos may be replaced as required to produce special effects as required Gobo replacement should always be carried out with the power to the unit shut off and the top and bottom housing removed as desc...

Page 24: ...r passages The fans and air passages must be cleaned approximately every 6 weeks the period for this periodic cleaning will depend of course upon the conditions in which the projector is operating Sui...

Page 25: ...ut the prism wheel Prot prism rotation from Pro1 to Pro9 rGob rotating gobo wheel From rGo0 to rGo7 Grot rotating gobos From Gro1 to Gro9 Foc focusing From Foc1 to Foc5 Stro strobe effect From Open to...

Page 26: ...70 this is acceptable If however the temperature is 70 or above the lamp must be switched off Note that the external temperature should note exceed 45 From the SPEC function point 2 3 Press the or but...

Page 27: ...ttons to display On if you wish the display to stay on 6 Press the or buttons to display Off if you wish the display to be off 7 Press the enter button to confirm your selection the display will turn...

Page 28: ...ction allows the fan speed to be adjusted automatically by the unit in order for the unit to maintain its own optimum internal temperature ProSpot From the FAnS function point 3 4 Press the enter butt...

Page 29: ...when the projector is turned on 5 Press the enter button then press the or buttons to display off to inhibit the lamp turning on when the projector is turned on 6 Press the enter button to confirm you...

Page 30: ...d position You may effect a calibration either via the display panel or via external signal 19 1 Calibrating via an external signal source A DMX512 control source must be connected to the ProSpot 1 Pr...

Page 31: ...ensure that all settings are as required 19 2 Calibrating via ProSpot s on board controls This allows calibration to be performed even if there is no external DMX source available ProSpot 1 Press the...

Page 32: ...n 8 Press the or buttons to display FCAL for calibration 9 Press the enter button 10 Press the or buttons to display Colo EFEC rGob Grot 11 Press the enter button 12 Press the or buttons which will al...

Page 33: ...fective or its cabling is not connected properly The gobo wheel will not have repositioned itself correctly after the reset IGEr Rotating gobo indexing error This message may appear after a reset has...

Page 34: ...of the ProSpot are available as replacement spares from your authorised tas sales agent Accurate description of the fixture model number and type will assist us in provi ding for your requirements in...

Page 35: ...tas reserves the right to effect modifications without prior notification manuale istruzioni instruction manual ProSpot 1 edizione settembre 1999 1st edition september 1999 coemar spa viaInghilterra...

Reviews: