16
TASCAM CD-400U
2 – Names and Functions of Parts
Wireless remote control (TASCAM RC-CD400)
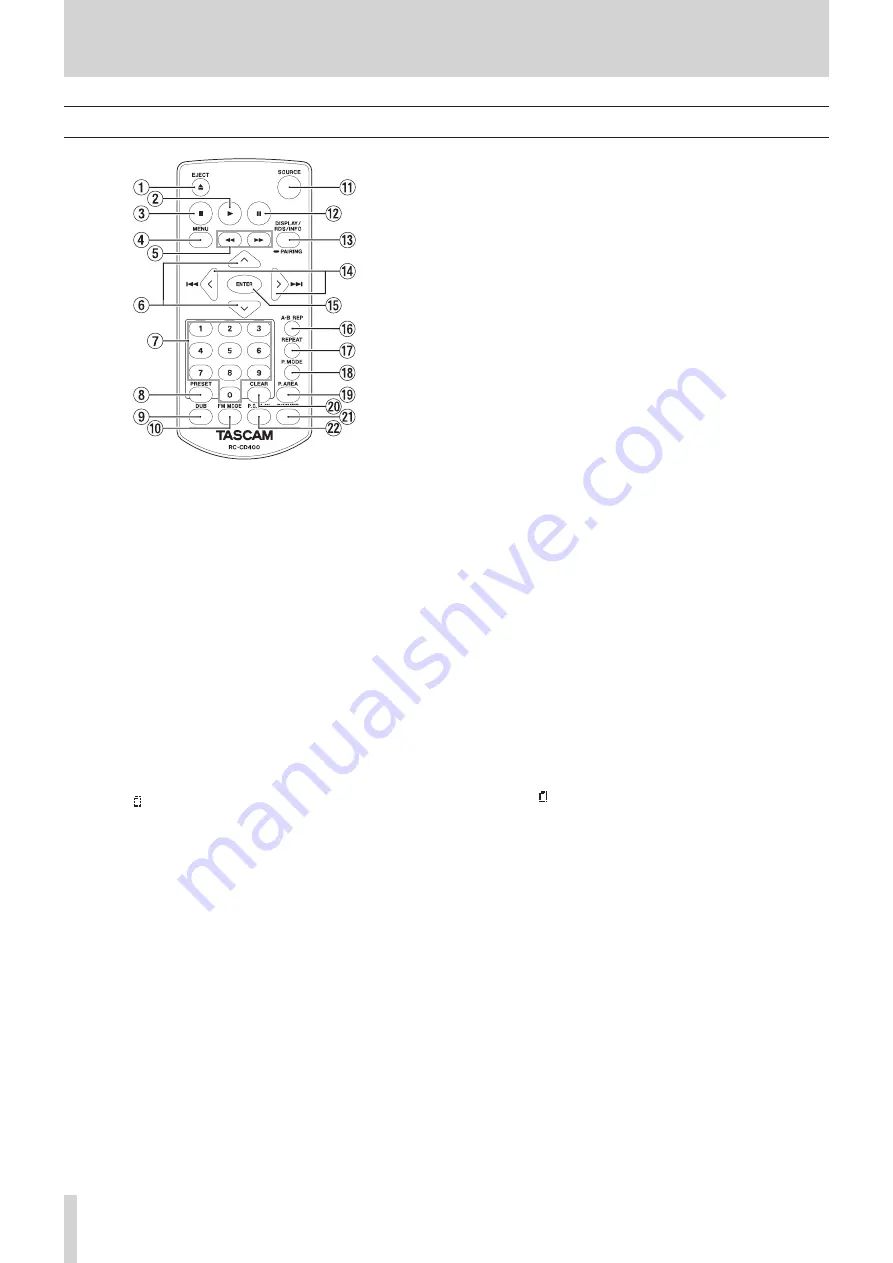
1
EJECT button
This has the same function as the EJECT button on the main
unit. (see “Inserting and removing discs” on page 21)
2
7
button
This has the same function as the PLAY button on the main
unit.
3
8
button
This has the same function as the STOP button on the main
unit.
4
MENU button
This has the same function as the HOME/MENU button on
the main unit.
5
m
/
.
buttons
These have the same functions as the
m
and
,
[FAST]
buttons on the main unit.
6
k
/
j
buttons
i
When the current source is
USB
or
SD
and the play area is
folder ( icon shown), press the
k
button to move up one
folder level. (see “Playback area” on page 24)
i
When the current source is
AM
or
FM
, press the
j
button to
select a preset station.
i
When a
MENU
setting screen is open, press the
k
button to
move up one menu level.
i
The
j
button has the same function as the remote control
ENTER button.
7
Number (0–9) buttons
i
When the current source is
CD
,
USB
or
SD
and the play area
is set to
"ALL"
, use the number buttons to select tracks by
their track numbers. For track numbers, a maximum of two
digits can be input for audio CDs and three digits for data
CDs. (see “Selecting tracks directly” on page 25)
i
When the current source is
AM
or
FM
, press to tune in a pre-
set station.
8
PRESET button
i
When the current source is
AM
or
FM
, press to program pre-
set stations manually. (see “Setting radio station presets
manually” on page 32)
i
When the current source is
AM
or
FM
, press and hold to
program preset stations automatically. (see “Setting radio
station presets automatically” on page 32)
9
DUB button
Press when stopped to start dubbing (copying) preparation.
(see “Dubbing procedures” on page 36)
0
FM MODE button
When the current source is
FM
, press to switch between ste-
reo and mono for FM broadcast reception. (see “Setting the
FM mode” on page 32)
q
SOURCE button
This has the same function as the SOURCE button on the
main unit. (see “Selecting the playback source.” on page 22)
w
9
button
This has the same function as the PAUSE button on the main
unit.
e
DISPLAY/RDS/INFO [PAIRING] button
i
Press during playback to show a variety of information. (see
“Time and text information display” on page 30)
i
When the current source is
BLUETOOTH
, press and hold to
activate Bluetooth pairing mode. Press when pairing to
end pairing mode. (see “Pairing” on page 31)
i
Please ignore INFO on the remote control unit. (INFO func-
tion does not work on this unit.) This button does not work
at all on the USA/Canadian model.
i
Press when the current source is
FM
to switch the RDS
mode. (see “RDS (European model only)” on page 34)
r
.
/
/
[
l
/
;
]
buttons
i
When the current source is
CD
,
USB
or
SD
and the play area
is set to "ALL", press to skip tracks. (see “Skipping to earlier
and later tracks” on page 24)
i
When the current source is
USB
or
SD
and the play area is
folder ( icon shown), press to move between tracks and
folders. (see “Playback area” on page 24)
i
If the current source is
AM
or
FM
, press to change the fre-
quency received. (see “Tuning in radio stations” on page
32)
i
When the current source is
AM
or
FM
and preset mode is
enabled, press to move to the previous or next preset num-
ber. (see “Setting radio station presets” on page 32)
i
When a
MENU
screen is open, turn to select items and
change setting values. (see “Basic MENU screen operations”
on page 18)
t
ENTER button
When a
MENU
screen is open, press to confirm selections and
settings.


