background image

28


TASCAM CD-6010

6 – Various Playback Functions

Using the remote control: 

Press the 

PITCH

 button to turn the pitch control function 

on. Use the 

+

 and 

 buttons to adjust the setting in the 

range between −16% and +16%. 

Setting the pitch adjustment 

increment

To set the adjustment increment for pitch control 

playback (pitch step) use the 

12 P-STEP

 menu item. 

Options (%): 

0.1

 (default value), 

0.5

1.0


NOTE

The pitch step setting is retained even when the power is 

turned off. 

Changing playback speed 

without changing pitch  

(KEY ORIG) 

Ordinarily, when using the pitch control function, the 

speed changes along with the pitch. When the original 

key function is on, however, the pitch does not change 

even when the playback speed is changed. 
Use one of the following procedures to turn the original 

key function on/off. 

Press the 

• 

KEY ORIG

 button on the remote. 

Use the 

• 

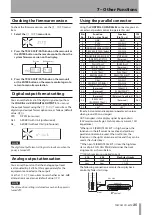
01 Origin

 menu item (default value: 

OFF

).

When the original key function is on, 

KEY ORIG

 appears 

at the bottom of the display. 

NOTE

The original key function on/off setting is retained even when 

the power is turned off. 

Program playback 

By setting a program in advance, you can set the unit to 

play tracks in the order that you want. Up to 100 tracks 

can be added to the program. To use program playback 

to play tracks in the program order, set the playback 

mode to program playback mode and start playback. (See 

“Selecting the playback mode” on page 23.) 

Program setting mode

Use the following procedures to enter program setting 

mode and add tracks to the empty program.

NOTE

You can add tracks to the program regardless of the 

• 

current playback mode. 
You can add the same track to the program multiple 

• 

times. 
The program setting is retained even when the power is 

• 

turned off or the disc is ejected. The player can remember 

one program for up to 100 discs. 

Using the front panel buttons: 

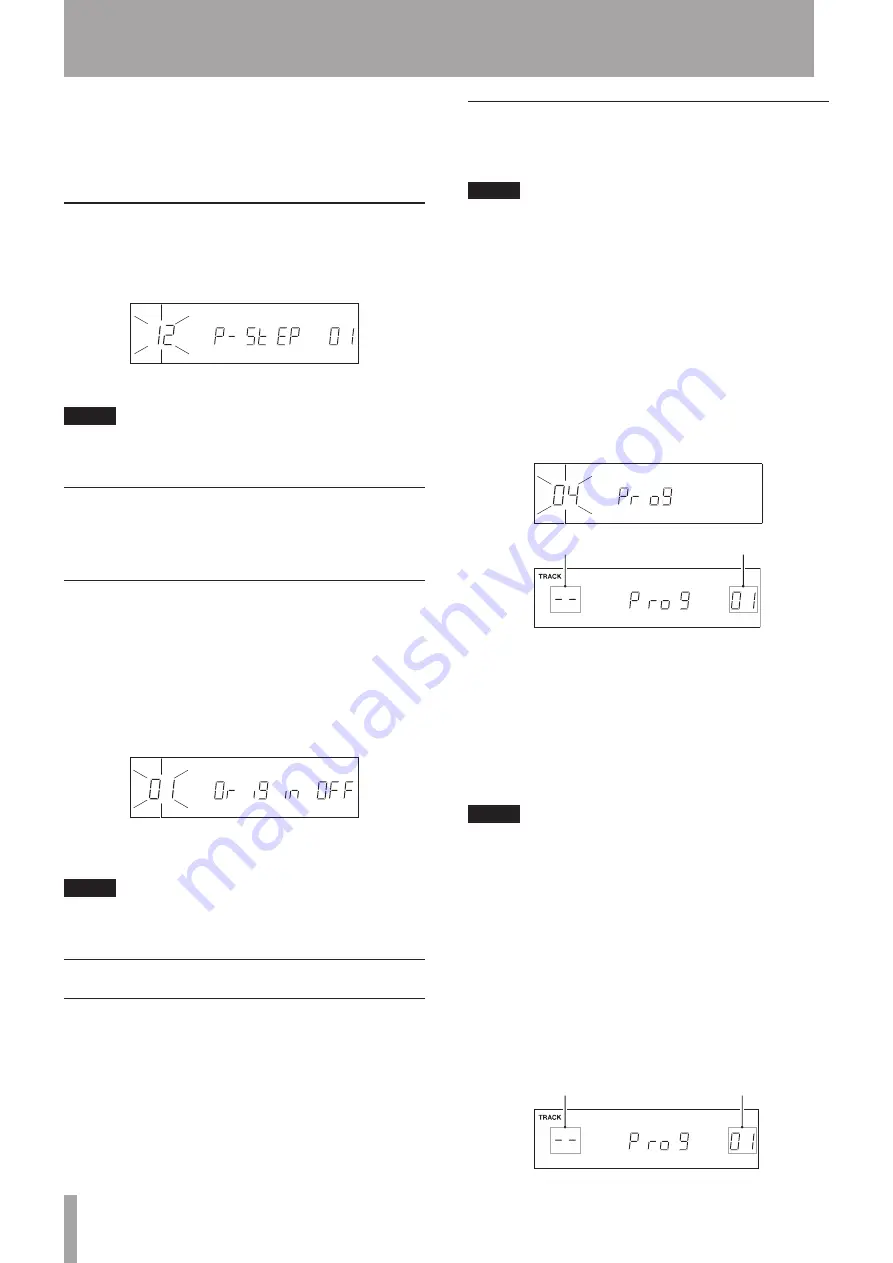
1  When playback is stopped, select the 

04 Prog


menu item, and press the TRACK SKIP/DATA knob to 

enter program setting mode. The display appears as 

follows. 

Track number

Program number

2  Use the number buttons or TRACK SKIP/DATA knob 

to select the number of the track that you want to 

add at the currently displayed program number. The 

selected track number blinks. 

3  Press the SEARCH 

 [AUTO READY] button to 

add the selected track. The next program number is 

shown. 

4  Repeat steps 2 and 3 to add tracks as desired.

NOTE

After selecting a track, turning the TRACK SKIP/DATA knob to 

the right or pressing the SEARCH 

 [AUTO READY] button 

adds the track to the program. If you exit program setting 

mode without doing this, the track selected just before will 

not be added to the program. 

5  When you are done adding tracks to the program, 

press the TRACK SKIP/DATA knob to exit program 

setting mode.

Using the remote control: 

1  When stopped, press the PGM button to enter 

program setting mode. The display appears as 

follows. 

Track number

Program number

Summary of Contents for CD-6010

Page 1: ...D01168520B CD 6010 CD Player OWNER S MANUAL...

Page 2: ...cturer 12 Use only with the cart stand tripod bracket or table specified by the manufacturer or sold with the apparatus When a cart is used use caution when moving the cart apparatus combination to av...

Page 3: ...vironment and human health because of the presence of hazardous substances in the equipment d The Waste Electrical and Electronic Equipment WEEE symbol which shows a wheeled bin that has been crossed...

Page 4: ...consult a doctor immediately If the fluid gets on a person s body or clothing it could cause skin injuries or burns If this should happen wash it off with clean water and then consult a doctor immedi...

Page 5: ...Selecting the playback mode 23 6 Various Playback Functions 24 Auto cue function 24 Setting the auto cue level 24 Auto ready function 24 Resume function 24 Call function 25 Cue function 25 Setting cu...

Page 6: ...tput attenuation 35 Using the parallel connector 35 8 Troubleshooting 36 9 Error Messages 37 10 Specifications 38 Media and formats 38 Analog audio output 38 Digital audio output 38 Control input and...

Page 7: ...unction can go back a few seconds amount can be set during playback TASCAM RC 500 wireless remote control included can be disabled using a setting on the main unit Gap between tracks during playback c...

Page 8: ...ality and or cause malfunctions Places with significant vibrations or that are otherwise unstable Near windows or other places exposed to direct sunlight Near heaters or other extremely hot places Ext...

Page 9: ...store them in a clean state Do not use any record spray anti static solutions benzene paint thinner or other chemical agents to clean CDs as they could damage the delicate playing surface It may cause...

Page 10: ...utton to exit menu mode To turn the panel lock function on and off press and hold this button when in shift mode when the SHIFT indicator is lit or while pressing the SHIFT button This function preven...

Page 11: ...een 1 10 and 11 20 for flash start program numbers track numbers and cue numbers r Force eject hole If the tray will not open ordinarily insert a fine rod such as a paperclip here and press to open th...

Page 12: ...ALANCED jacks These are analog outputs for the CD playback signal The maximum output level is 6 dBV h DIGITAL OUTPUTS COAXIAL connector This outputs the CD playback as a S PDIF or AES EBU digital sign...

Page 13: ...racks playback mode Nothing appears Single playback mode Sappears Program playback mode PGMappears Random playback mode RANDOMappears 8 Repeat mode indicators The repeat mode is shown See Repeat playb...

Page 14: ...e number buttons to designate track numbers to select songs Input two digits for audio CDs and three digits for data CDs See Designating track numbers on page 22 9 SKIP buttons Use these buttons for t...

Page 15: ...nlike the CLEAR button on the main unit the CLEAR button on the wireless remote control cannot be pressed and held while pressing a number button to delete a cue point s SEARCH buttons During playback...

Page 16: ...N AES EBU Connecting a footswitch Connect a TASCAM RC 3F footswitch sold separately to the REMOTE connector to enable it to control some unit operations See Controlling the player with a footswitch on...

Page 17: ...the batteries Replace both batteries with new ones when the range of the remote control becomes short or if the buttons become unresponsive Precautions about using batteries Misuse of batteries could...

Page 18: ...ns on the front panel of the unit except the SHIFT and DISPLAY LOCK buttons and the remote control are disabled LOCKEDwill appear on the display if you push any of the buttons NOTE Even when the panel...

Page 19: ...em that was selected the last time that the unit was in menu mode appears Menu item number Menu item name Setting 2 Use the unit s front panel buttons or the remote control to conduct the following op...

Page 20: ...extension to recognize WAV files Always add the wav extension to WAV file names The player cannot play back WAV files that do not have the wav extension In addition to having the wav extension the fil...

Page 21: ...disc when the power is OFF insert a paperclip or similar stiff rod into the hole beneath the tray and push to open the tray Tray lock function The tray lock function allows you to disable the operatio...

Page 22: ...mber is 4 enter 0 0 and then 4 When stopped use the number buttons to designate a track number and If the auto cue function is off pause at the beginning of the designated track After this press the P...

Page 23: ...inuously Playback modes This unit has 4 playback modes The current playback mode is indicated on the display Continuous playback mode default Nothing appears in the playback mode indication area at th...

Page 24: ...function on off setting is retained even when the power is turned off Setting the auto cue level To set the auto cue function trigger level auto cue level use the 03 A CUEmenu item Options 24 default...

Page 25: ...e corresponding number button to jump to that cue point and pause If the FLASH indicator is lit pressing a number button with a set cue point will start playback from that point immediately See Flash...

Page 26: ...by pressing the PLAY MODE REPEAT button while pressing and holding the SHIFT button Press the REPEAT button on the remote until REPEAT disappears from the top of the screen NOTE The repeat playback se...

Page 27: ...start playback 1 First connect the power of this unit so that it receives power from the timer 2 Load the disc that you want played back 3 Set the 07 P onPLmenu item to ON default value OFF 4 Leave th...

Page 28: ...start playback See Selecting the playback mode on page 23 Program setting mode Use the following procedures to enter program setting mode and add tracks to the empty program NOTE You can add tracks to...

Page 29: ...DATA knob to select the desired track 3 Press the SEARCH AUTO READY button to confirm the change Using the remote control 1 Use the SEARCH buttons to select the program number that you want to change...

Page 30: ...or fade out is set To set only the fade out time in fade in out setting mode step 1 above turn the TRACK SKIP DATA knob on the player or press the PREV or NEXT button on the remote until OUT blinks Th...

Page 31: ...on 3 While the beginnings of the tracks are being loaded into memory the word FLASHblinks on the display After loading completes FLASH 01 10appears on the display the FLASH indicator lights and the PL...

Page 32: ...LY signal can be output from the CONTROL I O PARALLEL connector With data CDs an end of track warning will not appear on the display The CONTROL I O PARALLEL 21 EOM TRACK TALLY signal will be output a...

Page 33: ...nu item to ON default value OFF When mono output is on MONOappears at the bottom of the display NOTE The mono output on off setting is retained even when the power is turned off Controlling the player...

Page 34: ...L I O RS 232C connector D sub 9 pin RS 232C compliant can be used for serial control of this unit by a computer or other external device Setting the baud rate Use the 13 232Cmenu item to set the baud...

Page 35: ...ntrol to operate this unit Pin No Function Pin 14 H or Open Function Pin 14 L IN OUT 1 GND GND 2 PLAY FLASH 1 In 3 STOP FLASH 2 In 4 INDEX DIR SEARCH FWD FLASH 3 In 5 TRACK SKIP FWD FLASH 4 In 6 TRACK...

Page 36: ...the front panel Make sure that the panel lock function is not on Unit cannot be controlled with the remote control Confirm that batteries are in the remote control and that they have a charge No sound...

Page 37: ...u are still unable to resolve the problem please contact TASCAM customer support Message Meaning Response Err01 TOC Read Error Clean or change the disc Err09 Flash ROM Error If one of these errors app...

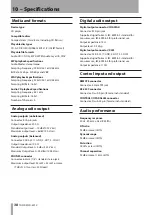
Page 38: ...utput impedance 100 Standard Output level 4 dBu 1 23 Vrms Maximum Output level 24 dBu 12 28 Vrms PHONES connector Connector 6 3mm 1 4 standard stereo jack Maximum output level 45 mW 45 mW or more THD...

Page 39: ...ings Repeat function on off Various menu settings General Power supply AC 100 240 V 50 60 Hz Power consumption 12 5 W Dimensions W x H x D 483 x 94 x 306 mm Weight 4 9 kg Operating temperature range 5...

Page 40: ...9 Wallace Street Mississauga Ontario L4Z 1Z8 Canada TEAC MEXICO S A de C V teacmexico net Phone 52 55 5010 6000 R o Churubusco 364 Colonia Del Carmen Delegaci n Coyoac n CP 04100 M xico DF M xico TEAC...

Reviews: