background image

2 – Features of the CD-RW2000—Front panel

 TASCAM CD-RW2000 

11

2.1 Front panel

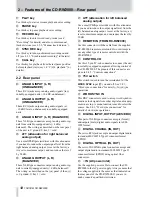
1

POWER switch 

The power switch is used to switch the unit between 
off and on (full operational mode).

When the unit is turned on, the display shows 

Welcome!

.

2

Disc tray

Discs should be placed label side upwards in the disc 
tray.

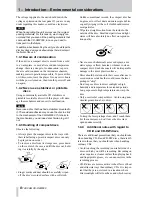
When a disc is loaded into the unit, the display 
briefly shows 

TOC Reading.

, with a flash-

ing period following the word “Reading” as the unit 
determines the contents of the disc. 

3

OPEN/CLOSE key 

Use this key to open and close the disc tray. The dis-
play shows 

OPEN

 when the tray is opening and 

CLOSE

 when the tray is closing.

4

RHSL key

Use this key when recording to set and adjust the 
start point of a recording session or the start of a 
track on the recorded disc. See 4.5, “Rehearsal” for 
details.

5

FADER key

Use this key to start fade-in recordings or to start a 
fade-out when recording (see 4.3.5, “Fade-in and 
fade-out” for details).

6

INPUT SELECT

Repeated presses of this key cycle through the differ-
ent audio inputs and the input combinations. See 4.1, 
“Input selection” for full details.

7

WORD indicator

This indicator shows that an external word clock 
source has been selected (using a menu function) 
when using the unit with other digital audio units in a 
setup (see 2.4.1, “Word sync connections” for 
details).

8

Display

The display is used to show the current status of the 
unit, as well as the current menu settings. See 2.2, 
“Rear panel” for details.

9

MENU key

Repeated presses of this key cycle through the differ-
ent menu items used to set parameters.

A

DISPLAY key

Repeated presses of this key cycle through the differ-
ent time display modes. These modes differ, accord-
ing to whether the unit is playing back or recording a 
disc.

B

MULTI DIAL control

Use this control to select tracks for playback, to set 
parameter values, etc. 

Typically, turning the control clockwise will increase 
a value, and turning it counterclockwise will 
decrease the value. There is no “end-stop” to the con-
trol—it may be turned continuously in either 
direction.

In addition, when setting menu values, pushing the 
control acts like an “enter” key, i.e. the currently-dis-
played value or setting is confirmed and the display 
returns to the time display.

C

PHONES jack and LEVEL control

Use a standard pair of stereo headphones, equipped 
with a 1/4-inch plug, with this jack.

Adjust the volume from the jack with the control 
(turn clockwise for higher volume).

D

REC LEVEL controls

Use these concentric controls to adjust the level of 
the analog audio signals received at the 

ANALOG IN


jacks 

M

. Typically, turning one of these controls will 

cause the other to turn, but they can be turned inde-
pendently of each other.

Use the lower (outer) control to adjust the left signal, 
and the upper (inner) control to adjust the right 
signal.

Turning the controls clockwise past the “

5

” position 

will boost the signals relative to their input level, and 
turning them counterclockwise to a position below 

5

” will cut the signals relative to their original input 

level.

E

FINALIZE key

Use this key to finalize recordable discs. See 1.2, 
“Finalizing” and 5.1, “Finalizing” for details.

F

ERASE key

Use this key (with CD-RW discs only) to erase 
tracks, or a whole disc, or to refresh a “bad” disc, or 
to unfinalize a finalized disc. See 5.2, “Erasing” for 
details.

G

STOP key

Use this key to stop playback or recording.

Summary of Contents for CD-RW2000

Page 1: ...the literature accompanying the appliance The lightning flash with arrowhead symbol within an equilateral triangle is intended to alert the user to the presence of uninsulated dangerous voltage within...

Page 2: ...hould be used and be sure to re fit the fuse cover IF IN DOUBT CONSULT A COMPETENT ELECTRICIAN TO THE USER This equipment has been tested and found to comply with the limits for a Class A digital devi...

Page 3: ...ng structure grounding of the lead in wire to an antenna discharge unit size of grounding conductors location of antenna discharge unit con nection to grounding electrodes and requirements for the gro...

Page 4: ...classified as a class 1 laser product There is no hazardous invisi ble laser radiation during operation because invisible laser radiation emitted inside of this product is completely confined in the p...

Page 5: ...mote control unit 13 1 OPEN CLOSE key 13 2 Number keys 0 through 10 and 10 13 3 CLEAR key 13 4 REPEAT key 13 5 DISPLAY key 13 6 MENU key 13 7 ENTER key 13 8 FADER key 13 9 MONITOR key 13 A PLAY MODE k...

Page 6: ...rks to which you own the copy right or where you have obtained permission from the copyright holder or the rightful licensor Unless you own the copyright or have obtained the appropri ate permission f...

Page 7: ...diagram in this manual and the corresponding explanation 5 When referring to a remote control key the follow ing typeface is used to show the number of the key as given in the diagram in this manual...

Page 8: ...press down on the center of the case and lift the disc out hold ing it carefully by the edges Finger marks and dust should be carefully wiped off the disc s recorded surface with a soft cloth Unlike c...

Page 9: ...to date list of manufacturers who produce media suitable for use in the CD RW2000 can be obtained from your TASCAM dealer or found on the TASCAM Web site at http www tascam com 1 4 6 Default settings...

Page 10: ...10 TASCAM CD RW2000 2 Features of the CD RW2000 3 4 5 6 7 8 A 9 B 2 1 C D E F G H I J K L 4 J I G E 5 8 9 D 2 B 1 3 6 7 L H F C A K O P Q R S TU V W X Y Z MN...

Page 11: ...eated presses of this key cycle through the differ ent time display modes These modes differ accord ing to whether the unit is playing back or recording a disc B MULTI DIAL control Use this control to...

Page 12: ...left balanced analog output Use a small Phillips screwdriver with this attenuator if you need to reduce the output signal level from the left balanced analog output As set at the factory a it is set...

Page 13: ...e tracks or a whole disc or to refresh a bad disc or to unfinalize a finalized disc See 5 2 Erasing for details equivalent to F D RECORD key Use this key to enter record ready mode equivalent to J E S...

Page 14: ...lternate the message Word CLK Err word clock error with the time display If the CD RW2000 is receiving a word clock sync signal and is also acting as the word clock source for any units which receive...

Page 15: ...e and total remaining time refer to the programmed mate rial not the whole disc 3 1 2 Track search Use the MULTI DIAL control B or the SKIP keys on the remote control unit H to jump forward or back wa...

Page 16: ...number the total time of the program so far and the step number e g 2Tr14 56 03 4 The next program step can then be entered NOTE Steps 3 and 4 above can be carried out from the main unit by turning an...

Page 17: ...s selected for playback in pause mode cued playback will start not at the first posi tion of the track as indicated by the subcode but at the first position of the track where the audio level exceeds...

Page 18: ...ect mode is turned off the menu reappears the settings previously made here will take effect and the input volume may suddenly change 4 1 2 Input monitoring When the unit is in record ready or record...

Page 19: ...eptionally quiet An analog signal input at nominal level with no cut or boost from the volume controls is equivalent to a reading of 16 dB on the meters on other words 0 is equivalent to 16 dBFS 4 Pre...

Page 20: ...f 99 tracks and the number of tracks currently recorded Every time a track division is made the number shown at the right of the display goes down by one When the number shown is 1 and a track divisio...

Page 21: ...recording Also when a digitally connected DAT is used as the source and the tape is wound fast forward or backward to cue the source tape to the start of the desired track you should remember that ST...

Page 22: ...c start and a manual end or vice versa When the source material is being played back before synchronized recording is enabled the condi tions under which synchronized recording will start after synchr...

Page 23: ...ing or digital sources other than MD CD or DAT and the sound level has dropped below the threshold for more than two seconds and sound has re started To enable or disable automatic track division 1 Wi...

Page 24: ...sappears Once the digital direct mode is turned off the level settings pre viously made will take effect and the input volume may suddenly change 4 3 4 Rec mute function The rec mute function allows i...

Page 25: ...ich prevents any digi tal copies being made from the recorded disc 1 Press the MENU key 9 or 6 repeatedly until the display shows COPY ID XXXX where XXXX is the current setting for copy protection as...

Page 26: ...in 3 Press the RHSL key 4 so that the display shows Waiting Sync 4 Start playing the source When the start of the track is detected as explained in 4 3 1 Syn chronized recording the display changes t...

Page 27: ...mpled data loops in a four second loop The display shows Inc 0 0X where X is the current second of the loop 8 Stop the source 9 Turn the MULTI DIAL control B to adjust the point of the loop The displa...

Page 28: ...CD players 5 1 1 Unfinalizing CD RW discs If a CD RW disc has been finalized it is possible to erase the Table of Contents in the following way 1 With the finalized disc loaded and the unit in stop m...

Page 29: ...e disc press the MULTI DIAL control or press the ENTER key 7 NOTE This operation cannot be undone If you are going to erase a disc make sure that it contains only record ings that you really want to e...

Page 30: ...sc is bad If it is a CD RW disc you may refresh it 5 2 3 Refreshing a disc otherwise replace the disc Erase Error An error has occurred while trying to erase the disc The display suddenly shows PMA Wr...

Page 31: ...EC60958 TYPE II Digital outputs AES EBU XLR type AES3 1992 COAXIAL RCA pin IEC60958 TYPE II OPTICAL TOSLINK IEC60958 TYPE II Voltage requirements USA Canada 120 VAC 60 Hz U K Europe 230 VAC 50 Hz Aust...

Page 32: ...dow The Croxley Centre Watford Herts WD1 8YA U K TEAC DEUTSCHLAND GmbH Phone 0611 71580 Bahnstrasse 12 65205 Wiesbaden Erbenheim Germany TEAC FRANCE S A Phone 01 42 37 01 02 17 Rue Alexis de Tocquevil...

Reviews: