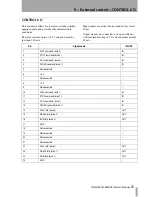
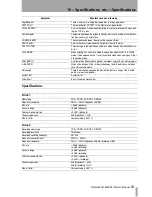
background image

40

 TASCAM CD-RW402 

Owner’s Manual

6 – After recording

This section deals with the actions taken after record-
ing: finalizing for CD-R and CD-RW discs, and erase 
operations for CD-RW discs. 

NOTE

This section refers to drive 2 only. Finalizing and erase 
operations are only possible on drive 2 of the CD-
RW402.

Once finalized, CD-R discs are truly final—no more 
can be recorded on them. By contrast, CD-RW discs 
can be “unfinalized” using the CD-RW402, i.e. their 
TOC can be deleted, and if there is space, further 
material can be recorded on them. Even if the disc is 
full, tracks can be erased following the unfinalize 
process, and new material can be recorded.

Finalizing

As has been explained earlier (“Finalizing” on 
page 10), in order for a disc to become a standard 
CD, it must have a Table of Contents (TOC) written 
to it. This process is known as finalizing. 

An unfinalized disc can always be distinguished on 
the CD-RW402 by the 

NO TOC

 indicator under the 

disc type on the display being lit when the disc is 
inserted.

To finalize a disc:

1

With the unfinalized (recordable) disc 
loaded, and the unit in stop mode, press the 

FINALIZE

 key.

The display shows 

FINALIZE OK?

.

2

To start the finalizing process, push the 

MULTI DIAL 

or 

REC

 key.

If you do not want to proceed with the final-
izing process, press any other key (such as 
the 

STOP

 key).

If finalization has been chosen, the display 
changes. The 

NO TOC

 indicator goes out, and 

the word 

TOC

 and the 

REC

 indicator flash in 

the display. The unit starts counting down 
from a time shown on the display.

After finalization, a 

CD-RW NO TOC

 changes to 

CD-RW

 and a 

CD-R NO TOC

 changes to a 

CD

.

NOTE

Although CD-R discs finalized on the CD-RW402 may be 
replayed on ordinary CD players, remember that final-
ized CD-RW discs may not play on CD players (but they 
may be played on drive 1 of the CD-RW402).

Unfinalizing CD-RW discs

If a CD-RW disc has been finalized, it is possible to 
erase the Table of Contents in the following way:

1

With the finalized disc loaded and the unit in 
stop mode, press the 

ERASE

 key.

2

If the display does not show the word 

UNFINALIZE?

, turn the 

MULTI DIAL

 until it is 

displayed.

3

To start the unfinalizing process, push the 

MULTI DIAL 

or 

REC

 key.

If you do not want to proceed with the unfi-
nalizing process, press any other key (such as 
the 

STOP

 key).

If unfinalization has been chosen, the 

NO TOC


indicator starts flashing in the display, and 
the word 

ERASE

 also starts flashing. The unit 

starts counting down from a time shown on 
the display.

After unfinalization, a 

CD-RW

 indicator 

changes to a 

CD-RW NO TOC

 indicator.

Erasing

Unfinalizing (described above) is a special case of 
erasing a disc. It is also possible to erase a track or 
tracks, starting with the last-recorded track, a whole 
disc, or to “refresh” a disc.

NOTE

Erase procedures are possible only on a CD-RW disc. 
Even if a CD-RW disc has been finalized, selecting an 

erase procedure will automatically unfinalize it prior to 
erasure. The disc may then have to be re-finalized. Any 
CD TEXT information (see “CD TEXT” on page 42) is 
therefore lost.

Remember that it is not possible to perform any erase 
procedures on a CD-R disc.

Summary of Contents for CD-RW402

Page 1: ...he literature accompanying the appliance The lightning flash with arrowhead symbol within an equilateral triangle is intended to alert the user to the presence of uninsulated dangerous voltage within...

Page 2: ...type should be used and be sure to re fit the fuse cover IF IN DOUBT CONSULT A COMPETENT ELECTRICIAN TO THE USER This equipment has been tested and found to comply with the limits for a Class A digit...

Page 3: ...supporting structure grounding of the lead in wire to an antenna discharge unit size of grounding conductors location of antenna discharge unit con nection to grounding electrodes and requirements for...

Page 4: ...ter J based on the Radiation Control for Health and Safety Act of 1968 and is classified as a class 1 laser product There is no hazardous invisi ble laser radiation during operation because invisible...

Page 5: ...ching inside tracks 23 Using the main unit 23 Using the remote control unit 23 Using the jog function 23 Changing the preview portion length 23 Playback modes 23 Using the remote control 23 Using the...

Page 6: ...characters using an external keyboard 43 Entering titles 43 Entering artists 43 8 Copying discs Types of copying 44 Some notes on copying 44 Disc copying and DAO 45 Disc copying 45 Program copy 46 DA...

Page 7: ...s designed to help you record and repro duce sound works to which you own the copyright or where you have obtained permission from the copy right holder or the rightful licensor Unless you own the cop...

Page 8: ...NOTE If the mounting surface is more than 5 degrees away from the horizontal the tray will not open or close The voltage supplied to the unit should match the voltage as printed on the rear panel If y...

Page 9: ...discs can only be played on one side To remove a disc from its storage case press down on the center of the case and lift the disc out hold ing it carefully by the edges Finger marks and dust should b...

Page 10: ...id as these will damage the disc If you are in any doubt as to the care and handling of a CD R disc read the precautions supplied with the disc or contact the disc manufacturer directly Never use a st...

Page 11: ...ad map to guide you around the front and rear panels of the CD RW402 as well as the remote control unit 4 Playback operations Using the CD RW402 as an ordinary CD player is straightforward but there a...

Page 12: ...no questions pushing the MULTI DIAL is equivalent to yes and pressing STOP is equivalent to no Inside a menu that is when a menu item is being displayed pressing MENU moves up a level and shows the me...

Page 13: ...digital signals MIN_L 72 66 60 54 48 42 36 30 24 dB 54dB COPY ID SCMS copy protection PROH 1GEN FREE 1GEN FADE IN TIME Time for recording fade ins 1s 24s 3s FADE OUT TIME Time for recording fade outs...

Page 14: ...for recording 1 Press the appropriate MENU key 2 Turn the MULTI DIAL until SYSTEM MENU appears in the display Push the MULTI DIAL 3 Turn the MULTI DIAL until PEAK HOLD appears in the display Push the...

Page 15: ...keyboard may be used the Japanese keyboard has a different layout and extra keys to cope with the complexities of the Japa nese language 1 Press MENU key 2 2 Turn the MULTI DIAL until SYSTEM MENU app...

Page 16: ...to the B memory point The indicator lights When the MEMO IN indi cator is not lit and the LOC B indicator is lit pressing this key will move the playback position to the set point 9 CALL key 1 This ke...

Page 17: ...disc for drive 2 X Drive 2 display Shows track and playback information etc for drive 1 as well as the menu parameters and settings Y INPUT control This control adjusts the level of an analog signal...

Page 18: ...connections These connections all han dle analog audio I O o UNBALANCED INPUT 2 These unbal anced RCA connectors allow the input of 10 dBV nominal level signals to drive 2 red right p UNBALANCED OUTP...

Page 19: ...1 functions The following keys all affect the operation of drive 1 only 4 DISPLAY key This key changes the time dis play type for drive 1 equivalent to the DISPLAY 1 key on the main unit A 5 P MODE ke...

Page 20: ...through the different repeat modes all single or off These functions can also be set using menu functions on the main unit L FADER key Equivalent to the FADER key on the main unit S M ERASE key Equiv...

Page 21: ...r example indicators 1 through 13 will light If there are more than 20 tracks on a disc the track number OVER indi cator at the bottom of the display will light If the disc contains CD TEXT informatio...

Page 22: ...n to the cue point from stop ready or play mode 1 Simply press the CALL key The playback position is returned to the cue point and the drive enters ready mode Press PLAY to start playback from this po...

Page 23: ...s backwards or forwards depending on the direction in which the dial is turned or on the skip key pressed The preview portion of the track immediately before the new playback position is repeated Turn...

Page 24: ...no program steps have yet had tracks assigned to them 3 Set the switch on the remote control to let the number keys control either drive 1 or drive 2 4 Use the number keys on the remote control to en...

Page 25: ...with another disc allowing continuous playback of varied pro gram material The order of tracks to be played back may be programmed on the idle drive and on drive 1 the TOC may be edited etc Use the t...

Page 26: ...place If repeat is active see Repeat playback on page 24 the unit will enter play ready mode at the start of the next track REPEAT ALL or the start of the track which is being repeated REPEAT 1 To se...

Page 27: ...display shows EOM TIME Push the MULTI DIAL 3 Turn the MULTI DIAL so that the display shows EOM TIME xs where x is a value between 0 and 99 The 0 value indicates that no tally signal is sent 4 Push th...

Page 28: ...erase the current track Dividing tracks This splits the current track into two at the current playback position remember that a track cannot be less than four seconds in length and there cannot be mo...

Page 29: ...the MULTI DIAL to set the end point of the current track at the playback position point Clearing the virtual TOC If you want to restore the original TOC and clear all the edits you can always eject th...

Page 30: ...controls Digital signal levels from whatever the source as well as the level of analog signals once they have passed through the INPUT and BALANCE controls are adjusted in the following way 1 Press t...

Page 31: ...selection on page 30 is not connected prop erly or is not powered up the message D IN UNLOCK digital input is unlocked is dis played to show that the system is not ready to record 3 Adjust the level o...

Page 32: ...sound level and manual settings To make manual track divisions while recording is taking place press the RECORD key The current track number is incremented by one For details of automatic track divis...

Page 33: ...below The CD RW402 provides two separate trigger levels one for analog inputs and one for digital 1 Press the MENU key 2 and turn the MULTI DIAL to display REC MENU 1 2 Press the MULTI DIAL 3 Turn th...

Page 34: ...the general condition of which starting synchronized recording from a stopped or paused source is a special case Alternatively when recording digitally from sources MD CD and DAT which output track d...

Page 35: ...u re wondering how the CD RW402 can start before it receives a signal it s not magic just clever use of buffer memory 1 Press the MENU key 2 and turn the MULTI DIAL to display REC MENU 2 2 Press the M...

Page 36: ...c track division For instance if you have recorded two albums on one DAT tape and you wish to make two separate CDs from this tape you can use the MULTI DIAL to set the number of tracks to the number...

Page 37: ...The time during which recording is muted before the drive enters record ready after the REC MUTE key has been pressed is set in the following way 1 Press the MENU key 2 and turn the MULTI DIAL to dis...

Page 38: ...de from the discs produced on the CD RW402 There are three settings FREE may be freely copied where no copy protec tion is applied to the recorded disc 1GEN single generation copying where one digital...

Page 39: ...used as a lead in track The default length is 1 second but it can be set in 1 sec ond increments from 0 seconds to 4 seconds 1 Press the MENU key 2 and turn the MULTI DIAL to display REC MENU 2 2 Pres...

Page 40: ...lay The unit starts counting down from a time shown on the display After finalization a CD RW NO TOC changes to CD RW and a CD R NO TOC changes to a CD NOTE Although CD R discs finalized on the CD RW4...

Page 41: ...s on a disc follow the procedure below 1 With the disc loaded and the unit in stop mode press the ERASE key 2 Turn the MULTI DIAL until the display shows ERASE DISC If you do not want to proceed with...

Page 42: ...and turn the MULTI DIAL until the display shows CD TEXT Push the MULTI DIAL 2 Turn the MULTI DIAL until the display shows Text STORE Push the MULTI DIAL 3 The display shows STORE OK Push the MULTI DI...

Page 43: ...E EDIT and push the MULTI DIAL If a keyboard is connected Shift F11 also allows title editing 3 Now the display shows T_EDIT xxxx where xxxx can be DISC or a track number 1Tr through 99Tr Turn the MUL...

Page 44: ...le for use to halt the copy operation Note that this stop operation above cannot be car ried out during DAO copying Index markers except for index 00 and 01 Index markers above 01 are collapsed into m...

Page 45: ...ntinue or STOP to cancel Drive 1 shows Wait and Drive 2 shows Copy Standby and Drive 1 starts reading the source disc from track 1 When the unit is ready to start copying a few seconds the drive 1 dis...

Page 46: ...a blank disc in drive 2 DAO copying is the only option available for CD ROMs and the whole of CD EXTRA discs music tracks of CD EXTRA discs may be copied using the copy operations described above In t...

Page 47: ...play shows COPY START 6 Press the MULTI DIAL 2 Copying takes place standby and copy as for other copy operations The displays return to normal when the copy operation is complete NOTE The error messag...

Page 48: ...the join is satisfactory press the MULTI DIAL otherwise press STOP and reset the A and B points If you do not want to rehearse choose NO and press the MULTI DIAL 7 Select the copy speed x4 x2 or x1 a...

Page 49: ...ard controls for drive 1 are The keyboard controls for drive 2 are Key Control F1 STOP F2 PLAY F3 READY F5 Track skip back F6 Track skip forward Shift Esc MENU key Shift Enter Push MULTI DIALa a In me...

Page 50: ...ntrol PC keyboard 50 TASCAM CD RW402 Owner s Manual Keyboard template You may find it useful to make a copy of this page cut out the templates below and attach them to the keyboard you use to control...

Page 51: ...m voltage 15 V and maximum current 50 mA Pin Signal name IN OUT 1 PLAY command drive 2 IN 2 STOP command drive 2 IN 3 CALL command drive 2 IN 4 FADER command drive 2 IN 5 Not connected 6 5 V 7 Not con...

Page 52: ...erly or the amplifier s input source selector is not at the correct posi tion No meter indication when a source is input Analog and or digital volume Signal volume on page 30 is set too low The signal...

Page 53: ...Y An attempt has been made to perform a program copy with an empty program A B ERROR When attempting an A B or A B excluded copy the A B points have not been set or B is set ahead of A Not enough Ther...

Page 54: ...3 cold Nominal output level 4 dBu FS 16 dB Maximum output level 20 dBu Output impedance 75 UNBALANCED LINE INPUTS 2 Unbalanced RCA Nominal input level 10 dBV 6dBV 16 dB Maximum input level 6dBV Input...

Page 55: ...tion 100 V 120 V 34 W 220 V 240 V 39 W Applicable electromagnetic environment E4 Peak inrush current 6 1 A Pro CE Dimensions 483 x 138 x 301 mm 19 x 5 4 x 11 6 in Weight 8 kg 17 6 lb Operating tempera...

Page 56: ...Park Watford Hertfordshire WD1 8TE U K TEAC DEUTSCHLAND GmbH Phone 0611 71580 Bahnstrasse 12 65205 Wiesbaden Erbenheim Germany TEAC FRANCE S A Phone 01 42 37 01 02 17 Rue Alexis de Tocqueville CE 005...

Reviews: