background image

English

1. Before you start

6

TASCAM  CD-X1500  DUAL CD PLAYER

1.1 Environmental conditions

The TASCAM CD-X1500 may be used in most
areas, but to maintain top performance, and
prolong operating life, observe the following
environmental conditions:
The nominal temperature should be between 5°C
and 35°C (41°F and 95°F).
Relative humidity should be 30 to 90 degrees non-
condensing.
Make sure that the drive unit is mounted in a level
position for correct operation.
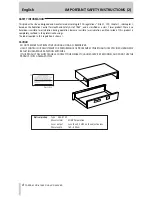
The units should be mounted, using the supplied
rack mounting kits. A typical configuration is
shown below, but other configurations are
possible:

If the disc trays are more than 5 degrees
away from the horizontal, they will not
open or close.

Do not install this apparatus in a  con-
fined space such as a book case or simi-
lar unit.

1.2 Beware of condensation

If the player (or a compact disc) is moved from a
cold to a warm place, or used after a sudden
temperature change, there is a danger of
condensation; vapor in the air could condense on
the internal mechanism, making correct operation
impossible. To prevent this, or if this occurs, leave
the player for one or two hours with the power
turned on, then turn the power off and on again.

NOTE

1.3 Handling of discs

The unit has been designed specifically for
reproduction of discs bearing the 

mark. No

other discs can be reproduced.

Observe the following:

• Always place the compact discs in the trays with

their label facing upward (compact discs can
only be played on one side).

• To remove a disc from its storage case, press

down on the center of the case, and lift the disc
out, holding it carefully by the edges.

• Finger marks and dust should be carefully wiped

off the disc's recorded surface with a soft cloth.
Unlike conventional records, the compact disc
has no grooves to collect dust and microscopic
debris, so gently wiping with a soft cloth should
remove most particles.

• Wipe in a straight motion from the inside to the

outside of the disc. Small dust particles and light
stains will have absolutely no effect on reproduc-
tion quality.

• Never use such chemicals as record sprays, anti-

static sprays or fluid, benzine or thinner to clean
compact discs. Such chemicals will do irrepara-
ble damage to the disc's plastic surface.

• Discs should be returned to their cases after use

to avoid serious scratches that could cause the
laser pickup to "skip".

• Don't expose discs to direct sunlight or high

humidity and temperature for extended periods.
Long exposure to high temperature can warp the
disc.

• Only use circular compact discs. Avoid using

non-circular promotional, etc. discs.

• To keep the laser pickups clean, don't touch

them. For the same reason, don't leave the disc
trays open unnecessarily.

Summary of Contents for CD-X1500

Page 1: ...CD X1500 DUAL CD PLAYER OWNER S MANUAL MANUAL DEL USUARIO D00783300A...

Page 2: ...re fit the fuse cover IF IN DOUBT CONSULT A COMPETENT ELECTRICIAN TO THE USER This equipment has been tested and found to comply with the limits for a Class A digital device pursuant to Part 15 of the...

Page 3: ...cularly at plugs convenience receptacles and the point where they exit from the apparatus 11 Only use attachments accessories specified by the manufacturer 12 Use only with the cart stand tripod brack...

Page 4: ...is completely confined in the protective housings The label required in this regulation is shown 1 CAUTION DO NOT REMOVE THE PROTECTIVE HOUSING USING A SCREWDRIVER USE OF CONTROLS OR ADJUSTMENTS OR P...

Page 5: ...ash Start 12 3 4 A B Looping 13 To store the LOOP points 13 Disengage the loop 13 Re looping 13 Erasing the LOOP points 13 Changing the LOOP end point B point 13 3 5 Adjusting the tempo 14 Tempo range...

Page 6: ...d specifically for reproduction of discs bearing the mark No other discs can be reproduced Observe the following Always place the compact discs in the trays with their label facing upward compact disc...

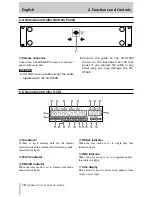
Page 7: ...6 DIGITAL OUTPUT COAXIAL S PDIF Coaxial connectors provide digital output signals These connectors can output the 44 1KHz digital signals constantly even if pitch control is activated 7 FADER START j...

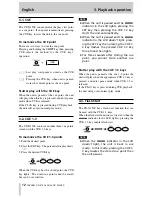
Page 8: ...pressing the P MODE key enters program edit mode NOTE e TIME ENT SHIFT key Selects the time display mode either elapsed remain or total remain ELAPSED Elapsed time will show in the numerical portion i...

Page 9: ...cue points with CUE 1 3 page 12 Memorizes the track memory data page 16 Adds the current selected song to the program list page 18 a CUE 1 3 keys Depending on the setting these keys locate to cue poin...

Page 10: ...age the CD X1500 2 4 Remote Controller Bottom Panel 2 5 Remote Controller LCD x M indicator If there is track memory data for the current selected track in the current selected memory bank this indica...

Page 11: ...s when relay play is set to on LOOP indicator Lights when loop play is engaged S indicator Lights when loop mode is set to single loop ALL indicator Lights when loop mode is set to all loop Time Addre...

Page 12: ...en the CUE key has the stored point the CUE key lights The stored cue point cannot be erased but can be overwritten When the unit is paused and the indicator in the LCD lights pressing the SET key the...

Page 13: ...At this time the indicator in the LCD lights Disengage loop play When loop play is engaged pressing the LOOP key disengages loop play In this case the unit continues playback and LOOP light goes off b...

Page 14: ...lly 3 6 Pitch Bending When playing back a disc pressing the BEND or key or using the Jog wheel can change playback tempo momentary Pressing the key or moving the Jog wheel clockwise increases the play...

Page 15: ...is off scratching cannot be performed Once it lights again scratching can be performed When SEARCH function is on the Jog wheel works as the search dial When filter effect is turned on scratch functio...

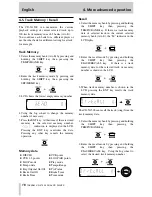
Page 16: ...y cancels the memory operation Memory data DISC ID CUE point CUE 1 3 points LOOP A B points LOOP mode Play mode Tempo data Tempo Range Key Original On Off TAP value Brake On Off Brake Time Brake Time...

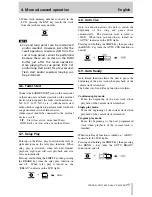
Page 17: ...relay play is activated when left unit finishes playback right unit will start playback and vice versa automatically Pressing and holding the SHIFT key then pressing the BRAKE key turns the relay play...

Page 18: ...eter display Select desired track with the track skip keys 3 Go to next program number by pressing the ENT key or using the Jog wheel 4 Repeat 2 3 5 Exit the program edit mode by pressing and holding...

Page 19: ...g the SHIFT key then pressing the P MODE PGM key 2 Program number is shown in the parameter display Select desired program number that you want to delete the program with the Jog wheel 3 Press FLASH D...

Page 20: ...oop mode Single track loop mode In this mode indicator in the LCD lights All loop mode In this mode indicator in the LCD lights TIMER start Turns the power on play on or off DIRECT When direct mode is...

Page 21: ...detected within five seconds try with another disc or remove and clean the existing disc before replacing it Err 03 Focus error after repeating the attempt eight times to focus an error still occurs t...

Page 22: ...entrada y en el punto en que estos cables salen del aparato 11 Utilice solo los accesorios elementos especificados por el fabricante 12 Utilice esta unidad solo con un soporte carro tr pode o bastido...

Page 23: ...le A B 31 Para almacenar los puntos de bucle o LOOP 31 Desactivaci n del bucle 31 Re bucle 31 Borrado de los puntos LOOP 31 Cambio del punto de final de bucle punto B 31 3 5 Ajuste del tempo 32 Rango...

Page 24: ...de discos que lleven la marca No es posible reproducir otros discos Tenga en cuenta lo siguiente Coloque siempre los discos en las bandejas con su etiqueta hacia arriba los discos compactos s lo se p...

Page 25: ...on nivel de l nea 6 DIGITAL OUTPUT COAXIAL S PDIF Conectores coaxiales que le ofrecen se ales de sa lida digitales Estos conectores pueden dar salida a las se ales digitales a 44 1KHz de forma continu...

Page 26: ...ENTER SHIFT mientras pulsa P MODE acceder al modo de edici n de programa e Tecla TIME ENT SHIFT Elige el modo de visualizaci n del tiempo entre las opciones elapsed remain o total remain NOTA ELAPSED...

Page 27: ...clas CUE 1 3 Dependiendo del ajuste estas teclas colocan la unidad en los puntos de escucha o cue realizan un inicio flash desde esos puntos por defecto o una reproducci n tartamuda desde los puntos c...

Page 28: ...da arse 2 4 Mando a distancia Panel inferior 2 5 Mando a distancia LCD x Indicador M Si en el banco de memoria elegido hay datos de una memoria de pista para la pista activa este indicador se ilumina...

Page 29: ...ara indicarle que la reproducci n con bucle est activada Indicador S Se ilumina cuando el modo de bucle est ajustado a bucle nico Indicador ALL Se ilumina cuando el modo de bucle est ajustado a bucle...

Page 30: ...mina El punto de escucha almacenado no puede ser borrado pero s puede grabar otros datos encima de los anteriores Cuando la unidad est en pausa y en la LCD se ilumine el indicador al pulsar la tecla S...

Page 31: ...le Cuando tenga el modo de bucle activado la pulsaci n de la tecla LOOP har que este tipo de reproducci n se desactive En este caso la unidad continuar con la reproducci n normal y la tecla LOOP se ap...

Page 32: ...ajustar manualmente el BPM 3 6 Inflexi n tonal Durante la reproducci n de un disco la pulsaci n de la tecla BEND o el uso de la rueda Jog le permiten cambiar de forma moment nea el tempo de reproducc...

Page 33: ...a tecla volver a iluminarse podr usar la funci n Cuando la funci n de b squeda SEARCH est activada la rueda Jog actuar como un dial de b squeda Cuando el efecto de filtro est activado la funci n de sc...

Page 34: ...Pulse cualquier otra tecla para cancelar la operaci n de grabaci n Datos memorizados DISC ID Punto CUE Puntos CUE 1 3 Puntos LOOP A B Modo LOOP Modo de reproducci n Datos de tempo Rango de tempo Clave...

Page 35: ...sta funci n Si la reproducci n consecutiva est activada cuando la unidad de la izquierda termine su reproducci n la derecha arrancar de forma autom tica y viceversa Para activar o desactivar la funci...

Page 36: ...clas de salto de pistas 3 Vaya al siguiente n mero de programa pulsando la tecla ENT o usando la rueda Jog 4 Repita los pasos 2 3 tantas veces como sea necesario 5 Salga del modo de edici n de program...

Page 37: ...anteniendo pulsada la tecla SHIFT y pulsando a la vez la tecla P MODE PGM 2 En la pantalla de par metro aparecer el n mero del programa Elija el n mero de programa que quiera eliminar con la rueda Jog...

Page 38: ...B Modo de bucle de una nica pista En este modo en la LCD se ilumina el indicador Modo de bucle completo En este modo en la LCD se ilumina el indicador Inicio por temporizador Activa o desactiva la rep...

Page 39: ...con otro disco o expulse ese y l mpielo antes de volver a colocarlo Err 03 Error de foco despu s de que la unidad haya tratado de enfocar el disco ocho veces se sigue produciendo un error pruebe con o...

Page 40: ...xico DF TEAC UK LIMITED Phone 44 1923 438880 www tascam co uk 5 Marlin House Croxley Business Park Watford Hertfordshire WD1 8TE U K TEAC DEUTSCHLAND GmbH Phone 49 611 71580 www tascam de Bahnstrasse...

Reviews: