background image

Español

4. Otras funciones avanzadas

40

TASCAM  CD-X1700  REPRODUCTOR DE CD DUAL

Borrado del muestreo grabado

El pulsar simultáneamente las teclas IN/

ß

y OUT

hará que se borre el muestreo grabado. En ese
momento, las teclas IN/

ß

y OUT se apagarán.

Bucle de muestreo

Mantenga pulsada la tecla SAMPLE y pulse la
tecla OUT

para activar o desactivar la

reproducción en bucle del muestreo. Cuando esta
reproducción en bucle del sampler esté activada, el
piloto LOOP se encenderá.

Inversión del sampler

Mantenga pulsada la tecla SAMPLE y pulse la
tecla IN/

ß

para activar o desactivar la

reproducción al revés del muestreo. Cuando esta
función de reproducción inversa esté activada, el
piloto REV se encenderá.

Control de tono del sampler

Mantenga pulsada la tecla SAMPLE y use la rueda
Jog para cambiar el tono de la reproducción del
muestreo.
El rango del control de tono es de +/-32% en pasos
de 0.1%.

Nivel de salida del sampler

Mantenga pulsada la tecla IN y use la rueda Jog
para ajustar el nivel de salida del sampler. Puede
ajustar este nivel de salida desde 0 (anulación) a
100 (nivel por defecto).

Carga de los datos de sampler

Si los puntos de muestreo están memorizados en la
memoria de pista de la pista activa, al pulsar la
tecla OUT durante más de 1,5 segundos, el sampler
comenzará a reproducir de forma automática.

4-7. Memoria de pista / carga

El CD-X1700 puede memorizar los distintos
ajustes de reproducción de la pista elegida en ese
momento en hasta 100 memorias de pista
distribuidas en 5 bancos (A a E). 
Por ejemplo, puede usar cada uno de los bancos
para un músico distinto o usar otro banco para una
configuración distinta de una pista.

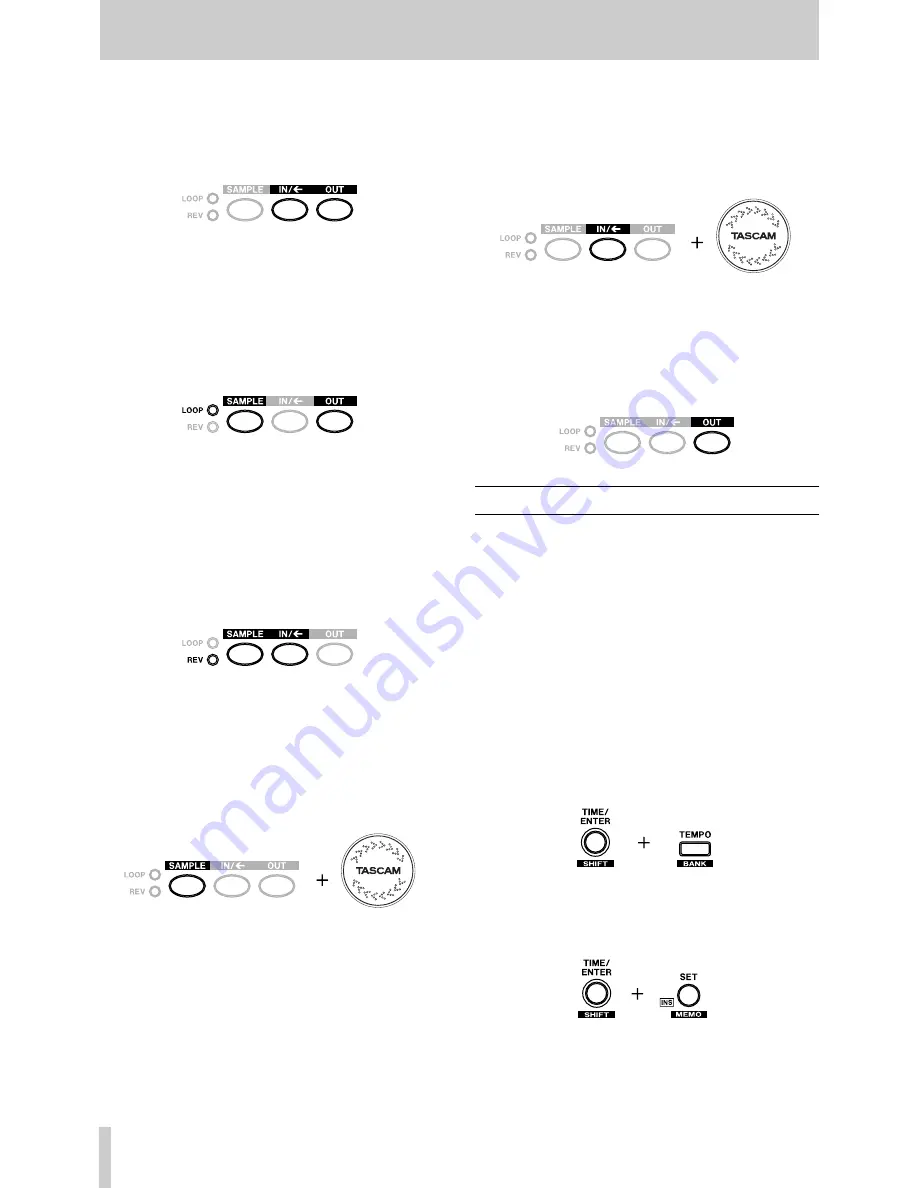
Memoria de pista

1. Elija el banco de memoria (A a E) manteniendo

pulsada la tecla SHIFT y pulsando la tecla
TEMPO/BANK.

2. Elija el banco de memoria (A a E) manteniendo

pulsada la tecla SHIFT y pulsando la tecla
TEMPO/BANK.

Summary of Contents for CD-X1700

Page 1: ...CD X1700 DUAL CD PLAYER OWNER S MANUAL MANUAL DEL USUARIO D00785400A...

Page 2: ...re fit the fuse cover IF IN DOUBT CONSULT A COMPETENT ELECTRICIAN TO THE USER This equipment has been tested and found to comply with the limits for a Class A digital device pursuant to Part 15 of the...

Page 3: ...cularly at plugs convenience receptacles and the point where they exit from the apparatus 11 Only use attachments accessories specified by the manufacturer 12 Use only with the cart stand tripod brack...

Page 4: ...is completely confined in the protective housings The label required in this regulation is shown 1 CAUTION DO NOT REMOVE THE PROTECTIVE HOUSING USING A SCREWDRIVER USE OF CONTROLS OR ADJUSTMENTS OR P...

Page 5: ...TEMPO slider 14 Auto BPM and TAP key 14 3 6 Pitch bending 14 3 7 Key origina 14 4 More advanced operation 15 4 1 Key control 15 4 2 Scratching 15 4 3 Brake 15 Set the brake time 15 4 4 Effect 15 Effe...

Page 6: ...d specifically for reproduction of discs bearing the mark No other discs can be reproduced Observe the following Always place the compact discs in the trays with their label facing upward compact disc...

Page 7: ...DIGITAL OUTPUT COAXIAL S PDIF Coaxial connectors provide digital output signals These connectors can output the 44 1KHz digital signals constantly even if pitch control is activated 7 FADER START jac...

Page 8: ...but no additional indicator will light NOTE REMAIN REMAIN indicator in the LCD will light TOTAL REMAIN The track number display area shows the number of tracks of inserted disc however for 5 seconds i...

Page 9: ...The following functions can be controlled by the Jog wheel Search Pitch Bend Scratch Brake time Key control Preset menu Effect parameters Sampler tempo level Program edit Track memory number select d...

Page 10: ...ve recorded the sample these keys will light Start and stop sample playback using these keys page 17 Pressing and holding the IN key then using the Jog wheel controls the sampler output level c LOOP a...

Page 11: ...s the current selected memory bank indicator A CUE indicator Lights when AUTO CUE function is turned on A RDY indicator Lights when AUTO READY function is activated RELAY indicator Lights when relay p...

Page 12: ...en the CUE key has the stored point the CUE key lights The stored cue point cannot be erased but can be overwritten When the unit is paused and the indicator in the LCD lights pressing the SET key the...

Page 13: ...this case the unit continues playback and LOOP light goes off but the loop points are not erased When loop play is engaged locating to the out point of a loop section disengages loop play i e pressing...

Page 14: ...eter When there is no tapped BPM or you erase the tapped BPM auto counted BPM will used for effect parameter instead NOTE 3 6 Pitch Bending When playing back a disc pressing the BEND or key or using t...

Page 15: ...ckward direction of the scratching can be performed up to 7 seconds When SEARCH function is on the Jog wheel works as the search dial When filter effect is activated with manual mode scratch function...

Page 16: ...the effect level NOTE NOTE The effect level parameter is shown in the parameter display FLANGER Pressing the FLANGE key activates the Flanger effect Effect time 10msec 16sec default 500msec Effect bea...

Page 17: ...or pausing SAMPLE key will go off and both IN and OUT keys will light NOTE NOTE If eight seconds elapse or if the end of the track is reached without pressing the OUT key the end point of the sample...

Page 18: ...pling data If the sampling points are memorized in the current track memory pressing the OUT key more than 1 5 seconds starts sampling automatically 4 7 Track Memory Recall The CD X1700 can memorize t...

Page 19: ...mber is shown in the LCD 3 When track memory number is shown in the LCD pressing the ENTER key recalls the track memory data The CD X1700 can recall the track song from the track memory data NOTE 1 Se...

Page 20: ...y is turned on the RELAY indicator in the LCD lights 4 10 Auto Cue Auto cue function allows the unit to search the beginning of the song and pause there automatically The detection level is fixed to 5...

Page 21: ...MODE PGM key 2 Program number is shown in the parameter display Select the desired track with the track skip keys 3 Go to next program number by pressing the ENTER key or using the Jog wheel 4 Repeat...

Page 22: ...lect desired track with track skip keys 5 Repeat 2 4 6 Exit the program edit mode by pressing and holding the SHIFT key then pressing the PLAY MODE PGM key Delete program 1 Enter the program edit mode...

Page 23: ...play Backward direction of the scratching can be performed up to 7 seconds Playing the MP3 file 1 Insert the CD ROM which including the MP3 files 2 Pressing the SKIP key selects the MP3 file 3 Press t...

Page 24: ...in the LCD lights TIMER start Turns the power on play on or off DIRECT When direct mode is set to on disc can be ejected when disc is played and when insert the disc playback is started automatically...

Page 25: ...detected within five seconds try with another disc or remove and clean the existing disc before replacing it Err 03 Focus error after repeating the attempt eight times to focus an error still occurs t...

Page 26: ...entrada y en el punto en que estos cables salen del aparato 11 Utilice solo los accesorios elementos especificados por el fabricante 12 Utilice esta unidad solo con un soporte carro tr pode o bastido...

Page 27: ...TAP 36 3 6 Inflexi n tonal 36 3 7 Clave original 36 4 Otras funciones avanzadas 37 4 1 Control de clave 37 4 2 Scratching 37 4 3 Frenado 37 Ajuste del tiempo de frenado 37 4 4 Efectos 37 Ajuste del t...

Page 28: ...de discos que lleven la marca No es posible reproducir otros discos Tenga en cuenta lo siguiente Coloque siempre los discos en las bandejas con su etiqueta hacia arriba los discos compactos s lo se p...

Page 29: ...grupo para el disco 1 y otro para el 2 6 DIGITAL OUTPUT COAXIAL S PDIF Conectores coaxiales que le ofrecen se ales de salida digitales Estos conectores pueden dar salida a las se ales digitales a 44...

Page 30: ...o entre las opciones elapsed remain o total remain ELAPSED En la parte num rica de la pantalla podr ver el tiempo transcurrido pero no se iluminar ning n indicador adicional REMAIN En la LCD se ilumin...

Page 31: ...sa Con esta tecla puede realizar una reproducci n tartamuda p gina 34 Elige el modo de funcionamiento de la tecla CUE p gina 34 a Tecla PLAY PAUSE Cambia el modo de reproducci n entre la reproducci n...

Page 32: ...nte la grabaci n de estos Mantenga pulsada esta tecla y pulse la tecla IN para activar el modo de reproducci n de muestreos al rev s o mantenga pulsada esta tecla y pulse OUT para activar el modo de r...

Page 33: ...tivada Q Indicador LOOP Se ilumina para indicarle que la reproducci n con bucle est activada W Indicador S Se ilumina cuando el modo de bucle est ajustado a bucle nico E Indicador ALL Se ilumina cuand...

Page 34: ...umina El punto de escucha almacenado no puede ser borrado pero s puede grabar otros datos encima de los anteriores Cuando la unidad est en pausa y en la LCD se ilumine el indicador al pulsar la tecla...

Page 35: ...le Cuando tenga el modo de bucle activado la pulsaci n de la tecla LOOP har que este tipo de reproducci n se desactive En este caso la unidad continuar con la reproducci n normal y la tecla LOOP se ap...

Page 36: ...s 1 5 segundos podr ajustar manualmente el BPM El valor BPM tambi n se usa para el tiempo de efecto o el par metro de ritmo o beat P15 Cuando ajuste el BPM usando la tecla TAP el valor BPM marca do se...

Page 37: ...ratch hacia atr s durante un m ximo periodo de 7 segundos Cuando la funci n de b squeda SEARCH est activada la rueda Jog actuar como un dial de b squeda NOTA NOTA Cuando el modo de filtro est activado...

Page 38: ...aparecer el par metro de nivel de efecto NOTA NOTA Flanger El pulsar la tecla FLANGE activar el efecto flanger Tiempo de efecto 10 mseg 16 seg valor por defecto 500 mseg Ritmo de efecto 32 16 8 4 2 1...

Page 39: ...teclas SAMPLE y OUT comenzar n a parpadear NOTA NOTA 2 Pulse la tecla OUT con la unidad en pausa o reproducci n SAMPLE se apagar y tanto la tecla IN como OUT se quedar n iluminadas fijas Transcurridos...

Page 40: ...o El rango del control de tono es de 32 en pasos de 0 1 Nivel de salida del sampler Mantenga pulsada la tecla IN y use la rueda Jog para ajustar el nivel de salida del sampler Puede ajustar este nivel...

Page 41: ...l banco de memoria manteniendo pulsada la tecla SHIFT y pulsando la tecla TEMPO BANK Si en el banco de memoria elegido en ese momento A a E hay datos de una memoria de pista de la pista activa aparece...

Page 42: ...quierda termine su reproducci n la derecha arrancar de forma autom tica y viceversa Para activar o desactivar la funci n de reproducci n consecutiva mantenga pulsada la tecla SHIFT y pulse la tecla BR...

Page 43: ...recer el n mero del programa Elija la pista que quiera con las teclas de salto de pistas 3 Vaya al siguiente n mero de programa pulsando la tecla ENTER o usando la rueda Jog 4 Repita los pasos 2 3 tan...

Page 44: ...lto de pista 5 Repita los pasos 2 4 tantas veces como le sea necesario 6 Salga del modo de edici n de programa manteniendo pulsada la tecla SHIFT y pulsando la tecla PLAY MODE PGM Borrado de programa...

Page 45: ...iempre y cuando siga el siguiente formato Formato de disco ISO9660 nivel 1 N mero de directorios hasta 254 N mero de archivos hasta 255 Formato de ficheros MPEG 1 audio layer 3 Frecuencia de bits 32 a...

Page 46: ...se ilumina el indicador Inicio por temporizador Activa o desactiva la reproducci n en cuanto se encienda la unidad DIRECT Cuando el modo direct est activado podr expulsar el disco con la reproducci n...

Page 47: ...o expulse ese y l mpielo antes de volver a colocarlo Err 03 Error de foco despu s de que la unidad haya tratado de enfocar el disco ocho veces se sigue produciendo un error pruebe con otro disco o exp...

Page 48: ...810 Mexico DF TEAC UK LIMITED Phone 44 1923 438880 www tascam co uk 5 Marlin House Croxley Business Park Watford Hertfordshire WD1 8TE U K TEAC DEUTSCHLAND GmbH Phone 49 611 71580 www tascam de Bahnst...

Reviews: