background image

Specifications

60 

TASCAM DP-01 Owner’s Manual

Advanc

ed techn

iques

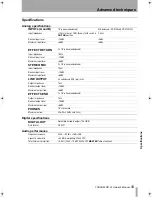
Physical characteristics

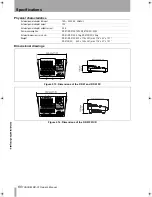
Dimensional drawings

External power adapter AC input

100 — 240V AC, 50/60Hz

External power adapter output

12V

External power adapter output current

2.5A

Power consumption

DP-01/DP-01FX: 15W, DP-01FX/CD: 25W

External dimensions (w x h x d)

DP-01/DP-01FX: 4.1kg, DP-01FX/CD: 5.2kg

Weight

DP-01/DP-01FX: 452 x 110 x 307 (mm) 17.8" x 4.3" x 12.1"
DP-01FX/CD:

452 x 130 x 307 (mm) 17.8" x 5.1" x 12.1"

Figure 2.13: Dimensions of the DP-01 and DP-01FX

Figure 2.14: Dimensions of the DP-01FX/CD

DP-01_OM_E.book  60 ページ  2005年6月13日 月曜日 午後7時14分

Summary of Contents for D00871320A

Page 1: ...DP 01 DP 01FX DP 01FX CD D00871320A OWNER S MANUAL...

Page 2: ...operate this equipment Declaration of Conformity Model Number DP 01FX CD Trade Name TASCAM Responsible party TEAC AMERIA INC Address 7733 Telegraph Road Montebelllo California U S A Telephone number...

Page 3: ...s specified by the manufacturer 12 Use only with the cart stand tripod bracket or table specified by the manufacturer or sold with the apparatus When a cart is used use caution when moving the cart ap...

Page 4: ...onfined in the protective housings The label required in this regulation is shown 1 CAUTION DO NOT REMOVE THE PROTECTIVE HOUSING USING A SCREWDRIVER USE OF CONTROLS OR ADJUSTMENTS OR PERFORMANCE OF PR...

Page 5: ...many songs at one time 22 Song information 22 Additional song operations 22 Assigning inputs Recording More advanced features 25 Using marks to locate positions 25 Punch recording 25 Bouncing 25 Trac...

Page 6: ...unctions 51 COPY PASTE 51 COPY INSERT 51 MOVE PASTE 52 MOVE INSERT 52 OPEN 53 CUT 53 SILENCE 53 CLONE TRACK 54 CLEAN OUT 54 Undoing operations 54 Troubleshooting Messages 57 Specifications Analog spec...

Page 7: ...CDs 71 Making an audio CD 72 Writing by Disk At Once 72 Writing by Track at Once 74 Finalizing CDs 75 Erasing Audio CDs 75 Data CD Menu Importing and exporting tracks 76 Importing from a CD 76 Exporti...

Page 8: ...rding tracks 24 Figure 2 1 The DP 01 meters 30 Figure 2 2 Bouncing tracks 34 Figure 2 3 Disconnecting the DP 01 44 Figure 2 4 Copy and paste 51 Figure 2 5 Copy and insert 51 Figure 2 6 Move and paste...

Page 9: ...you an idea of the basic operations of the DP 01 and will get you started with recording Fur ther features are described in Advanced techniques on page 28 We give hints and tips on using the DP 01 wh...

Page 10: ...els Any exceptions are noted Chapter 3 of this manual DP 01FX Appendix on page 62 deals with the features of the DP 01FX and the DP 01FX CD Chapter 4 of this manual DP 01FX CD Appendix on page 69 deal...

Page 11: ...tarting up the DP 01 With the DP 01 s rear panel power switch OFF connect the power adaptor to the DP 01 the power cable to the power adaptor and the power cable to the power supply Switch on the DP 0...

Page 12: ...turn it off or disconnect the power when the ACCESS indicator is lit to avoid damage to the hard disk and possi ble loss of data This red indicator shows that the hard disk or the CD RW drive is in u...

Page 13: ...he cursor key The SONG LOAD screen is displayed 6 Move the cursor to DP01DEMO and press the ENTER key When the demo is finished being loaded the display returns to the SONG MENU screen 7 Press the EXI...

Page 14: ...ted At the bottom right of all menu screens is a symbol showing whether there are more menus below the current list above the current list or above and below the current list To go up a level in the m...

Page 15: ...you press and hold it while pressing another key the other key takes on the function shown in the label shown below the key white on blue for the DP 01FX and white on green for the DP 01 and DP 01FX...

Page 16: ...me Before you start recording with the DP 01 you will need to make a few connections to other equipment Figure 1 4 shows how you can connect your DP 01 to your existing audio setup Figure 1 4 Connecti...

Page 17: ...ntrols to adjust the level so that the OL indicators light up only during the very loudest passages Guitars and basses passive types are connected to the front panel input A using a standard 1 4 mono...

Page 18: ...n you re ready to make your final stereo master you can use these jacks to connect to an analog recorder A typical setup would connect these jacks to the AUX IN of a stereo sys tem Tracking means reco...

Page 19: ...DP 01 You can connect a digital recorder CD MD using the digital connec tion while using the LINE OUTPUT jacks for monitoring Digital output Use a standard optical digital cable to connect this rear...

Page 20: ...title a song by pressing the SHIFTed MENU key to edit the title of the currently loaded song 3 Enter a title as described in Titling on page 15 4 Press ENTER to create the song The current song is sto...

Page 21: ...tion and press the key 3 Use the jog wheel to move the cursor to the song to be loaded and press ENTER If the symbol appears next to the song then that song is currently loaded The current song is sav...

Page 22: ...e 40 Press ENTER when you have selected all the songs to be erased You are asked if you are sure Press ENTER again to erase them or EXIT to exit the process without erasing them You can erase all the...

Page 23: ...ASSIGN keys A or B to turn the inputs on or off as shown by the indicator You may want to turn off unused inputs to reduce noise While holding down the ASSIGN key press the REC key of the track to whi...

Page 24: ...of the recorded when playing back recorded tracks Use the track fader s and the red MASTER fader to adjust the level of what you hear The pan controls position the track in the stereo image you hear i...

Page 25: ...recording punch out If you have a footswitch connected to the PUNCH jack you can press the footswitch to change between playback and recording as long as at least one track is armed for recording You...

Page 26: ...overall level and watch the L and R meters at the right of the display to make sure that the mix is not too loud if it s too loud it will distort and sound bad Use the EQ HIGH and EQ LOW tone control...

Page 27: ...recording stops Note that while the MASTER key is lit steadily you cannot use the mixer controls except for the MASTER fader 3 Press the MASTER key so that it is lit steadily Now when you press PLAY...

Page 28: ...ds wrap round so going from 59 seconds to 0 seconds adds 1 to the minutes etc As you turn the jog wheel the display blinks If you leave the jog wheel untouched for a few seconds or if you press ENTER...

Page 29: ...mark and press the cursor key to select it 1 10 frame is 1 300 of a second about 3 3 milliseconds 3 Use the wheel to move the mark backwards and forwards by 1 10 frame the rightmost digit of the numb...

Page 30: ...itar amp distortion and you need to avoid it Input meters These meters A and B show the level of the signal com ing into the DP 01 Adjust the level with the front panel controls or the instrument volu...

Page 31: ...this option 2 Use the arrow keys to scroll to EQ FRQ 3 Press the cursor key 4 Use the cursor keys and wheel to set these parameters Source This is the track affected by this setting from Track1 throug...

Page 32: ...rsal key so that it lights 5 Press the PLAY key Playback starts from before the IN point the PLAY indicator is lit If the IN and OUT points are not where they should be for your punch recording operat...

Page 33: ...e roll point The AUTO PUNCH indicator is turned off the track arming status stays the same If you want to re record the punch turn AUTO PUNCH back on before recording again Pre roll and post roll time...

Page 34: ...necessary 1 Un arm safe the existing tracks so that you don t accidentally record over them 2 Press the BOUNCE key above the MASTER fader so that it lights 3 Arm the two tracks which you are mixing t...

Page 35: ...ashes before playback starts again and the PLAY indicator lights steadily Turn off the repeat function by pressing REPEAT so that the indicator goes out Repeat auto punch rehearsal but not repeat auto...

Page 36: ...bpm and can be set from 20 to 250 Most rock and pop music is in 4 4 with a few famous exceptions Some country and folk songs as well as waltzes are in 3 4 The time signature can be set with the numbe...

Page 37: ...unction allows you to listen to the metronome on the DP 01 while the MIDI metronome function generates a metronome output on the MIDI interface 1 Press MENU use the DATA dial to select the MIDI menu a...

Page 38: ...OFF is selected at Output The metronome function is disabled and no items other than Output are displayed Working with MIDI The DP 01 is equipped with a MIDI OUT jack This can be used to drive a seque...

Page 39: ...t Typically you will use the timecode function with devices such as recorders and Digital Audio Workstations DAWs that work to a time base rather than a bars and beats base 1 Press MENU and scroll dow...

Page 40: ...puter Selecting the active partition Choose the active partition from which you can load existing songs and on which you can create new songs etc 1 Press MENU and select the DISK menu 2 Select the PAR...

Page 41: ...izes of the partitions are shown not the available space 3 Select the partition to be re formatted shown by the cursor and press ENTER A popup message reminds you that all data on the partition will b...

Page 42: ...artitions you will see the avail able free space figure change so you will always know if there is enough space for the song 4 Press ENTER when you ve selected the target partition You are asked if yo...

Page 43: ...be erased either 1 From the SONG menu select the PROTECT action 2 Use the wheel to change protection from OFF to ON and press ENTER In lists of songs for copying deletion etc a key icon appears besid...

Page 44: ...es export only as stereo WAV files to the WAVE directory of the FAT partition of the DP 01 System requirements Data transfer between the DP 01 and a PC takes place at USB 2 0 speeds maximum If your co...

Page 45: ...that it can be read by the PC While the system is open you can not perform any recording playback etc or any operations involv ing the DP 01 hard disk 1 Connect the DP 01 to the PC 2 Press MENU and se...

Page 46: ...on the PC you can close the DP 01 The song archive on the PC can then be backed up to CD R etc You can restore it later to the same DP 01 or to a friend s DP 01 allowing you to complete the recording...

Page 47: ...he key The display shows the song archive files on the FAT partition Although shorter file names are shown with spaces on the DP 01 display the actual file names on disk do not contain these spaces 6...

Page 48: ...artition the destination of the exported tracks and the space which the exported tracks will occupy 5 Press ENTER to export the selected tracks The tracks are exported with the names you entered a WAV...

Page 49: ...you 2 Select the EXPORT MSTR action and press the key The display shows a default file name for you to edit Press EXIT if you want to cancel the export operation 3 Use the left and right cursor keys a...

Page 50: ...computer you will probably find most of the DP 01 s editing operations pretty simple If you have never used a computer the DP 01 s editing operations are nothing to be scared of just read through this...

Page 51: ...on what you have selected for the source track If you have selected a single track you can select tracks 1 through 8 here If you have selected a pair of tracks for instance 1 2 you can only select tr...

Page 52: ...ed at the desti nation The track is therefore the same length as it was before the operation You can change the following values Src Trk This sets the source track or tracks from which the section is...

Page 53: ...inal There is only one value that you can change Src Trk Select an individual track 1 through 8 a pair of tracks 1 2 3 4 5 6 7 8 all of the tracks 1 8 or all tracks ALL Press YES to perform the operat...

Page 54: ...synchro nized to the DP 01 Working with MIDI on page 38 Although you can not mix the inputs of the STEREO MIX to the mixed master track you can add a drum machine say for instance to the mix in the fo...

Page 55: ...after the highlighted operation in the list was performed Note that the actions above the undo point do not disappear and that an arrow symbol appears to the right of the undo point In order to redo a...

Page 56: ...distorted Is the input level control on the front of the DP 01 set appropriately for the input source If you re recording an acoustic instrument are you sure you re not send ing it through an electri...

Page 57: ...n and mastering on page 26 In Punch Mode You tried to perform an action that cannot be done while in Punch mode Punching on page 32 In Repeat Mode You tried to perform an action that cannot be done wh...

Page 58: ...Song Protected The song is protected Protecting a song on page 43 and you are trying to change it record or edit etc Unprotect the song Too Many Songs You have 250 songs on one partition You must dele...

Page 59: ...um input level 6dBV STEREO MIX 2 x 1 4 phone unbalanced Input impedance 10k Nominal input level 10dBV Maximum input level 6dBV LINE OUTPUT 2 x unbalanced RCA pin jacks Output impedance 1k Nominal outp...

Page 60: ...r adapter output 12V External power adapter output current 2 5A Power consumption DP 01 DP 01FX 15W DP 01FX CD 25W External dimensions w x h x d DP 01 DP 01FX 4 1kg DP 01FX CD 5 2kg Weight DP 01 DP 01...

Page 61: ...E MUTE INPUT A L INPUT A R INPUT B R INPUT B L STEREO L STEREO R NONE NONE MTR Input Assign Record Source Select REC REC REC On On On Off Off Off Reverb Guitar Tuner Multi Effect Tuner Reverb Algorith...

Page 62: ...ver connect or disconnect micro phones to or from the XLR connec tors with the phantom power turned on Never turn the phantom power on when unbalanced dynamic micro phones are plugged into the XLR con...

Page 63: ...nes or the noise from guitar amplifiers etc may be too loud The DP 01FX allows you to gate this noise and only open the gate when the input signal goes over a certain level This only takes effect when...

Page 64: ...icator is lit showing that the multi effect is not in use on either input Selecting the effect type Press the MULTI key alone to bring up the multi effect selection and editing screen Press and hold t...

Page 65: ...aditional metal sound twin lead 80sRock1 80 s metal with a cutting edge 80sRock2 Deeper echo and a high cut with distortion 90sRock Bright distortion and reverb good for solo use FstChor Good with sin...

Page 66: ...rb UK Stack Maybe the most famous stack in the world Jimi Box There was only one Jimi and his distorted sound was something like this MBoogie Famous combo sounds HeartBrk Tube stack at low gain GentWe...

Page 67: ...ck etc Distortion adds depth to the sound Peculiar A warm bass sound RockBass Distorted pick bass setting with emphasized treble De Esser Removes sibilance ess sounds Chorist Choir sound using detunin...

Page 68: ...RETURN control affect the amount of signal sent to the inter nal reverb from the tracks and returned from the internal reverb unit to the stereo mix When the reverb is turned off the mixer EFFECT SEN...

Page 69: ...compact discs Observe the following Always place the compact discs in the trays with their label facing upward compact discs can only be played on one side To remove a disc from its storage case press...

Page 70: ...ard format Made on a CD player other than this CD R CD RW player Non finalized N 8cm CDDA standard format Commercially available CD B Format other than CDDA standard Commercially available CD protecte...

Page 71: ...into the CD tray and close the tray using the instructions above 2 Press the MENU key and select the AUDIO CD menu 3 Select CD PLAYER from the AUDIO CD menu 4 The CD PLAYER display is explained below...

Page 72: ...01FX CD are written all at once DAO finalized the disc when it s finished see Finalizing CDs on page 75 making the CD compatible with other CD players immediately after writing by DAO has ended With...

Page 73: ...s the ENTER key The arrow to the side of the song name changes to an up down arrow You can now change the order of the song using the DATA dial When you have changed the song order press EXIT key The...

Page 74: ...the MENU key to display the AUDIO CD menu 2 Select MASTER WRITE from the AUDIO CD menu 3 A list of songs including the master track is displayed Move the arrow using the and keys to select a song to...

Page 75: ...FINALIZE from the AUDIO CD menu 3 Press the ENTER key The following confirmation message is dis played Press the ENTER key to finalize the CD Erasing Audio CDs To erase a CD RW disc so that you can re...

Page 76: ...t these files to tracks of the currently loaded song 1 Insert a CD containing WAV format files into the CD tray and close the tray 2 Press the MENU key to display the DATA CD menu Only 16 bit 44 1 kHz...

Page 77: ...TA dial or pressing the and keys and press the INSERT key A tick mark is displayed to the left of the track to indicate that track is selected To deselect a track select the track using the DATA dial...

Page 78: ...well as any editing etc Reverse the process a CD to FAT partition to DP 01 disk when you want to restore a song Backing up songs to a CD Back up your songs to a data CD so that you can restore them la...

Page 79: ...ert a blank CD If you insert a written CD RW instead of a blank CD The following message is displayed If you press the ENTER key the CD RW will be erased and the backup continues If you do not want to...

Page 80: ...two or more CDs a message prompting you to insert the second backup CD will be displayed After the restore from the first CD ends insert the second CD Erasing data CDs To erase a CD RW so that it can...

Page 81: ...ERASE execution processes CD Write Error Press EXIT An error occurred in the FINALIZE BACKUP RESTORE and ERASE execution pro cesses Erase Error Press EXIT An error occurred in the ERASE execution pro...

Page 82: ...he CD tray CD IMPORT Insert Import CD Insert a CD written with import data The CD tray was opened in the CD IMPORT menu Insert a CD written with import data and close the CD tray CD RESTORE InsertBack...

Page 83: ...has been inserted Insert the import CD An audio CD blank CD or other invalid CD has been inserted in the CD IMPORT menu Insert a CD written with import data Invalid CD Insert Opened CD An invalid CD h...

Page 84: ...xceeded the capacity of the inserted CD when writing to CD is started in the MASTER WRITE menu Press EXIT to exit the menu and specify the track to write to again No Room On HD Press EXIT Not enough r...

Page 85: ...eter shape MENU PREFERENCE Meter See Using the meters on page 30 Connect the DP 01 to a PC MENU DISK USB OPN CLS See Using the USB connection on page 44 Copy a song MENU SONG COPY See Copying songs on...

Page 86: ...song on page 43 Read a WAV file into a track MENU WAVE IMPORT TRACK See Importing a track on page 47 Redo one operation Press SHIFT UNDO briefly See Undoing operations on page 54 Redo several operati...

Page 87: ...a guitar on page 62 Un protect a song MENU SONG PROTECT See Protecting a song on page 43 Undo one operation Press UNDO briefly See Undoing operations on page 54 Undo several operations at once Press...

Page 88: ...8 Canada TEAC MEXICO S A De C V Phone 52 555 581 5500 www tascam com Campesinos No 184 Colonia Granjes Esmeralda Delegaacion Iztapalapa CP 09810 Mexico DF TEAC UK LIMITED Phone 44 1923 438880 www tasc...

Reviews: