background image

 TASCAM DP-03  

45

3  Press the HOME button to move to a different time 

division and turn the DATA wheel to change the 

value.

4  After setting the desired time value, press the PLAY 

(

Á

) button to start playback from that position.

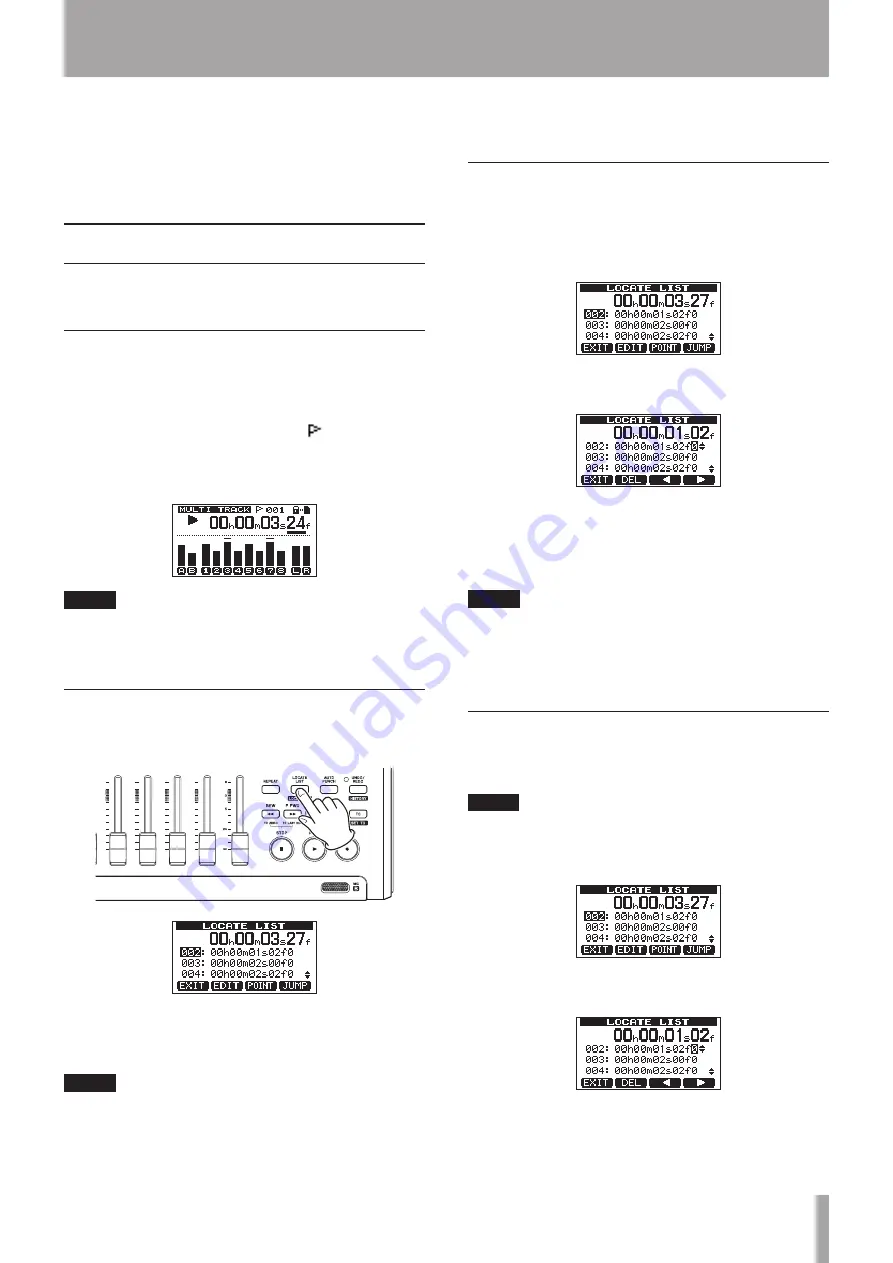
Location marks

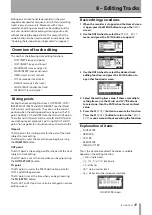
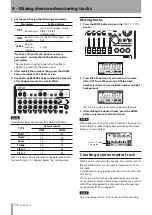
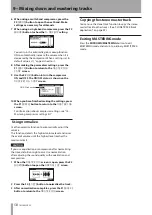
The unit can store up to 999 location marks per song! Use 

these to mark the start of verses, vocal entry points, etc. 

To set a location mark

While stopped, recording or playing, press and hold the 

LOCATE LIST [LOCATE SET] button at the point where 

you want the new mark.
The mark number is shown next to the   icon on the 

Home Screen. The mark number you see is the one at or 

immediately before the current position. In the example 

below, 

001

 indicates thefirst mark in the selected song.

NOTE

Marks are numbered in the order you enter them, not 

according to their position in the song. Mark 005 can 

therefore appear in a song before mark 001.

To move to a location mark

Press the LOCATE LIST [LOCATE SET] to show the 

location mark list:

Use the DATA wheel to choose a mark (they’re listed in 

the order they appear in the song) and press F4 (

JUMP

) 

to jump to that mark.

NOTE

Press the 


F1 (

EXIT

)LOCATE LIST [LOCATE SET] or 

HOME button to return to the Home Screen.
If the current song does not have any location marks, 


the location mark list will not open. A 

No Locate 

Mark

 pop-up appears briefly and then the 

I/O 

SETTING

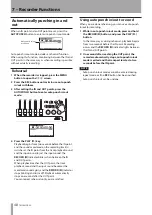
 screen opens.

To delete a location mark

You can erase a location mark when the recorder is 

stopped.
1  Press the LOCATE LIST [LOCATE SET] button to 

show the location mark list.

2  Use the DATA wheel to select a mark and press the 

F2 (

EDIT

) to bring up the edit screen.

3  Press the F2 (

DEL

) button to erase that mark and 

return to the 

LOCATE LIST

 screen. 

4  Press the F1 (

EXIT

), LOCATE LIST [LOCATE SET] or 

HOME button to return to the Home Screen.

NOTE

The marks are shown in the order they appear in the 


song, not by number.
This operation cannot be undone. Be certain before 


executing it.

To edit a location mark

If you made a mistake when you entered a location mark, 

you can change the time of the mark.

TIP

This is sometimes called “trimming”.
1   Press the LOCATE LIST [LOCATE SET] button to 

show the location mark list.

2  Use the DATA wheel to select a mark and press the 

F2 (

EDIT

) to bring up the edit screen.

7 – Recorder Functions

Summary of Contents for Digital Portastudio DP-03

Page 1: ...D01131020B DP 03 Digital Portastudio OWNER S MANUAL...

Page 2: ...at plugs convenience receptacles and the point where they exit from the apparatus 11 Only use attachments accessories specified by the manufacturer 12 Use only with the cart stand tripod bracket or ta...

Page 3: ...ul interference to radio or television reception which can be determined by turning the equipment off and on the user is encouraged to try to correct the interference by one or more of the following m...

Page 4: ...een operations 30 4 Preparations 31 Preparing the power and the SD card 31 Installing an SD card 31 Ejecting the card 31 Preparing the power 31 Startup shutdown 32 Starting up the unit 32 Shutting dow...

Page 5: ...End stereo master track checking 56 Mastering the stereo master track 56 Mastering procedures 56 Using mastering EQ equalizer 57 Using mastering compression 57 Using normalize 58 Copying the stereo m...

Page 6: ...ers list 78 15 Troubleshooting 79 16 Messages 80 General messages 80 CD mode messages 82 CD related error messages 83 17 Specifications 84 Ratings 84 Audio input output ratings 84 Control input output...

Page 7: ...band equalizers can be used on each input and playback track Mixing down to a dedicated master track possible Included mastering effects can be used on mixdowns of master tracks Reverb effect can be...

Page 8: ...pyright holder or the rightful licensor Unless you own the copyright or have obtained the appropriate permission from the copyright holder or the rightful licensor your unauthorized recording reproduc...

Page 9: ...using non circular promotional etc discs Copy protected discs and other discs which do not conform to the CD standard may not play back correctly in this player If you use such discs in this unit TEA...

Page 10: ...other than the TASCAM PS 1225L AC adaptor included because it is designed for the power requirements of this unit Use of a different adaptor could cause malfunction fire or electric shock There is a...

Page 11: ...s the HOME button to open the Home Screen 2 When the Home Screen is open press the MENU button to open the MENUscreen 3 Use the DATA wheel to select the SONGmenu item and press the F4 button to open t...

Page 12: ...th an electric guitar to track 1 and a lead guitar part to track 2 Then we will use the built in microphone to record vocals to track 3 Finally we will mix down the tracks to stereo In this section we...

Page 13: ...built in microphone on the right side of the front panel MIC B as the input source for INPUT B Set the guitar as the recording source for TRACK 1 By default the recording source for tracks 1 3 5 and...

Page 14: ...by the level meters for INPUT A and TRACK 1 on the display When you raise the TRACK 1 fader the MASTER fader and the PHONES LEVEL knob you can hear the sound of the guitar through the headphones and...

Page 15: ...we record the lead guitar on TRACK 2 Follow these procedures to change the recording source 1 Press the ASSIGN button to open the INPUT ASSIGNscreen On this page you can set the recording source for e...

Page 16: ...e RECORD button and press the PLAY button to start recording Perform the lead guitar part The RECORD button lights red and the TRACK 2 REC indicator stops blinking and stays lit 8 When you are done pe...

Page 17: ...edback could occur 6 Return to the beginning of the song and start playback of the recorded rhythm guitar and lead guitar parts Sing along with the recordings You can hear the playback of the recorded...

Page 18: ...RING button to open the MIXDOWNscreen Mixdown mode is enabled and the Home Screen reopens MIXDOWNappears in the upper left 6 Press and hold the RECORD button and press the PLAY button to start recordi...

Page 19: ...ghtly 1 In mastering mode press the F1 EQ button to open the MASTERING EQscreen 2 Turn the EQ HIGH knob to the left to lower the Hi GAINknob shown on the screen Set the value to 2 0dBto reduce the hig...

Page 20: ...2 This will record over the master and create a new stereo master track with equalization and compression applied Creating an audio CD with the master track You can use a stereo master track that you...

Page 21: ...to open the WRITE SONG LISTscreen On this screen you can change the order that the stereo master tracks will be written to the CD and set the gaps between them For details about changing song order a...

Page 22: ...rocedures which includes recording various information about the operations that have been conducted until now the power turns OFF standby Always use the procedures above to turn the power off properl...

Page 23: ...ore turning phantom power ON or OFF Depending on the mic a loud noise could occur damaging equipment and harming people s hearing Do not connect or disconnect a mic when phantom power is ON Turn this...

Page 24: ...s are referred to in order from the left as F1 F2 F3 and F4 in this manual t REVERB knobs TRACK 1 TRACK 8 Use to adjust the level volume sent to the reverb effect of the track s playback signal or the...

Page 25: ...on Press to turn the auto punch mode ON and OFF When auto punch mode is active appears on the screen See Automatically punching in and out on page 48 n UNDO REDO HISTORY button indicator Press this bu...

Page 26: ...same time INPUT B jack balanced TRS standard jack This is an input source when the INPUT B switch on the top panel is set to MIC LINE You can input a line level signal balanced unbalanced or mic sign...

Page 27: ...e SD card into this slot Right side panel T Disc tray Press the F2 button when the CDscreen is shown to open the disc tray to insert or remove a disc Push the disc tray until it clicks shut to close i...

Page 28: ...ptor around this to prevent the plug from becoming disconnected accidentally P GROUND connector Depending on the use environment you might hear noise when monitoring If this occurs use this connector...

Page 29: ...S 1 8 Shows input levels when recording and playback signal levels when playing back When mute is ON the track number is shown in inverse For example means that tracks 3 and 4 are muted When muting is...

Page 30: ...emselves F1 F2 F3 F4 BACKappears above the F1 button so the assignment of the F1 button is BACK when using this screen In this manual we show this as the F1 BACK button Likewise the assignments of the...

Page 31: ...SD and SDHC cards that are at least 512 MB in size can be used A list of SD cards that have been tested with this unit can be found on the TASCAM web site www tascam com Write protected cards SD card...

Page 32: ...Do not disconnect the power cord or otherwise cut the power supply when the power is ON If you do so all recorded data and settings made since the last time the unit was shut down or a song was saved...

Page 33: ...ections Turn the power of this unit and all devices that you will connect with it OFF or put them in standby power mode beforehand Supply power to all the devices from the same line When using a power...

Page 34: ...n to open the PREFERENCE screen 3 Use the F3 and F4 buttons to select the Contrast setting value and use the DATA wheel to adjust the display contrast The setting range is from 1 10 The default value...

Page 35: ...cursor position press the F3 INS button When editing a file name an A is inserted at the blank space Press the F4 DEL button to delete the character at the cursor position When you have finished input...

Page 36: ...ong NOTE The INFORMATIONscreen has three pages including SONG 1 3 CARD 2 3 and F W 3 3 Use the F3 PREV and F4 NEXT buttons to change the page see Viewing information on page 61 Copying songs You can c...

Page 37: ...fter selecting all songs that you want to erase press the F2 EXEC button A confirmation screen opens 7 Press the F3 YES button After the songs are erased the SONGscreen reopens NOTE To cancel erasing...

Page 38: ...the PHANTOM button to open the PHANTOMscreen 2 Press the F4 ON button to turn phantom power ON The indicator above the PHANTOM button lights and the Home Screen reopens To turn phantom power OFF pres...

Page 39: ...indicator Transport status Level meter display contents Unlit Playback Track playback signal Blinks record standby Playback Track playback signal Blinks record standby Stopped Track input signal Lit d...

Page 40: ...t the recording level Use the INPUT A or INPUT B TRIM knob to adjust the input level Watch the A or B level meter on the display and the OL indicator above and to the left of the TRIM knob while setti...

Page 41: ...lows you to return to a specific past operation and undo the operations that occurred after it NOTE The UNDO REDO indicator lights when a single undo or multi undo has been conducted Undoing the last...

Page 42: ...e power was turned OFF STANDBY The operation history is not restored however so past operations cannot be undone or redone NOTE The operation histories of songs that are not loaded are not erased when...

Page 43: ...ng the PLAY button Foot switch TASCAM RC 3F optional NOTE Press the switch pedal that you have set to PUNCHin the foot switch settings By default the center pedal Foot SW C is set to PUNCH See Setting...

Page 44: ...s all the way to L Use the MASTER fader to adjust the overall level 4 After returning to the start of the song press the PLAY button while pressing and holding the RECORD button to start the bounce Co...

Page 45: ...der they appear in the song and press F4 JUMP to jump to that mark NOTE Press the F1 EXIT LOCATE LIST LOCATE SET or HOME button to return to the Home Screen If the current song does not have any locat...

Page 46: ...these buttons during playback to search backward or forward while pressing The search speed is fixed at 10 times normal playback speed Repeat playback Use the repeat playback function to play the same...

Page 47: ...onfirm the value and return to the I O SETTINGscreen 7 Press the F4 JUMP button to locate to the point To return to the home screen without locating to the point press the F1 EXIT or HOME button inste...

Page 48: ...sound The RECORD indicator blinks when between the IN and OUT points When playback reaches the OUT point the track playback sound and the input sound becomes the monitored sound again and the RECORD...

Page 49: ...ck subject to track editing The IN point is set at the time when you begin pressing the IN SET IN button OUT point The OUT point is the ending point for the part of the track subject to track editing...

Page 50: ...as been set as the SOURCE TRK the DESTINATION TRKchoice is 1 8 all tracks In other words this setting cannot be changed in this case COPY TIMES Set the number of times that the copied section will be...

Page 51: ...tween the IN and OUT points on the MOVE source track This operation overwrites recorded data on the MOVE destination track Therefore the length of the MOVE destination track is not changed The followi...

Page 52: ...LENCE TRK 1to 8 1 2 3 4 5 6 7 8 1 8 IN OUT TIP Using this function you can delete short noises for example CLONE track track duplication Use this function to duplicate a single track a track pair or t...

Page 53: ...TING screen 2 Set the track EQ equalizer The track equalizer has the following parameters GAIN FREQ Hi High frequency gain Setting range 12 dB Default value 0 0 dB High frequency value Setting range 1...

Page 54: ...s below that setting value Muting tracks 1 Press the MUTE button to open the TRACK MUTE screen 2 Press the REC button of each track to turn mute ON or OFF for it When mute is ON the track number is sh...

Page 55: ...e appears 2 Press and hold the RECORD button and press the PLAY button to start the mixdown The RECORD button indicator lights Regardless of the recorder s current playback position the mixdown starts...

Page 56: ...STERING mode In mixdown mode press the MIXDOWN MASTERING button After the Mastering pop up message appears the unit switches to MASTERING mode and the Home Screen reopens NOTE When in MULTITRACK mode...

Page 57: ...independent settings allowing adjustment of the overall volume balance By using compression you can reduce unwanted peaks and increase the overall gain in order to raise the volume creating a mastered...

Page 58: ...ssor settings see 14 Mastering compressor settings list Using normalize Use the normalize function to automatically adjust the volume This function detects the highest volume level and raises the over...

Page 59: ...onome sound might also be recorded when you use a microphone to record When the metronome is operating you can adjust the LEVEL but other items on the METRONOMEscreen cannot be changed Moreover during...

Page 60: ...just the standard frequency of A4 The setting range is 435Hz 445Hz The default setting is 440Hz NOTE Use this to set the note output The setting range is C3 B5 The default setting is A4 LEVEL Use this...

Page 61: ...FORMATIONand press the F4 button The INFORMATIONscreen SONG 1 3 page appears The INFORMATIONscreen has three pages including this one 3 Use the F3 PREV and F4 NEXT buttons to change the page The pages...

Page 62: ...ARDmenu screen 3 Turn the DATA wheel to select FORMATand press the F4 button The FORMATscreen opens MTR partition size FAT partition size Total card size The following table shows the FAT and MTR part...

Page 63: ...will be erased so be certain that you will not lose anything important when reformatting 1 When the recorder is stopped press the MENU button to open the MENUscreen 2 Turn the DATA wheel to select CA...

Page 64: ...el to select CARD and press the F4 button to open the CARDmenu screen 3 Turn the DATA wheel to select the SD INITIALIZEitem and press the F4 button A pop up message warning that all data on the card w...

Page 65: ...r When this unit is connected to a computer the computer recognizes it as a removable disk There is no need for a special driver NOTE Data transfer between this unit and a computer occurs at USB 2 0 s...

Page 66: ...ype Command E to eject the DP 03 TIP Depending on the OS version or OS settings you might also be able to eject the DP 03 icon by clicking an eject button next to it in the Finder window or by using a...

Page 67: ...een appears 6 Turn the DATA wheel to select SONG RESTORE and press the F4 button The screen shows the backup files on the FAT partition NOTE An error message appears if there are no files on the FAT p...

Page 68: ...me way as other recording tracks you can edit the track that has received the imported file see 8 Editing tracks on page 49 To import a stereo WAV file an empty track pair is necessary 9 After importi...

Page 69: ...1 When the recorder is stopped press the MENU button to open the MENUscreen 2 Turn the DATA wheel to select IMPORT EXPORT and press the F4 button to open the IMPORT EXPORTmenu 3 Turn the DATA wheel to...

Page 70: ...r a CD has been mounted the CD MOUNTING pop up has appeared return to the CDor CD PLAYER screen to eject the CD Types of CDs that can be used with this unit This unit is compatible with 12 cm and 8 cm...

Page 71: ...not push it in with unnecessary force Pull the tray out completely once reload the disc properly and push the tray closed again If you force the disc in the unit or the disc could be damaged Ejecting...

Page 72: ...ently playing track will continue to play Stop playback once and then start again to play the selected track The search forward and backward functions cannot be used Creating an Audio CD Using the DP...

Page 73: ...der of multiple songs repeat steps 8 and 9 10 After changing the song order press the F1 EXIT button to return to the WRITE SONG LIST screen 11 If you want to change the length of the gaps between son...

Page 74: ...cks to the CD See Finalizing a CD on page 74 6 To finalize the disc use the DATA wheel to set it to ON If you do not want to finalize it use the DATA wheel to set it to OFF The default setting is OFF...

Page 75: ...Use the DATA wheel to select the song that you want to back up and press the F4 NEXT button A screen where you can enter the name of the file that you will write to the CD appears NOTE Only one song c...

Page 76: ...up CD into the tray 6 When restoration is complete the CDscreen will reopen Erasing a CD RW Follow the procedures below to erase a CD RW disc that has already been written to 1 In MULTITRACK mode pres...

Page 77: ...CDDA standard format Made on this CD R CD RW player Non finalized A A CDDA standard format Made on a CD player other than this CD R CD RW player Non finalized N N Format other than CDDA standard Comm...

Page 78: ...ing If using the compressor causes the sound to become distorted lower the gain of each band or adjust the mixdown so that the maximum level does not quite cause the overload indicator to light By doi...

Page 79: ...ot directly be read Noise occurs if I connect a passive guitar or bass directly Connecting another device to the unit s line output LINE OUT jacks might reduce the noise This might be caused by interf...

Page 80: ...ARD FORMAT Mark Full You tried to store more than 999 location marks in a song Location marks on page 45 Delete some location marks and try again Master Track Not Found You have tried to export a ster...

Page 81: ...ack edit again Trk Too Short You are trying to enter mixdown mode but the time between the IN and OUT points is too short Make the time longer more than 4 seconds Using IN OUT and TO points on page 46...

Page 82: ...a blank CD has been inserted when writing to CD by the MASTER WRITE or CD BACKUP menu This is also displayed when a finalized CD has been inserted when writing by Track at Once Insert a blank CD Inval...

Page 83: ...y tracks by CLEAN OUT or import after making a new song Wrong Order Insert Backup CD The CD order is wrong Insert the backup CD You have inserted the backup CD in the wrong order while you are restori...

Page 84: ...mm 1 4 TRS phone jack Tip HOT Ring COLD Sleeve GND Input impedance 10 k or more Standard input level 4 dBu Maximum input level 24 dBu Headroom 20 dB LINE OUT jack Connector RCA pin jack Standard outpu...

Page 85: ...968 lb w o AC adaptor Operating temperature range 5 35 C 41 95 F Backup memory The following settings are backed up even when the unit power is turned off PREFERENCE item Repeat Int Contrast Foot swit...

Page 86: ...86 TASCAM DP 03 Block diagram 17 Specifications...

Page 87: ...35 Create a stereo master track MIXDOWN MASTERING See Creating a stereo master track on page 54 Cut and close up part a track MENU TRACK EDIT CUT See CUT remove part on page 52 Delete a location mark...

Page 88: ...Undoing an operation on page 41 Remove a section of a track and replace it with silence MENU TRACK EDIT SILENCE See SILENCE part erase on page 52 Remove the USB connection Disconnect the unit from a...

Page 89: ...TASCAM DP 03 89 Notes...

Page 90: ...90 TASCAM DP 03 Notes...

Page 91: ...TASCAM DP 03 91 Notes...

Page 92: ...lace Street Mississauga Ontario L4Z 1Z8 Canada TEAC MEXICO S A de C V http www teacmexico net Phone 52 55 5010 6000 R o Churubusco 364 Colonia Del Carmen Delegaci n Coyoac n CP 04100 M xico DF M xico...

Reviews: