background image

TASCAM DR-07MKII


105

Make sure that the microSD card is inserted 

properly.

NOTE

If the USB cable is connected to the unit when batteries has 
been installed, the power is supplied from the USB port (USB 
bus power prioritized).

If a microSD card is not properly inserted before 

making the USB connection, “

Can't Save 

Data

” appears on the screen. 

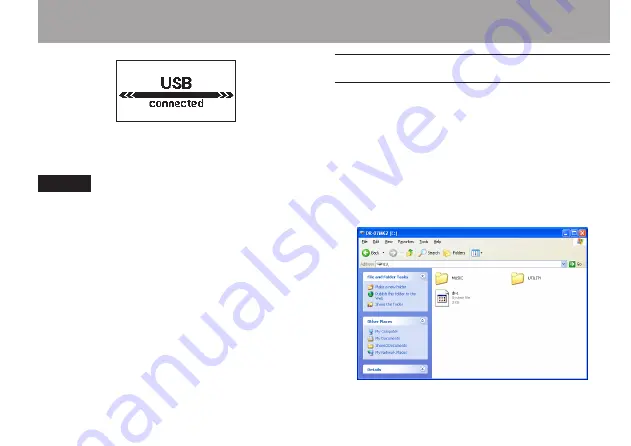
This unit appears on the computer screen as 

external volume named “DR-07MK2.”

Transferring files to a computer

1  Click the “

DR-07MK2

” drive on the 

computer screen to show the “

MUSIC

” and 

UTILITY

” folders. 

2  Open the “

MUSIC

” folder and drag and 

drop the files that you want to transfer 

to the computer to destinations of your 

choice. 

10–Connecting with a computer

Summary of Contents for DR-07MKII

Page 1: ...near PCM Recorder D01145020A OWNER S MANUAL This device has a serial number located inside the battery compartment Please record it and retain it for your records Serial number _______________________...

Page 2: ...e receptacles and the point where they exit from the apparatus 11 Only use attachments accessories specified by the manufacturer 12 Use only with the cart stand tripod bracket or table specified by th...

Page 3: ...other batteries or metallic objects When throwing used batteries away follow the disposal instructions indicated on the batteries and the local disposal laws Do not use batteries other than those spe...

Page 4: ...e instruction manual may cause harmful interference to radio communications However there is no guarantee that interference will not occur in a particular installation If this equipment does cause har...

Page 5: ...cates that electrical and electronic equipment must be collected and disposed of separately from household waste e Return and collection systems are available to end users For more detailed informatio...

Page 6: ...or cadmium Cd as defined in the Battery Directive 2006 66 EC then the chemical symbols for those elements will be indicated beneath the WEEE symbol e Return and collection systems are available to end...

Page 7: ...Menu item list 35 Using menus 36 Basic operation 37 3 Preparation 38 Powering the unit 38 Using AA batteries 38 Using an AC adaptor sold separately 38 Using USB bus power 39 Start up shutdown 40 Start...

Page 8: ...format 61 Simultaneous listening to playback and input sound Monitor Mix 62 Adjusting the input level simple adjustment 63 Start the overdubbing 65 Recording automatically AUTO REC 66 Creating and cha...

Page 9: ...ick Operations 94 Features of the QUICK button 94 Quick menu screen 95 Closing the Quick menu screen 97 Deleting the selected file Quick Delete 97 Dividing the selected file DIVIDE 97 Increasing the p...

Page 10: ...ICK FORMAT 110 Using FULL FORMAT 111 Setting the format of file names 112 File name format 112 Setting the WORD item 112 12 Messages 113 13 Troubleshooting 117 14 Specifications 119 Ratings 119 Input...

Page 11: ...and maximum file size for details on page 50 1 Install batteries in the battery compartment on the back of the unit Fit them to the and marks shown in the compartment 2 Turn on and various setting in...

Page 12: ...or details 5 Press the RECORD button to start recording The REC indicator will light during recording 6 Press the HOME button to finish recording REC indicator NOTE To pause recording press the RECORD...

Page 13: ...to control the playback volume 9 Press the HOME button to stop playback NOTE If you have made several recordings use the or button to select the file to play when playing back or stopped and the Home...

Page 14: ...ecording Can record with different types of stereo sound depending on the angle of the microphones Close Clear Stereo Sound with less phase difference Open Wide Stereo Sound 44 1 48 96 kHz 16 24 bit l...

Page 15: ...gh Low cut filter conveniently reduces low frequency noise VSA function can change the playback speed in the range from 0 5 to 1 5 times in 0 1 increments the normal speed without changing pitch Repea...

Page 16: ...ini B type USB 2 0 port Operates on 2 AA batteries an AC adaptor sold separately TASCAM PS P515U or USB bus power Tripod attachment screw hole built into unit USB cable included Items included with th...

Page 17: ...at appears on the screen the typeface looks like this ON microSD memory card is sometimes abbreviated as microSD card Additional information is introduced in the styles below when needed TIP We give h...

Page 18: ...demand applications and the like or on physical media compact discs digital versatile discs semiconductor chips hard drives memory cards and the like An independent license for such use is required F...

Page 19: ...related to the use of such data and or information This product is designed to help you record and reproduce sound works to which you own the copyright or where you have obtained permission from the c...

Page 20: ...ing them Do not leave them in extremely hot or cold places Do not leave them in extremely humid places Do not let them get wet Do not put things on top of them or twist them Do not hit them Precaution...

Page 21: ...this occurs let the unit sit for one or two hours at the new room temperature before using Cleaning the unit Use a dry soft cloth to wipe the unit clean Do not clean the unit with a chemically treate...

Page 22: ...mes inactive 2 PEAK indicator Lights when the input volume is too high 3 Display Shows a variety of information 4 HOME button Press this button during playback to cause the playback to pause at the cu...

Page 23: ...s button to return to the MENU Screen from the various setting screens When the MENUScreen is displayed press this button to return to the Home Screen When the IN and OUT points are set in the track a...

Page 24: ...isplayed press this button to decrease the output level from the built in speaker or LINE OUT jack During adjustment a volume indicator will be displayed in a pull up window When the Playback Control...

Page 25: ...g playback or when playback is stopped to skip to beginning of the next track When the IN and OUT points are set between the current position and the end of the track pressing this button skips to tho...

Page 26: ...previous or next mark respectively When the Playback Control screen is open use this button to set the IN start and OUT end points of the interval that you want to set for loop playback When the IN an...

Page 27: ...ection of the arrow to engage the hold function All buttons are inoperative when hold is ON Right side panel p USB port Use the included USB cable to connect with a computer USB port Power can be supp...

Page 28: ...bled or when Monitor Mix is enabled d Tripod attachment screw hole 1 4 inch Use this to attach the unit to a tripod or mic stand CAUTION Tighten the unit securely to the tripod or microphone stand to...

Page 29: ...Monitor Mix setting status On off status of Monitor Mix is shown Monitor Mix off Monitor Mix on 4 Effect status Shows whether the effect function is ON or OFF Effect off Effect on 5 Thebuilt inmicroph...

Page 30: ...ing Skipping forward Skipping backward 8 Level meter The level of the input or playback sounds is shown When Monitor Mix is ON the level of the combined input and playback sounds is shown 9 File infor...

Page 31: ...USICfolder FOLDER All files in the selected folder P LIST All files added to the playlist y Loop playback IN starting and OUT ending points The set starting and ending points of the loop are shown The...

Page 32: ...s ON and in recording standby appears when the auto recording function is ON and recording 4 Low cut filter status Low cut filter off Low cut filter on when set to 40Hz 80Hz or 120Hz 5 Recorder operat...

Page 33: ...x file size is reached appears in hours minutes seconds If the remaining recording time on the card is less than the remaining time until the selected max file size is reached the remaining recording...

Page 34: ...thout changing the pitch function is enabled 3 Playback position display Thecurrentplaybackpositionisshownbyabar As playbackprogresses thebarextendstotheright 4 Loop playback IN starting and OUT endin...

Page 35: ...llows INFORMATION Information about the file microSD card and system 107 MONITOR MIX Monitor Mix settings 62 TUNER Tuner settings 103 EFFECT Effects settings 101 FILE NAME File name settings 112 DATE...

Page 36: ...n to select a menu item highlighted to be set Example AREAis selected 4 Use the or button to move the cursor to highlight the value of the setting 5 Use the or button to change the setting 6 Press the...

Page 37: ...rmation message button Use this to move the cursor the highlighted area to the right on the screen and to open folders on the BROWSEscreen button Use this to move the cursor the highlighted area to th...

Page 38: ...order to accurately show the amount of power remaining and allow the unit to accurately determine whether power is available for proper operation See Setting the type of AA batteries on page 110 NOTE...

Page 39: ...AC adaptor Using USB bus power Connect the unit to a PC using the attached USB cable as shown in the illustration The USBSELECTscreen appears to choose between USB bus power for power supply or connec...

Page 40: ...a large noise would cause damage to headphones or your ears Starting up the unit To start up the unit from the stopped state press and hold the HOME button until TASCAM DR 07MKII start up screen is d...

Page 41: ...disconnect the power cable AC adapter TASCAM PS P515U or USB cable accidently while the unit is operating If you do so the unit cannot shut down properly and all recordings settings and other data wi...

Page 42: ...s the button The OTHERSscreen is displayed 3 Use the or button to select the DATE TIMEmenu item and press the button The DATE TIMEscreen is displayed 4 Press the or button to move the cursor highlight...

Page 43: ...he microSD card NOTE A microSD card is already installed when the unit is shipped from the factory If you want to use this card to record and play tracks there is no need to reinstall it 1 Open the mi...

Page 44: ...SD card is installed and turn the power ON 2 The following message appears when a new card or a card formatted for use with another device is installed in the unit 3 Press the button to start formatti...

Page 45: ...the or button to select the SPEAKER and press the button The SPEAKERscreen is displayed 3 Use the or button to select ON 4 When finished press the HOME button to return to the Home Screen NOTE Even i...

Page 46: ...hanged You can choose Clear Stereo Sound or Wide Stereo Sound according to the recording source situation etc by opening or closing the microphone pair Setting the mics to record a wide stereo sound A...

Page 47: ...not L R appears on the Home Screen See Swapping the left right channels of the built in microphone pair on page 48 Setting the mics to record a clear stereo sound X Y position Close the stereo microph...

Page 48: ...t to the left channel and the right microphone should be set to the right channel When A B position L R When the microphone pair is closed the left microphone should be set to the right channel and th...

Page 49: ...n to change the setting Press the HOME button to leave the setting as it is NOTE When you change the microphone angle setting and the pop up message appears you must press the button to change the L R...

Page 50: ...you can mix and record a sound input through the built in mic or one of the input jacks with an audio file that is played back using the overdubbing function Selectingfileformat sampling frequency typ...

Page 51: ...MONOis selected a mono file is created and the same signals are sent to both L and R level meters and output channels If sound is recorded in MONOin WAV format the file size will be half that recorde...

Page 52: ...tting value in parentheses Recording automatically stops if recording time exceeds 24 hours 10 Press the HOME button to return to the Home Screen Set where to save the file Set the folder where record...

Page 53: ...Fwhen using the built in mic or connecting a dynamic microphone or microphone with a built in battery If set to ON the plug in power may damage such microphones Use headphones to monitor when you are...

Page 54: ...if an external microphone is connected to the MIC EXT IN jack Recording an external device EXT IN Use a stereo miniplug cable to connect to the output of an external audio device Other audio equipmen...

Page 55: ...ting the INPUT level try changing the distance and angle between the microphone and the sound source The angle and distance of the microphone can also change the character of the recorded sound Manual...

Page 56: ...is mark at about the center without causing the PEAK indicator to light red when the loudest sounds occur NOTE Press the HOME button to exit recording standby When in recording standby or during recor...

Page 57: ...u screen will appear 3 Use the or button to select highlight LEVEL CTRL and press the button The level control setting screen will appear Options OFF default PEAK REDUCTION AUTO LEVEL LIMITER 4 Use th...

Page 58: ...ing recording It is also possible to store the recording in the limiter mode after automatically setting the recording level in the peak reduction mode AUTO LEVEL The recording level is controlled aut...

Page 59: ...can always monitor the input a pop up appears that allows you to turn overdubbing ON or OFF For ordinary recording select OFF and continue to step 2 2 To start recording press the RECORD button again...

Page 60: ...an instrument or sing as you play back a saved track and mix and record both sounds in a new file NOTE You cannot overdub if input monitoring is OFF The prerecording function is disabled if the input...

Page 61: ...E Screen on page 75 for selecting files using the BROWSE screen Selecting file format 1 Press the MENU button to open the MENU screen 2 Use the or button to select REC SETTING and press the button REC...

Page 62: ...is ON 1 Press the MENU button to open the MENU screen 2 Use the or button to select OTHERS and press the button to open the OTHERS submenu 3 Use the or button to select MONITOR MIX and press the butt...

Page 63: ...NOTE You cannot select ONor OFFfor INPUTitems on the MONITOR MIXduring recording in recording standby Adjusting the input level simple adjustment If Monitor Mix is enabled INPUTis selected in the MONI...

Page 64: ...will not appear when pressing the or button When distortion of sound is about to occur as the input sound level is increased the PEAK indicator on the upper left above the display will be turned on Ad...

Page 65: ...also appear so that you can confirm them before you start recording 2 Use the or button to select ON from the overdubbing ON OFF pop up 3 Press the RECORD button to start overdubbing When recording st...

Page 66: ...reate new files for example 1 Press MENU to open the Menu Screen 2 Use the or button to select REC SETTING and press the button REC SETTINGscreen appears 3 Use the or button to select the MODEand pres...

Page 67: ...10The recording mode changes according to the setting of the MODE REC If the input signal level falls below the standard level for more than five seconds which is set on LEVEL the unit goes into in re...

Page 68: ...over to a new file during continued recording Track incrementing You can manually or automatically split a recording by creating a new file Track incrementing Manual track incrementation during record...

Page 69: ...the MENU Screen 2 Use the or button to select REC SETTING and press the button REC SETTINGscreen appears 3 Use the or button to select SIZE and press the or button Use the or button to set the maximu...

Page 70: ...k Mark number pull up appears NOTE Mark information is stored in the file with numbers between 01 99 The maximum number of marks in a file is 99 As the unit is compatible with the BWF format for WAV f...

Page 71: ...cally AUTO REC on page 66 Moving to a mark position You can move to marks in the currently selected file when paused and during playback You can use this function to identify points to create shortcut...

Page 72: ...ton 3 Use the or button to select PRE REC and press the or button 4 Use the or button to select ON Default OFF 5 Press the HOME button to return to the Home Screen TIP By using this in combination wit...

Page 73: ...elf timer icon appears in the recorder status screen and time is shown on the right Each time you press the PB CONT button the setting changes as follows OFF default 5S 5 seconds 10S 10 seconds OFF 3...

Page 74: ...tereo mono 32 kbps 44 1 kHz 48 kHz 74 32 149 04 298 08 596 16 64 kbps 44 1 kHz 48 kHz 37 16 72 32 149 04 298 08 96 kbps 44 1 kHz 48 kHz 24 50 49 40 99 20 198 40 128 kbps 44 1 kHz 48 kHz 18 38 37 16 74...

Page 75: ...n the MENUscreen Use the or button to select BROWSEand press the button The contents of the folder that contains the file that was selected on the Home Screen before the BROWSEScreen was opened appear...

Page 76: ...s folder Regardless of the previous setting the playback area is set to FOLDER and this folder becomes the new playback area Icons on the BROWSE screen The meanings of icons that appear on the BROWSES...

Page 77: ...e appears Press the button again or press the HOME button to return to the BROWSEscreen ADD LIST Adds the selected file to the playlist See Playlist on page 84 DELETE A message appears to confirm that...

Page 78: ...area is set to FOLDER and this folder becomes the new playback area When recording files are created in this folder ALL DEL A pop up message appears to confirm that you want to delete all the files i...

Page 79: ...the button to create a new folder or press the HOME button to cancel Note that the unit supports only a two level folder structure and accordingly NEWFOLDER does not exist in the second level folders...

Page 80: ...so use the BROWSE Screen to set a folder as the playback area TIP On the BROWSEScreen regardless of the playback area setting you can select any file on the card that you want Adjusting playback volum...

Page 81: ...D card FOLDER default Set the playback area as all the files in the currently selected folder PLAYLIST Set the playback area as the tracks in the playlist See Playlist on page 84 If there is no playli...

Page 82: ...Use the or button to select a folder level and use the or button to select a folder For an explanation of how to use the Browse Screen see Screen navigation on page 75 4 Press the QUICK button to ope...

Page 83: ...is displayed 3 Use the or button to select a folder level and use the or button to select the folder that contains the track file you want to play For an explanation of how to use the BROWSE Screen se...

Page 84: ...ars NOTE For an explanation of how to use the BROWSEScreen see Screen navigation on page 75 3 Use the or button to select the file you want to add to the playlist and press the QUICK button NOTE For d...

Page 85: ...button BROWSEscreen appears 3 Use the button to move to the top folder level 4 Use the or button to select PLAYLIST and press the button PLAYLISTscreen appears 5 Use the or button to select the file y...

Page 86: ...st The file is removed from the playlist but it is not erased from the microSD card MOVE Select this to change the order of tracks in the playlist In addition to the file name the track number also ap...

Page 87: ...on the display The icon appears on the display when playback is stopped at the beginning a track and the icon appears when playback is stopped in the middle of a track paused When the IN and OUT poin...

Page 88: ...2 Use the or button to select PLAY SETTING and press the button PLAY SETTINGscreen appears 3 Use the or button to select REPEAT and press the or button 4 Use the or button to select a repeat mode CON...

Page 89: ...rall sound pressure for comfortable listening when the playback is indiscernible These playback control functions serve for effective practice on musical instruments and analysis of musical passages P...

Page 90: ...responding point under the playback indicator bar 3 Press the MARK button at the end point of the section that you want to play repeatedly This position is set as OUT end point and loop playback of th...

Page 91: ...eed VSA The unit features the VSA Variable Speed Audition function that changes the playback speed without changing its pitch CAUTION The VSA function cannot be effective for files recorded with a sam...

Page 92: ...TTING and press the button PLAY SETTINGscreen appears 3 Use the or button to select PLAY EQ and press the or button 4 Use the or button to set the equalizer TREBLE MIDDLE and BASS indicate that adjust...

Page 93: ...age The jump back time is set as a JUMPBACKsetting 1 Press the MENU button to open the MENU screen 2 Use the or button to select PLAY SETTING and press the button PLAY SETTINGscreen appears 3 Use the...

Page 94: ...on page 68 The Quick menu screen will not appear in this case A pop up menu to work with a selected file or folder appears if the BROWSEscreen or the PLAYLISTscreen is open Switches CALIBand INPUTLEVE...

Page 95: ...le Quick Delete on page 97 DIVIDE The current track can be divided See Dividing the selected file Divide on page 97 LEVEL ALIGN The perceived overall sound pressure can be increased to enhance listena...

Page 96: ...to sudden excessive input For details of the level control function see Using the Level Control Function on page 57 When Monitor Mix is enabled the input level can be adjusted in a simple way using th...

Page 97: ...e QUICK button while the Home Screen is open when stopped 3 Use the or button to select DELETE 4 Press the button A confirmation screen for file deletion appears Press the button to delete the file or...

Page 98: ...d set the divide position while playing the track When the DIVIDEscreen is open press the button to pause resume playback and press the or button to move to the beginning or the end of the track Adjus...

Page 99: ...P Add marks during recording at positions where you want to divide a file See Markfunction onpage70 Increasing the perceived overall sound pressure to enhance listenability Level Alignment If the play...

Page 100: ...s the button to enable the level alignment function Or select OFFand press the button to disable the level alignment function NOTE The level alignment function may not be able to achieve sufficient ef...

Page 101: ...ton to open the MENU screen 2 Use the or button to select OTHERS and press the button to open the OTHERS submenu 3 Use the or button to select EFFECT and press the button The EFFECTscreen appears As s...

Page 102: ...etting to return to item selection status 7 Press the HOME button to return to the Home Screen CAUTION When the sampling frequency is set to 96 kHz or a WAV file with a sampling frequency of 96 kHz is...

Page 103: ...l frequency Setting range 435Hz 445Hz in 1Hz increments default 440Hz Tuning a musical instrument 1 Open the TUNERscreen and sound a note near the unit 2 Tune the instrument so that the target pitch n...

Page 104: ...DR 07MKII and connecting it directly to a computer that has a built in microSD card slot or by using a card reader CAUTION You cannot use this unit s other functions when it is connected to a compute...

Page 105: ...ot properly inserted before making the USB connection Can t Save Data appears on the screen This unit appears on the computer screen as external volume named DR 07MK2 Transferring files to a computer...

Page 106: ...and audio files on the third level or below Since you can set the DR 07MKII to only play the contents of a specific folder you can organize tracks into genres artists or other categories as you like...

Page 107: ...y loaded file Card information page CARD Shows the use status of the currently inserted microSD card System information page SYSTEM Shows the unit s system setting information and firmware version Fil...

Page 108: ...SD card capacity REMAIN SIZE USED SIZE Shows the amount of unused used capacity on the microSD card Press the or button to switch between REMAINSIZEand USEDSIZE System information page The SYSTEM page...

Page 109: ...owing settings can be made for the items on the SYSTEMscreen Use the or button and the or button to set each item Turning the unit power OFF automatically Use the AUTOOFFitem to set the time before th...

Page 110: ...LIZEitem to restore the various settings of this unit to their factory settings 1 Use the or button to select INITIALIZE and press the button to highlight Exec 2 Press the button again to open a confi...

Page 111: ...e dr 1 sys file that is necessary to use the microSD card with the DR 07MKII 1 Use the or button to select FULL FORMAT and press the button to highlight Exec 2 Press the button to open a pop up confir...

Page 112: ...ng settings for each item File name format The TYPEitem can be set to either WORD default setting or DATE WORD When set to WORD a 6 character file name is used as the beginning of each file name Examp...

Page 113: ...ame Before choosing the DIVIDE function connect the unit to a computer and edit the file name File Not Found The file added to the playlist cannot be found or a file could be damaged Please check the...

Page 114: ...in FAT format CAUTION Execution of FAT formatting erases all data currently on the card File Not Found Make Sys File The system file is missing This unit requires a system file for operation When thi...

Page 115: ...ur computer Card Error The card could not be handled properly Replace the card Current File MP3 MP3 files cannot be divided File Protected The file is read only and cannot be erased No Card No card is...

Page 116: ...AC adaptor TASCAM PS P515U and or disconnect the USB cable for bus power supply If the error message continues to appear frequently please contact a TEAC Repair Center File Error Can t Save Data Playe...

Page 117: ...is firmly connected Confirm that the USB cable if used for USB bus power supply is not connected via a USB hub The unit does not function Confirm that the HOLD switch is not set in the direction of th...

Page 118: ...trying to record sounds distorted Confirm that the input level setting for recording REC LEVEL is not too high Do the built in effects work The playback sounds unnatural Confirm that the playback spee...

Page 119: ...tings MIC EXT IN jacks supporting plug in power Connector 1 8 3 5 mm stereo mini Input impedance 25 k Nominal input level 20 dBV Maximum input level 4 dBV LINE OUT Connector 1 8 3 5 mm stereo mini Out...

Page 120: ...48 96kHz JEITA S N ratio 92dB or higher EXT IN to LINE OUT Fs 44 1 48 96kHz JEITA Note JEITA Conforming to JEITA CP 2150 Computer compatibility Windows Pentium 300 MHz or faster 128 MB or more memory...

Page 121: ...WAV 96KHz 24bit About 17 hours Headphones Recording playback Format Operation time Note Playback WAV 96KHz 24bit About 17 hours Built in Speaker Playback WAV 44 1KHz 16bit About 19 5 hours Headphones...

Page 122: ...1KHz 16bit About 16 5 hours Built in Speaker Playback MP3 44 1KHz 128Kbps About 16 hours Headphones Playback MP3 44 1KHz 128Kbps About 15 hours Built in Speaker Playback MP3 48 KHz 320Kbps About 16 ho...

Page 123: ...onal drawings 68mm 26mm 158mm 90mm Dimension of the microphone opened Illustrations and other depictions may differ in part from the actual product Specifications and external appearance may be change...

Page 124: ...5939 Wallace Street Mississauga Ontario L4Z 1Z8 Canada TEAC MEXICO S A de C V Phone 52 55 5010 6000 http www teacmexico net R o Churubusco 364 Colonia Del Carmen Delegaci n Coyoac n CP 04100 M xico DF...

Reviews: