background image

TASCAM  DR-10X

 59

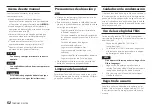
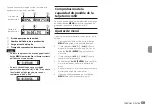
Cuando comience la reproducción y durante esta 

aparecerán las siguientes pantallas.

Al inicio de la 

reproducción

Durante la 

reproducción

1

  Estado operativo de la unidad

2

  Nombre del fichero de reproducción

3

  Carga restante de la pila

4

  Tiempo de reproducción transcurrido

NOTA

 • Durante la reproducción, mantenga pulsado el 

botón 

MENU

 para visualizar el tiempo restante 

del fichero de reproducción.

 • Durante el rebobinado o avance rápido, 

aparecerá en pantalla “

gg

” o “

tt

”. Si aumenta 

la velocidad de la búsqueda, esos iconos 

cambiarán a “

ggg

” o “

ttt

”.

Comprobación de la 

capacidad disponible de la 

tarjeta microSD

Con la unidad parada o en reproducción, mantenga 

pulsado el botón 

MENU

 para ver la capacidad de 

grabación restante de la tarjeta microSD.

Ajustes de menú

Siga estos pasos para realizar diversos ajustes de la 

unidad.
1.  Con la pantalla inicial activa, pulse el botón 

MENU

 para acceder a la pantalla de menú.

2.  Use los botones 

.


[

j

]

 y 

/


[

k

]

 para 

elegir el elemento de menú a ajustar y pulse 

el botón 

7’9


[ENTER]

 para visualizar el 

elemento.

3.  Use los botones 

.


[

j

]

 y 

/


[

k

]

 para 

cambiar el valor del ajuste.

4.  Pulse el botón 

7’9


[ENTER]

 para confirmar 

el ajuste realizado y volver a la pantalla de 

menú.

5.  Repita los pasos 2 a 4 las veces necesarias para 

ajustar cada uno de los elementos.

6.  Una vez que haya acabado, pulse el botón 

MENU

 para volver a la pantalla inicial.

Summary of Contents for DR-10X

Page 1: ...D01236200A ENGLISH FRAN AIS ESPA OL DEUTSCH ITALIANO OWNER S MANUAL MODE D EMPLOI MANUAL DEL USUARIO BEDIENUNGSANLEITUNG MANUALE DI ISTRUZIONI DR 10X Compact Linear PCM Recorder X...

Page 2: ...49 611 71580 Bahnstrasse 12 65205 Wiesbaden Erbenheim Germany TEAC SALES TRADING SHENZHEN CO LTD Phone 86 755 88311561 2 Room 817 Block A Hailrun Complex 6021 Shennan Blvd Futian District Shenzhen 51...

Page 3: ...and receiver c Connect the equipment into an outlet on a circuit different from that to which the receiver is connected d Consult the dealer or an experienced radio TV technician for help CAUTION Chan...

Page 4: ...r STANDBY ON switch not in the ON position The mains plug is used as the disconnect device the disconnect device shall remain readily operable Caution should be taken when using earphones or headphone...

Page 5: ...al negative effects on human health and the environment c Improper disposal of waste equipment can have serious effects on the environment and human health as a result of the presence of hazardous sub...

Page 6: ...1 Shutting down 12 Turning off automatically 12 Installing a microSD card 12 Handling microSD cards 12 Precautions when handling microSD cards 12 Recording durations when using microSD cards 13 Connec...

Page 7: ...ts where the input level is too high to suitable levels Low cut filter is useful for reducing low frequency noise Dual recording function allows two files to be recorded simultaneously at different le...

Page 8: ...aces with bad ventilation or high humidity Very dusty locations Places exposed directly to rain or other water Do not place this unit on top of a power amplifier or other device that generates heat Cl...

Page 9: ...on during playback to search backward i i When the Menu Screen is open press the j button to open the Menu Screen i i When a setting item is shown press the j button to move the cursor left i i When i...

Page 10: ...the unit on off i i Slide and hold this switch toward 0REC for about one second to start recording i i When recording slide and hold this switch toward 0REC for about one second to stop recording NOT...

Page 11: ...isplay The battery icon shows the amount of power remaining in bars q q The battery is almost dead and the power will soon turn off if the icon with no bars blinks When operating on USB bus power the...

Page 12: ...he direction of the arrow as shown in the following illustration until it clicks into place Removing the microSD card Press the microSD card in gently and then release it to allow it to come out CAUTI...

Page 13: ...g with a computer Connect the unit to a computer using the included USB cable as shown in the illustration Computer microB USB cable Whether the power is on or off when connected the POWER STORAGEscre...

Page 14: ...us 4 File name 5 Elapsed recording time NOTE The one second delay is intended to prevent accidental operation Without pausing recording a new file can be created automatically during recording when th...

Page 15: ...capacity of the microSD card When stopped or recording press and hold the MENU button to show the remaining recording capacity of the microSD Making menu settings Follow these procedures to change va...

Page 16: ...C MODE Dual recording OFF ON This recorder can simultaneously record a second recording at a different input level along with the regular recording For example you can make an ordinary recording with...

Page 17: ...r at the cursor position In addition to the alphabet and numbers the following characters can be used _ TIP When using more than one of these units you can set the file name in advance to identify whi...

Page 18: ...ton to confirm the date and time and return to the Menu Screen Use the j and k buttons to change the number at the cursor position SYSTEM INIT Restore factory default settings Sure YES NO Use this to...

Page 19: ...perly or the formatting is broken Use the DR 10X to format the microSD card Invalid Card The card might be abnormal Change the microSD card No Music File There is no file that can be played back on th...

Page 20: ...imiter off limiter auto_level This indicates the Menu Screen AUTO LEVELsetting Notate it as off or on Example auto_level off auto_level dual_rec This indicates the Menu Screen DUAL REC MODEsetting Not...

Page 21: ...nnector XLR JACK female 1 GND 2 HOT 3 COLD When MIC GAIN external input EXT selected HOT pin unbalanced input Maximum input level 8 dBu Nominal input level 24 dBu When MIC GAIN mic input LO MID HI sel...

Page 22: ...r 0 25A maximum 8 8 Battery operation time continuous operation Using an alkaline battery EVOLTA Format Operation time Note Recording 48kHz 24 bit WAV About 10 0 hours Headphones not connected Limiter...

Page 23: ...g protrusions 8 8 Weight 68 3 g including batteries 56 3 g not including batteries 8 8 Operating temperature range 0 C 40 C 32 F 104 F Dimensional drawings 52mm 28mm 94 4mm Illustrations in this manua...

Page 24: ...24 TASCAM DR 10X...

Page 25: ...e fiche polaris e a deux broches l une plus large que l autre Une fiche de terre a deux broches identiques et une troisi me broche pour la mise la terre La broche plus large ou la troisi me broche ser...

Page 26: ...aller l envers peut entra ner la rupture ou la fuite des piles source d incendie de blessure ou de d g t autour d elles Quand vous rangez ou jetez des piles isolez leurs bornes avec de l adh sif isola...

Page 27: ...l quipement Mise au rebut des piles et ou accumulateurs a Les piles et ou accumulateurs hors d usage doivent tre trait s s par ment de la collecte municipale d ordures m nag res dans des points de col...

Page 28: ...unit 33 Extinction 34 Mise hors tension automatique 34 Installation d une carte microSD 34 Gestion des cartes microSD 34 Pr cautions lors de la manipulation des cartes microSD 34 Dur es d enregistrem...

Page 29: ...u d entr e est trop lev des niveaux appropri s Le filtre coupe bas est utile pour r duire les bruits de basses fr quences La fonction de double enregistrement permet d enregistrer simultan ment deux f...

Page 30: ...Lieux mal ventil s ou tr s humides Lieux tr s poussi reux Emplacements expos s directement la pluie ou l eau Ne placez pas cette unit sur un amplificateur de puissance ou un autre appareil g n rant d...

Page 31: ...he vers l arri re i i Quand l cran de menu est ouvert pressez la touche j pour s lectionner un param tre de menu i i Quand un param tre de r glage est affich pressez la touche j pour d placer le curse...

Page 32: ...ites glisser ce commutateur vers et maintenez le ainsi environ une seconde pour allumer teindre l unit i i Faites le glisser vers 0REC et maintenez le environ une seconde pour lancer l enregistrement...

Page 33: ...ic ne de pile repr sente la charge restante en barres q q La pile est quasiment d charg e et l alimentation va bient t se couper si l ic ne sans barres clignote En cas d alimentation par le bus USB l...

Page 34: ...rez la carte microSD dans le lecteur dans le sens de la fl che de l illustration suivante jusqu ce qu elle clique en place Retrait de la carte microSD Appuyez d licatement sur la carte microSD puis re...

Page 35: ...SD microSDHC Branchement un ordinateur Branchez l unit un ordinateur l aide du c ble USB fourni comme repr sent dans l illustration Ordinateur C ble USB micro B Que l unit soit ou non sous tension qua...

Page 36: ...de fonctionnement de l enregistreur 4 Nom du fichier 5 Temps d enregistrement coul NOTE La temporisation d une seconde est destin e viter les manipulations accidentelles Sans mettre en pause l enregis...

Page 37: ...sur la carte microSD A l arr t ou en enregistrement maintenez press e la touche MENU pour afficher la capacit d enregistrement restante de la carte microSD R glages de menu Suivez ces proc dures pour...

Page 38: ...glage automatique du niveau OFF ON Quand le niveau du son entrant est trop faible ou trop fort le volume d enregistrement est automatiquement augment ou diminu jusqu un niveau appropri DUAL REC MODE D...

Page 39: ...s e comme nom de fichier au format aammjj Exemple 000_110101 wav FILE NAME R glage du nom de fichier DR0000 Pressez la touche 7 9 ENTER pour d placer le curseur de gauche droite caract re par caract r...

Page 40: ...7 9 ENTER pour d placer le curseur de gauche droite 1q2q3q4q5 Quand le curseur est sur 5 l extr me droite pressez la touche 7 9 ENTER pour confirmer la date et l heure et revenir l cran de menu Utili...

Page 41: ...est endommag Utilisez le DR 10X pour formater la carte microSD Invalid Card La carte microSD souffre peut tre d une anomalie Changez de carte microSD No Music File Il n y a pas de fichier pouvant tre...

Page 42: ...mic_gain mid mic_gain low_cut Indique le param tre LOWCUTde l cran de menu R glez le sur off ou on Exemple low_cut off low_cut limiter Indique le param tre LIMITERde l cran de menu R glez le sur off o...

Page 43: ...spara Exemple avec seulement le r glage de l heure dr10_syspara time 23 59 59 time dr10_syspara Caract ristiques techniques Donn es 8 8 Supports d enregistrement Carte microSD 64 Mo 2 Go Carte microSD...

Page 44: ...cept s Windows Windows 7 Windows 8 y compris 8 1 Mac OS X Mavericks 10 9 OS X Mountain Lion 10 8 G n rales 8 8 Alimentation 1 pile ou batterie AAA alcaline NiMH ou lithium Alimentation par le bus USB...

Page 45: ...profondeur sauf parties saillantes 8 8 Poids 68 3 g avec piles 56 3 g sans piles 8 8 Plage de temp rature de fonctionnement 0 C 40 C Dessin avec cotes 52mm 28mm 94 4mm Les illustrations de ce mode d...

Page 46: ...46 TASCAM DR 10X...

Page 47: ...eptor c Conectar este aparato a una salida de corriente o regleta distinta de la que est conectado el receptor d Consultar a su distribuidor o a un t cnico especialista de radio TV para que le asesore...

Page 48: ...a de la salida de corriente AC aun cuando su interruptor POWER o STANDBY ON no est en la posici n ON Dado que el cable de alimentaci n es el sistema de desconexi n de esta unidad debe ubicarla de form...

Page 49: ...potenciales tanto para la salud como para el entorno c Una eliminaci n incorrecta de este tipo de aparatos junto con la basura org nica puede producir efectos graves en el medio ambiente y en la salud...

Page 50: ...ncendido 55 Apagado 56 Apagado autom tico 56 Instalaci n de una tarjeta microSD 56 Gesti n de tarjetas microSD 56 Precauci n en el manejo de tarjetas microSD 56 Tiempos de grabaci n al usar tarjetas m...

Page 51: ...muy til para reducir los ruidos de bajas frecuencias Funci n de grabaci n dual que le permite grabar simult neamente dos ficheros a distintos niveles Un interruptor deslizante para la activaci n de l...

Page 52: ...nte calurosos Lugares extremadamente fr os Lugares con mala ventilaci n o muy h medos Lugares con altas concentraciones de polvo Lugares expuestos a la lluvia o al agua No coloque esta unidad encima d...

Page 53: ...ot n durante el rebobinado para hacer un rebobinado i i Con la pantalla de men activa pulse el bot n j para acceder a la pantalla de men i i Cuando en pantalla aparezca un elemento de ajuste pulse el...

Page 54: ...a la posici n y mant ngalo all durante un segundo para encender o apagar la unidad i i Deslice este interruptor hacia 0REC y mant ngalo all durante un segundo para iniciar la grabaci n i i Durante la...

Page 55: ...perior derecha de la pantalla aparecer el icono de una pila Este icono le mostrar la cantidad de carga restante en formato de barras q q La pila estar ya casi agotada y la unidad estar a punto de apag...

Page 56: ...n la ranura en el sentido de la flecha tal como le mostramos abajo hasta que haga clic en su posici n Extracci n de la tarjeta microSD Empuje suavemente en la tarjeta microSD y luego suelte para que u...

Page 57: ...nidad a un ordenador usando el cable USB incluido de la siguiente forma Ordenador Cable USB micro B Tanto si la unidad est encendida o apagada cuando conecte el cable aparecer la pantalla USB SELECT p...

Page 58: ...stado operativo de la grabadora 4 Nombre del fichero 5 Tiempo transcurrido de grabaci n NOTA El retardo de un segundo ha sido dise ado para evitar una activaci n accidental Durante la grabaci n esta u...

Page 59: ...pacidad disponible de la tarjeta microSD Con la unidad parada o en reproducci n mantenga pulsado el bot n MENU para ver la capacidad de grabaci n restante de la tarjeta microSD Ajustes de men Siga est...

Page 60: ...e la fuente sonora AUTO LEVEL Ajuste de nivel autom tico OFF ON Cuando el nivel del sonido de entrada es demasiado bajo o alto el volumen de grabaci n ser aumentado o reducido autom ticamente para con...

Page 61: ...LE NAME Ajuste de nombre de fichero DR0000 Pulse el bot n 7 9 ENTER para desplazar el cursor de izquierda a derecha un car cter cada vez Cuando el cursor est en el car cter de la esquina derecha pulse...

Page 62: ...t n 7 9 ENTER para desplazar el cursor de izquierda a derecha 1q2q3q4q5 Cuando el cursor est en el extremo derecho de 5 pulse el bot n 7 9 ENTER para confirmar la fecha y la hora y volver a la pantall...

Page 63: ...a ado Use el DR 10X para formatear la tarjeta microSD Invalid Card La tarjeta no se comporta correctamente Sustituya la tarjeta microSD No Music File No hay ning n fichero que pueda ser reproducido de...

Page 64: ...antalla de men Aj stelo a off o on Ejemplo low_cut on low_cut limiter Esto indica el ajuste LIMITERde la pantalla de men Aj stelo a off o on Ejemplo limiter off limiter auto_level Esto indica el ajust...

Page 65: ...de grabaci n Tarjeta microSD 64 MB 2 GB Tarjeta microSDHC 4 GB 32 GB 8 8 Formatos de grabaci n reproducci n WAV MONO formato BWF a 48 kHz 24 bits Entradas y salidas 8 8 Entrada anal gica Toma Mic Cone...

Page 66: ...on 10 8 General 8 8 Alimentaci n 1 pila AAA alcalina NiMH o de litio Alimentaci n por bus USB desde un ordenador 8 8 Consumo 0 65 W m ximo 8 8 Amperaje alimentaci n por bus USB 0 25 A m ximo 8 8 Tiemp...

Page 67: ...8 8 Peso 68 3 g incluyendo pilas 56 3 g sin incluir las pilas 8 8 Rango de temperaturas de funcionamiento 0 40 C 32 104 F Esquema de dimensiones 52mm 28mm 94 4mm Las ilustraciones y otras im genes mo...

Page 68: ...68 TASCAM DR 10X...

Page 69: ...Austreten von S ure Explosion der Bat terien Akkus oder andere Probleme zur Folge haben Befolgen Sie immer die hier aufgef hrten Vorsichtsma nahmen beim Umgang mit Batterien Akkus Versuchen Sie nicht...

Page 70: ...angemessenen Schutz gegen sch dliche Funk st rungen innerhalb von Wohngeb uden sicher Dieses Ger t arbeitet mit Hochfrequenzenergie die ausgestrahlt werden kann und kann bei unsach gem er nicht der A...

Page 71: ...erien Akkus ber staatlich daf r vorgesehene Stellen zu entsorgen Durch die ordnungsgem e Entsorgung solcher Ger te und Batterien Akkus leisten Sie einen Beitrag zur Einsparung wertvoller Rohstoffe und...

Page 72: ...n Recorder ein und ausschalten 78 Den Recorder einschalten 78 Den Recorder ausschalten 78 Automatische Abschaltung 78 Speicherkarten verwenden 78 Wichtige Hinweise zu Speicherkarten 78 Eine microSD Ka...

Page 73: ...chaltbarer Limiter sorgt daf r dass zu hohe Eingangspegel entsprechend begrenzt werden Ein schaltbares Trittschallfilter unterdr ckt uner w nschte Tiefenanteile Erstellt bei Bedarf zur gleichen Zeit z...

Page 74: ...inigen niemals getr nkte Reinigungst cher auf chemischer Basis Verd nner Alkohol oder andere chemische Substanzen Diese k nnen die Oberfl che des Ger ts angreifen oder Verf rbungen hervorrufen Die glo...

Page 75: ...k Wenn Sie die Taste am Anfang der Datei dr cken springen Sie an den Beginn der vorhergehenden Datei Halten Sie die Taste w hrend der Wiedergabe gedr ckt um die Datei r ckw rts zu durchsuchen Wenn ein...

Page 76: ...e Kartenschachtabdeckung auf der linken Ger teseite Siehe Eine microSD Karte einlegen S 79 q Kopfh rerausgang Schlie en Sie hier einen Stereokopfh rer an w o 0REC Schalter Schieben Sie diesen Schalter...

Page 77: ...n mit diesem Ger t nicht verwendet werden NiMH Akkus k nnen mit dem Recorder selbst nicht aufgeladen werden Verwenden Sie hierf r ein handels bliches Ladeger t Statusanzeige der Stromversorgung Wenn d...

Page 78: ...ht das USB Kabel heraus wenn Sie das Ger t ber USB mit Strom versorgen Andernfalls k nnen s mtliche Aufnahmen Ein stellungen und sonstigen Daten verloren gehen Auf diese Weise verlorene Daten und Eins...

Page 79: ...Einschalten auf dem Display Folgendes angezeigt Keine Datei Wenn sich keine microSD Karte im Recorder befindet wird nach dem Einschalten auf dem Display Folgendes angezeigt Keine Karte Verf gbare Auf...

Page 80: ...ellt hat Auf dem Computer erscheint der Recorder als Wechseldatentr ger mit der Bezeichnung DR 10 3 Doppelklicken Sie auf dem Computer auf das Symbol des Wechseldatentr gers DR 10 um die auf dem Recor...

Page 81: ...te 7 9 ENTER Um die Wiedergabe zu stoppen dr cken Sie die Taste erneut Zu Beginn der Wiedergabe und w hrend der Wie dergabe nimmt das Display folgendes Aussehen an Wenn die Wie dergabe beginnt W hrend...

Page 82: ...Sie mit den Tasten j und k den gew nschten Eintrag und dr cken Sie 7 9 ENTER Taste Die zugeh rige Einstellung erscheint 3 ndern Sie die Einstellung mit den Tasten j und k 4 Dr cken Sie 7 9 ENTER um di...

Page 83: ...len Sie k nnen beispielsweise eine Datei mit guter Aussteuerung des Eingangspegels aufzeichnen w hrend Sie die zweite Aufnahmedatei zur Sicherheit mit einer niedrigeren Pegeleinstellung 6 dB erstellt...

Page 84: ...u formatieren BATTERY TYPE Typ der eingelegten Batterie ALK NiMH LITH W hlen Sie hier den Typ der verwendeten Batterie Die Angabe dient dazu die verbleibende Batteriekapazit t anzuzeigen und um zu bes...

Page 85: ...tiert oder die Formatierung ist besch digt Formatieren Sie die Speicherkarte mithilfe des DR 10X Invalid Card M glicherweise ist die Karte besch digt Tauschen Sie die Karte aus No Music File Es wurde...

Page 86: ...n Sie das Datum im Format JJJJ MM TT an Beispiel date 2014 08 27 date time Einstellungen mithilfe einer Textdatei vornehmen Wenn Sie den Recorder einschalten liest er automatisch die Konfigurationsdat...

Page 87: ...ge Festlegen der Uhrzeit dr10_syspara time 23 59 59 time dr10_syspara Technische Daten Allgemein 8 8 Aufnahmemedien microSD Karte 64 MB 2 GB microSDHC Karte 4 32 GB 8 8 Aufnahme und Wiedergabeformate...

Page 88: ...untain Lion 10 8 Stromversorgung und sonstige Daten 8 8 Stromversorgung Alkaline Batterie Lithium Batterie oder NiMH Akku des Typs AAA 1 USB Verbindung mit einem Computer 8 8 Leistungsaufnahme 0 45 W...

Page 89: ...M DR 10X Benutzerhandbuch 89 Ma zeichnung 52mm 28mm 94 4mm Abbildungen k nnen teilweise vom tats chlichen Erscheinungsbild des Produkts abweichen nderungen an Konstruktion und technischen Daten vorbeh...

Page 90: ...90 TASCAM DR 10X Benutzerhandbuch...

Page 91: ...CLASSE B EST CONFORME A LA NORME NMB 003 DU CANADA Dichiarazione di conformit Parte responsabile TEAC AMERICA INC Indirizzo 1834 Gage Road Montebello California U S A Numero di telefono 1 323 726 030...

Page 92: ...di alimentazione in qualsiasi momento Se l apparecchio usa batterie inclusi pacchetto di batterie o batterie installate queste non dovrebbero essere esposte alla luce solare o al calore eccessivo CAUT...

Page 93: ...ccolte e smaltite separatamente dai rifiuti domestici e I sistemi di raccolta sono a disposizione degli utenti finali Per informazioni pi dettagliate sullo smaltimento delle vecchie apparecchiature el...

Page 94: ...ento 100 Spegnimento automatico 100 Installare una card microSD 100 Gestione delle card microSD 100 Precauzioni durante la manipolazione card microSD 100 Durata della registrazione quando si utilizzan...

Page 95: ...di ingresso troppo alto Filtro Low Cut per ridurre il rumore a bassa frequenza La funzione di registrazione duale consente di registrare due file simultaneamente a diversi livelli Interruttore scorrev...

Page 96: ...osi Luoghi direttamente esposti alla pioggia o acqua Non collocare l unit sopra un amplificatore di potenza o un altro dispositivo che genera calore Pulizia dell unit Per pulire l unit usare un panno...

Page 97: ...ere il pulsante j per aprire la schermata del menu i i Quando viene visualizzata una voce di impostazione premere il pulsante j per spostare il cursore a sinistra i i Quando si immette il nome di un f...

Page 98: ...secondo per accendere o spegnere l unit i i Far scorrere e tenere premuto questo inter ruttore verso 0REC per circa un secondo per avviare la registrazione i i Durante la registrazione far scorrere e...

Page 99: ...e visualizzata in alto a destra del display L icona della batteria mostra la quantit di carica residua in barre q q La batteria quasi scarica e l unit si spegner presto se l icona senza barre lampeggi...

Page 100: ...a fessura nella direzione della freccia come mostrato nella figura seguente fino a quando non si blocca Rimozione della card microSD Premere delicatamente la card microSD e poi rilasciarla per permett...

Page 101: ...SDHC Collegamento a un computer Collegare l unit a un computer tramite il cavo USB in dotazione come mostrato in figura Computer Cavo USB micro B Se l unit accesa o spenta una volta collegata appare l...

Page 102: ...Nome del file 5 Tempo di registrazione trascorso NOTA Il ritardo di un secondo ha lo scopo di impedire l azionamento accidentale Senza mettere in pausa la registrazione un nuovo file pu essere creato...

Page 103: ...la card microSD Quando l unit ferma o in registrazione tenere premuto il pulsante MENU per visualizzare la capacit di registrazione rimanente della microSD Effettuare le impostazioni dal menu Seguire...

Page 104: ...sonora AUTO LEVEL Regolazione automatica del livello OFF ON Quando il livello sonoro di ingresso troppo basso o troppo alto il volume di registrazione viene aumentato o diminuito automaticamente a un...

Page 105: ...000_110101 wav FILE NAME Imposta il nome del file DR0000 Premere il pulsante 7 9 ENTER per spostare il cursore da sinistra a destra di un carattere alla volta Quando il cursore si trova nel carattere...

Page 106: ...o Premere il pulsante 7 9 ENTER per spostare il cursore da sinistra a destra 1q2q3q4q5 Quando il cursore si trova su 5 a destra premere il pulsante 7 9 ENTER per confermare la data e l ora e tornare a...

Page 107: ...pulsanti DR 10X per formattare la card microSD Invalid Card La card potrebbe essere danneggiata Cambiare la card microSD No Music File Non vi alcun file che possa essere riprodotto sulla card microSD...

Page 108: ...ow mid o hi Esempio mic_gain mid mic_gain low_cut Questo indica l impostazione LOW CUTdella schermata del menu Annotare come off o on Esempio low_cut off low_cut limiter Questo indica l impostazione L...

Page 109: ...file_name battery_type alkali battery_type date 2014 08 27 date time 23 59 59 time dr10_syspara Esempio con solo l impostazione dell orario dr10_syspara time 23 59 59 time dr10_syspara Specifiche Dat...

Page 110: ...Windows Windows 7 Windows 8 compreso 8 1 Mac OS X Mavericks 10 9 OS X Mountain Lion 10 8 Generali 8 8 Alimentazione 1 batteria AAA alcalina NiMH o al litio Alimentazione dal bus USB di un computer 8...

Page 111: ...za altezza profondit sporgenze escluse 8 8 Peso 68 3 g batterie incluse 56 3 g batterie escluse 8 8 Temperatura di esercizio 0 C 40 C Dimensioni 52mm 28mm 94 4mm Le illustrazioni in questo manuale pot...

Page 112: ...112 TASCAM DR 10X...

Page 113: ...TASCAM DR 10X 113 V V Y V N O V 5 1 V V N V Y V...

Page 114: ...0 048kHz 24 Mono PCM WAV BWF 0 0 15 0 0 0 0 0 0 2 0 0 113 113 114 114 115 115 115 115 115 115 115 116 116 117 117 118 118 4 118 118 119 119 119 119 119 microSD 120 microSD 120 microSD 120 microSD 120...

Page 115: ...0 0 0 0 0 0 0 0 0 0 3 5mm 1 8 0 0 96x16 EL 0 0Micro B USB 2 0 0 0 x1 0 0USB x1 0 0 x1 0 0 MENU 0 0 ON _ 0 0 0 0 microSD microSDHC microSD 0 0 0 0 0 40 0 0 0 0 TASCAM http tascam jp support registrati...

Page 116: ...ASCAM DR 10X 0 0 0 0 0 0 i i DR 10X i i Serial No i i i i i i 0 0 0 0 0 0 1 XLR XLR HOT 127 1 GND 2 HOT 3 COLD 2 XLR 3 MENU i i MENU MENU i i MENU 4 j i i j i i 1 i i j i i j i i 5 k i i k i i k i i k...

Page 117: ...TASCAM DR 10X 117 6 7 9 ENTER i i 7 9 ENTER i i 7 9 ENTER 7 8 4 1 9 USB USB Micro B USB USB USB POWER STORAGE USB 0 microSD microSD microSD 120 microSD q w o 0REC 1 i i 0REC 1 i i 0REC 1...

Page 118: ...118 TASCAM DR 10X e PHONES PHONE 4 1 USB USB 4 4 4 4 4 1 4 122 i i 4 i i 4 q q USB...

Page 119: ...TASCAM DR 10X 119 XLR i i CLAMP i i i i DR 10X o 0REC 1 TASCAM DR 10 o 0REC 1 o 0REC USB USB AUTO PWR SAVE ON 10 DATE TIME 123 DATE TIME...

Page 120: ...croSD microSD microSDHC 64MB 2GB microSD 4GB 32GB microSDHC TASCAM http tascam jp microSD microSD microSDHC 0 0 0 0 0 0 0 0 0 0 microSD microSD microSDHC microSD microSDHC WAV24 MONO 48kHz DUAL REC MO...

Page 121: ...B microB USB USB USB USB POWER STORAGE POWER STORAGE j k 7 9 ENTER 0 0 POWER USB 0 0 STORAGE USB connected USB DR 10 DR 10 o 0REC 0REC 1 TASCAM DR 10 o 0REC 0REC 1 0REC 1 12dB 1 4 2 5 3 i i i i 2GB i...

Page 122: ...122 TASCAM DR 10X 7 9 ENTER j k j k j k 1 3 2 4 i i MENU i i gg tt ggg ttt microSD MENU microSD 1 MENU 2 j k 7 9 ENTER 3 j k 4 7 9 ENTER 5 2 4 6 MENU...

Page 123: ...HOT LO MID HI LOW CUT OFF ON 120Hz LIMITER OFF ON MIC GAIN AUTO LEVEL OFF ON DUAL REC MODE OFF ON 1 6dB 1 2 2 1 _D 002 _ TASCAM WAV 002 _ TASCAM _ D WAV 1 2 1 2 3 1 002 2 TASCAM FILE NAME WORD 3 D 6d...

Page 124: ...R0002 3 DR0003 10 DR0010 000_DR0001 wav 000_DR0002 wav 000_DR0003 wav 000_DR0010 wav FORMAT SD microSD Sure YES NO microSD YES NO BATTERY TYPE ALK NiMH LITH ALK 4 LITH 4 NiMH 4 DATE TIME YY MM DD HH M...

Page 125: ...icroSD DR 10X microSD Invalid Card microSD No Music File microSD Non Supported Write Timeout microSD Player Error Write Failed microSD 0 0 DR 10_SysPara txt 0 0 microSD dr10_syspara dr10_syspara dr10_...

Page 126: ...6 file_name DR0000 file_name battery_type BATTERY TYPE alkali ni mh lithium battery_type alkali battery_type date DATE TIME YYYY MM DD 10 date 2014 08 27 date time DATE TIME HH MM SS 24 8 time 23 59...

Page 127: ...29dB MID 35dB HI 45dB 10k 1 8 3 5mm STEREO PHONE DUAL MONO IN q PHONES 10k MIC GAIN EXT HOT 20Hz 22kHz 1 2dB 0 05 1kHz Sinewave S N 92dB PHONES volume max MIC GAIN LO MID HI 20Hz 22kHz 1 2dB 0 05 1kH...

Page 128: ...8 TASCAM DR 10X 0 0 EVOLTA WAV 48kHz 24 10 JEITA 0 0 eneloop WAV 48kHz 24 8 JEITA 0 0 Energizer ULTIMATE LITHIUM WAV 48kHz 24 15 5 JEITA 1 52 x 94 4 x 28 mm x x 68 3g 56 3g 0 40 52mm 28mm 94 4mm 0 0 0...

Page 129: ...TASCAM DR 10X 129...

Page 130: ...130 TASCAM DR 10X 206 8530 1 47 206 8530 1 47 0570 000 809 10 00 12 00 13 00 17 00 0 0 042 356 9137 FAX 042 356 9185 358 0026 858 0570 000 501 9 30 17 00 0 0 04 2901 1033 FAX 04 2901 1036...

Page 131: ...ce shippingchargestoanydestinationwithintheUnitedStates LIMITATIONOFIMPLIEDWARRANTIES Any implied warranties INCLUDING WARRANTIES OF MERCHANTABILITY AND FITNESS FOR A PARTICULAR PURPOSE are limited in...

Page 132: ...Model Serial No Date of purchase http teac global com Owner s name Address Dealer s name Dealer s address X DR 10X Memo WARRANTY...

Reviews: