6 − DVD±RW/HD playback & recording
TASCAM DV-RA1000HD
1
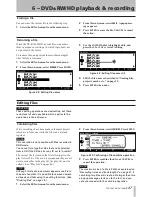
Recording times and track lengths
DVD±RW discs recording
The total time recordable on a DVD±RW single-layer
disc depends on the sampling frequency.
In addition, the maximum file size is fixed at 2GB.
This means that the maximum recording time per track
also varies according to the sampling frequency.
All audio files must be at least four seconds in length.
Sampling
frequency
Recording
type
Disc time
(minutes)
Maximum
track length
(minutes)
44.1 kHz
PCM
290
135
48 kHz
PCM
266
124
88.2 kHz
PCM
144
67
96 kHz
PCM
133
62
176.4 kHz
PCM
70
33
192 kHz
PCM
66
30
2.8224 MHz
DSD
107
50
Table 6.1: Sampling frequencies and
recording times
Sampling
frequency
Recording
type
Maximum project length
Maximum recordable time on the HD
(60 GB)
44.1 kHz
PCM
811 minutes (13.5 hours)
3779 minutes (62.9 hours)
48.0 kHz
PCM
745 minutes (12.4 hours)
3472 minutes (57.8 hours)
88.2 kHz
PCM
405 minutes (6.7 hours)
1889 minutes (31.4 hours)
96.0 kHz
PCM
372 minutes (6.2 hours)
1736 minutes (28.9 hours)
176.4 kHz
PCM
202 minutes (3.3 hours)
944 minutes (15.7 hours)
192.0 kHz
PCM
186 minutes (3.1 hours)
868 minutes (14.4 hours)
2.8224 MHz
DSD
811 minutes (13.5 hours)
1417 minutes (23.6 hours)
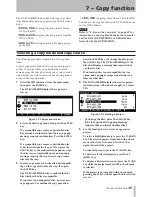
Table 6.2: Sampling frequencies and recording times
HD recording
The total time recordable on the HD is significantly
longer than the time recordable on a DVD±RW disc.
However, the maximum file length on the HD is the
same as for a DVD±RW disc. There is a limit to the
recording time for each project.
All audio files on the HD must be at least four seconds
in length.
The following recording times are estimates. You can-
not extend the recording time beyond the maximum
time specified for each project.
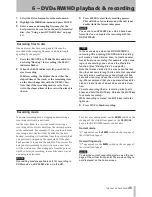
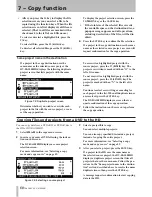
When you insert a new DVD±RW disc into the tray and
close it, the DV-RA1000HD displays a popup screen.
Press the
ENTER
key to display the format screen
shown below. Follow the steps below to format the disc:
NOTE
You cannot use a DVD±R disc which is not re-
corded any project. If you insert a DVD±R disc into
the tray, the DV-RA1000HD displays a message
“
UNUSABLE DISC
.”
Figure 6.3: Format screen
1
Press the
F1
or
F2
key (cursor) to highlight
FORMAT
.
2
Rotate the
JOG/DATA
dial to select
QUICK
or
FULL
.
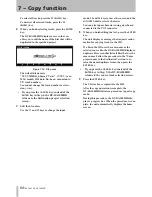
Quick format
This formatting writes a project file and other neces-
sary data, then places the DV-RA1000HD in record
ready mode in a few minutes.
If you insert a brand new disc, the DV-RA1000HD will
work in the background when the unit is not recording
or playing to format an unrecorded area on the disc.
Using a new DVD±RW disc


