background image

TASCAM  HD-R1


11

3–Screens and Menus

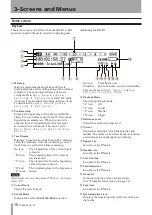
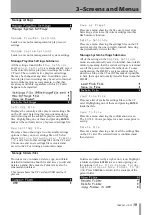
Transport state icons

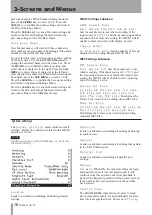
Screen navigation

Basic menu operation

The transport section of the screen changes its icons 

based on the transport’s current state. The recording 

space display will blink when free space is getting 

low.

Recording

y

 Sync Rec Icon

Icon shows the ON state.

u

 Input Source

Shows the currently active input.

“A” icon 

Analog (mic/line) input

“S” icon 

S/PDIF input

i

 File Format

Shows the currently selected file format.

“W” icon  WAV

“M” icon  MP3

o

 Pre-Record

Icon shows the ON state.

p

 Channels

Shows the currently selected channels.

“2” icon 

Stereo

“1” icon 

Mono right or left.

a

 Audio Overload

Lights when the audio signal is overloaded.

STOP

REC. READY

PLAY

PLAY READY

RECORD

FAST FORWARD

REWIND

Various settings for this device can be made using 

its menu system. To use the menu system, press the 

MENU

 key to enter Menu mode and open the Main 

Menu screen. When in Menu mode, press the 

MENU


key at any time to return to the Home Screen. 

Turn the 

SHUTTLE/DATA

 wheel to select the item you 

want to adjust. 
Selected items appear on screen as light characters on 

a dark background. Press the 

ENTER

 key to confirm 

selection of an item. If a 

˘

 icon appears to the right 

of the item, a submenu opens. If there is no submenu, 

either parameter settings appear or an operation is 

executed (in some cases a confirmation or warning 

message appears before execution). 

When the Main Menu is open, press the 

CANCEL


key to return to the Home Screen. When a submenu 

is open, press the 

CANCEL

 key to return to its parent 

menu.

NOTE

A setting with its name in italics is disabled and cannot be 

selected or changed. This may be due to a dependency on 

another setting or system state. For example, most settings 

cannot be changed while the transport is moving.

Summary of Contents for HD-R1

Page 1: ...D01008520B HD R1 Professional Stereo Audio Recorder OWNER S MANUAL...

Page 2: ...cet appareil peut provoquer des interf rences radio dans ce cas l utilisateur peut tre amen prendre des mesures appropri es F r Kunden in Europa Warnung Dies ist eine Einrichtung welche die Funk Entst...

Page 3: ...he apparatus When a cart is used use caution when moving the cart apparatus combination to avoid injury from tip over 13 Unplug this apparatus during lightning storms or when unused for long periods o...

Page 4: ...menu operation 11 Screen navigation 11 Main menu 12 Folder 12 Playlist 13 Play settings 14 Record settings 15 System settings 16 Manage settings 19 Manage folders files 19 Utilities 20 4 Key Shortcut...

Page 5: ...er files to or from a computer using the common File Transfer Protocol FTP standard The built in USB port permits files to be transferred to or from a USB storage device It also supports the use of a...

Page 6: ...ier Make sure that the unit is mounted in a level position for correct operation The voltage supplied to the unit should match the voltage as printed on the rear panel If you are in any doubt regardin...

Page 7: ...ey at the same time it becomes a shortcut key See 4 Key Shortcuts on page 22 i STOP Stops any transport motion silences input monitoring If pressed while playing locates to the beginning of the playba...

Page 8: ...itches the HD R1 s power on and off 2 PHANTOM 48V indicator This red indicator is illuminated when the HD R1 is providing phantom power to the XLR microphone inputs The PHANTOM power switch is located...

Page 9: ...this digital input is only used when monitoring the input or recording The digital input can be selected using Main Menu Record Settings Input Source When in use the HD R1 will lock its sample rate to...

Page 10: ...time of the current track is shown R icon The remaining time of the current track is shown T icon The elapsed time from the beginning of the play area is shown R and The remaining time in the play are...

Page 11: ...sing its menu system To use the menu system press the MENU key to enter Menu mode and open the Main Menu screen When in Menu mode press the MENU key at any time to return to the Home Screen Turn the S...

Page 12: ...ng the time and checking the software version NOTE Please note that if no CF card is present only the System Settings and Utilities menus will be available The inverted line on the screen indicates th...

Page 13: ...n the highlighted entry in the list press the TIME key to jump to the Change Playlist Position feature and use the SHUTTLE DATA wheel to move up and down in the list Please note that this means that t...

Page 14: ...their name on the left side and current value on the right NOTE Simultaneously pressing SHIFT MODE keys is a shortcut to the Play Settings Menu Playback Mode All Plays all tracks on the CF card visibl...

Page 15: ...g monitoring and recording Auto Markers The HD R1 can automatically drop markers when an audio input overload occurs or at a specific time interval The field options are Audio Overs and Time Interval...

Page 16: ...dth 16 Bits or 24 Bits Sets the number of bits per sample when recording Broadcast WAV files MP3 Settings Submenu MP3 Sample Rate 44 1 kHz 48 kHz Sets the sample rate to use when recording If the inpu...

Page 17: ...ate the input volume any time there is a playback signal over the Ducking Threshold Ducking Threshold 6 dBFS 12 dBFS 18 dBFS 24 dBFS 30 dBFS Infinity Ducking Attenuation 3 dB 6 dB 9 dB 12 dB 18 dB 24...

Page 18: ...etails Input Polarity Active Low or Active High Determines the polarity of all parallel port input signals Busy1 Signal If set to Playback the busy signal is initiated during playback If set to Record...

Page 19: ...slot stores the current settings into this flash memory location Delete Settings Presents a menu showing the settings files on the CF card except for the one currently loaded Selecting one permanentl...

Page 20: ...This menu option will not be selectable if there are no markers for this file NOTE Simultaneously pressing SHIFT MARK keys is a shortcut to Edit Markers list Delete All Markers Select this and press...

Page 21: ...updating software it replaces the user version If there is a problem with the update you can always boot up the HD R1 using the default system version by holding the STOP key and the ENTER key while...

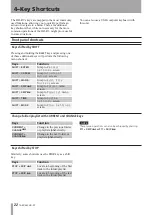
Page 22: ...owing menu shortcut Keys Function SHIFT ENTER Jump to Record Settings screen SHIFT CANCEL Jump to Contrast Adjust screen SHIFT MARK Jump to Edit File Markers screen SHIFT SKIP Jump to Folder menu scre...

Page 23: ...Folders Files Q Manage Play Rec Settings W Manage System Settings U Utilities C Contrast Adjust PrintScreen Saves a screenshot of the current display on the CF card ENTER Enter ESC Same function as C...

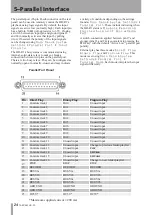
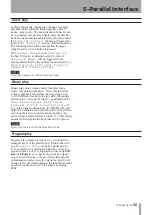
Page 24: ...to pressing the STOP key with the default Active Low parallel port polarity External play has three modes Direct Play Binary Play and Program Play This mode is set using Main Menu System Settings Para...

Page 25: ...1 10 are interpreted as a binary number This enables the triggering of up to 1023 different tracks In the idle state the signals fed into pins 1 10 must be inactive as determined by Main Menu System...

Page 26: ...a rate 9600 bps Character length 8 bits Parity bit none Stop bit 1 bit Transmission order Least significant bit first 9 pin D sub Connector Pinout Serial interface specifications Pin Signal Descriptio...

Page 27: ...client to make a connection on port 21 NOTE When displaying Japanese please use an FTP application that handles Unicode The case sensitive password can be set here Main Menu System Settings Network Se...

Page 28: ...a representation of the files and folders on a typical CF card used by the HD R1 The names used below are examples Audio Take0001 mp3 Take0002 mp3 Take0003 mp3 Take0004 wav Take0005 wav HDR1 HDR1 xml...

Page 29: ...l 20 Hz to 20 kHz 1 0 dB 44 1 kHz 48 kHz MIC to LINE OUT 20 Hz to 40 kHz 0 5 dB 4 dB 88 2 kHz 96 kHz Noise level at maximum trim MIC to LINE OUT 55 dBu 22 Hz to 22 kHz 150 input termination Dynamic ra...

Page 30: ...evel 4 7 dBu at 1 distortion Maximum power 50 mW 50 mW Digital Input Output Connector Coaxial RCA phono jack Impedance 75 Format S PDIF IEC 60958 2 Quantization 16 bit or 24 bit RS 232C Connector 9 pi...

Page 31: ...its in a 1U 19 rack space Weight 3 2 kg Specifications and appearance are subject to change without notice for improvement Please be aware that due to improvements in this product illustrations in thi...

Page 32: ...5939 Wallace Street Mississauga Ontario L4Z 1Z8 Canada TEAC MEXICO S A De C V www tascam com Phone 52 55 5010 6000 R o Churubusco 364 Colonia Del Carmen Delegaci n Coyoac n CP 04100 M xico DF M xico...

Reviews: