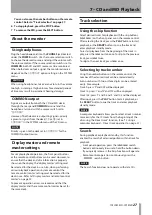
background image

14


TASCAM MD-CD1MKIII

4 – Names and Functions of Parts

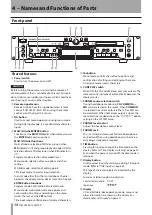
Front panel

1

2

3

4

5

6

7 8 9

0 q

w

Shared features

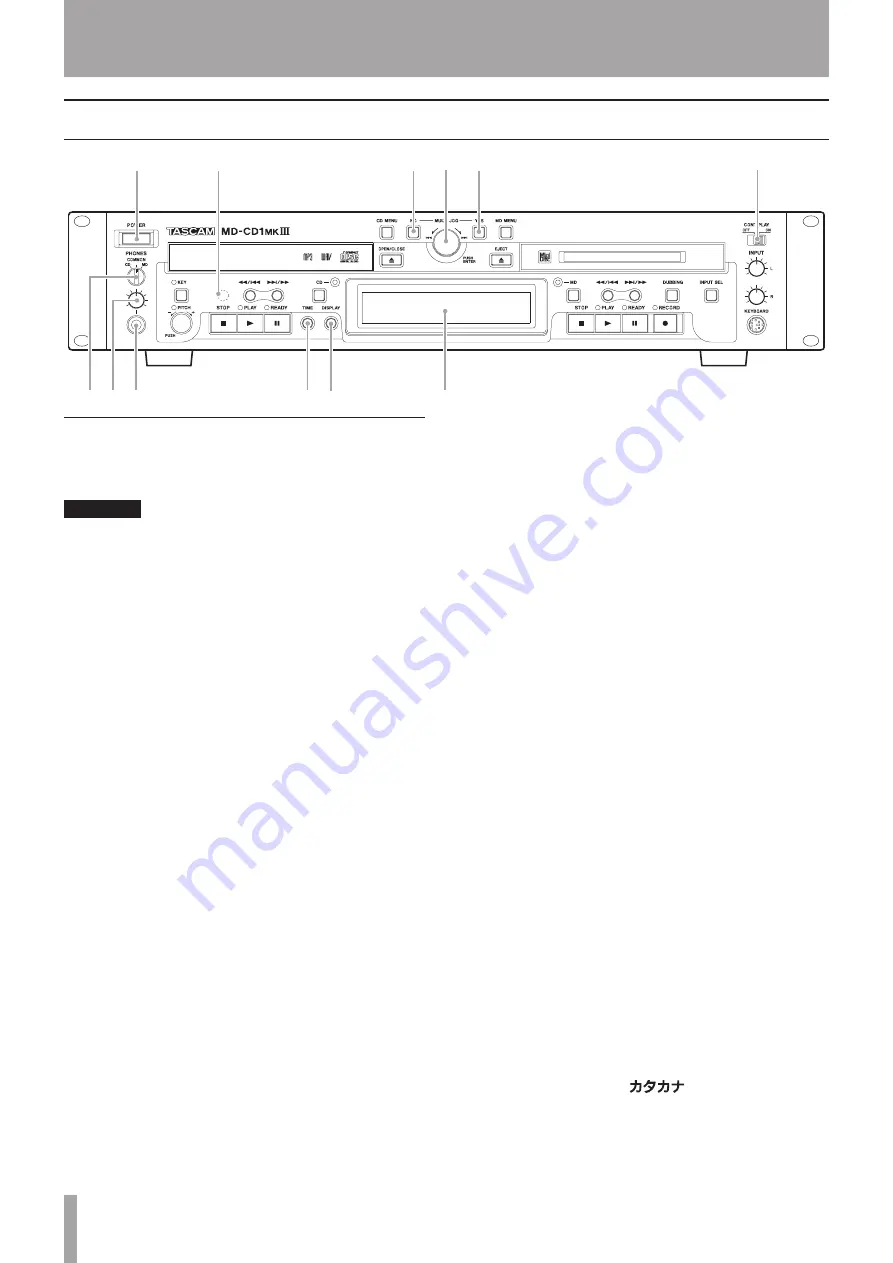
Power switch

Press to turn the power on and off.

CAUTION

Before turning the power on, minimize the volume of 

other equipment that is connected to this unit. Failure to 

do so might cause sudden loud noises, which could harm 

your hearing or result in other trouble.

2

  Remote signal sensor

Receives signals from the supplied wireless remote 

control (TASCAM RC-MC1). When using the remote 

control, point the tip at this sensor.

NO button

Used to cancel menu operations during menu mode.
During title input mode, it is used to delete character 

inputs

MULTI JOG dial/ENTER button

Functions as the 

MULTI JOG

 dial when rotated, and as 

the 

ENTER

 button when pushed

  MULTI JOG dial functions

Normal mode: selection of MD disc groups (when 

MD

 indicator is lit and group playback mode is ON) or 

selection of data CD directories (when 

CD

 indicator is 

lit)
Program mode: selection of recorded tracks
Menu mode: selection of menu options and their 

settings
MD Edit mode: selection of editing points
Title input mode: character input selection
In any mode other than those listed above, the dial 

performs the display master deck’s Track Skip function.

  ENTER button functions

Program mode: confirmation of selected tracks
Menu mode: confirmation of menu options and 

confirmation of settings and editing on the menu 

(works the same as the 

YES

 button)

Title input mode: confirmation of selected characters

Yes button

Menu mode: confirmation of menu options and 

confirmation of settings and editing on the menu
Title input mode: inserts characters

CONT PLAY switch

When ON, the CD and MD decks play successively. The 

deck currently in playback automatically becomes the 

display master.

PHONES source selection switch

During headphone monitoring, 

CD

COMMON

 or 

MD

 can be selected as the source. When 

COMMON


is selected, the current output (either CD or MD) can 

be monitored. When both decks output a signal, the 

monitored source depends on the “

COMMON?

” option 

setting on the SYSTEM menu.

PHONES level control

Adjusts the headphone output level.

PHONES jack

This is a standard stereo jack for stereo headphone 

connection. When using headphones with a stereo 

mini plug, an adaptor is required.

TIME button

Pressing this button changes the time mode on the 

display. Refer to “Time display switching” on page 32. 

Even when the power is turned off, the time mode is 

retained.

Display button

Used to select input character type during Title Input 

mode. Refer to “Title input” on page 44.
The type of character selected is indicated by the 

display.
Lower case letters/code: no indication
Capital letters/code:  

CAPS


Japanese: 


Display

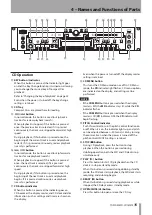
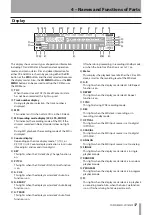
CD and MD data, deck operation mode, menus and 

other information are shown on the display. For 

details, refer to “Display” on page 17.

Summary of Contents for MD-CD1mkII

Page 1: ...D01142520A MD CD1 Minidisc Deck CD Player OWNER S MANUAL...

Page 2: ...interference at his own expense CAUTION Changes or modifications to this equipment not expressly approved by TEAC CORPORATION for compliance could void the user s authority to operate this equipment C...

Page 3: ...g to qualified service personnel Servicing is required when the apparatus has been damaged in any way such as power supply cord or plug is damaged liquid has been spilled or objects have fallen into t...

Page 4: ...ccumulators correctly you will help save valuable resources and prevent any potential negative effects on human health and the environment c Improper disposal of waste batteries and or accumulators ca...

Page 5: ...leak causing fire injury or stains around them Do not carry or store batteries together with small metal objects The batteries could short causing leak rupture or other trouble Do not heat or disasse...

Page 6: ...layback modes 26 Basic playback operation 26 About the monitor 27 Using headphones 27 COMMON output 27 Display master and remote master settings 27 Track selection 27 Using the skip function 27 Select...

Page 7: ...tle when creating a group 43 Deleting a group 43 11 Title input 44 Disc title input TITLE 44 Title input operation 44 Track title input 44 Group title input 45 12 Using a Computer Keyboard 46 Keyboard...

Page 8: ...playback modes Normal Single Program up to 99 tracks for CD 25 tracks for MD Random and A to B Equipped with a digital volume control for CD output and between 54 to 18 dB Fade in fade out playback f...

Page 9: ...in this document are the trademarks or registered trademarks of their respective owners Any data including but not limited to information described herein are intended only as illustrations of such da...

Page 10: ...e edge Dirt on discs can lower the sound quality so clean them and always store them in a clean state Do not use any record spray anti static solutions benzene paint thinner or other chemical agents t...

Page 11: ...ted Information about recorded tracks including their starting and ending addresses and titles is recorded in something called the User Table of Contents U TOC This is overwritten when the disc is edi...

Page 12: ...the buttons become unresponsive Precautions about using batteries Misuse of batteries could cause them to leak rupture or otherwise be damaged Please read and abide by the precautions on the battery...

Page 13: ...on NOTE You can use this unit in a system configured with balanced analog input output only by attaching a separately sold balanced analog input output board TASCAM LA MC1 Connection cables are not su...

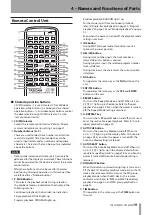
Page 14: ...e confirmation of menu options and confirmation of settings and editing on the menu works the same as the YES button Title input mode confirmation of selected characters 5 Yes button Menu mode confirm...

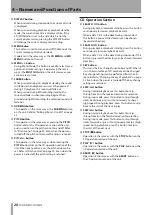
Page 15: ...his button is pressed the indicator goes on CD becomes the display master and CD deck and disc information such as settings and time are shown on the display Even when the power is turned off the disp...

Page 16: ...page 35 INPUT SEL button Select a recording source for the MD deck The source changes in the following order each time the key is pressed ANALOG OPTICAL COAXIAL During Dubbing mode the CD output signa...

Page 17: ...e display master deck s Auto Cue function is on A READY This lights when the display master deck s Auto Ready function is on A TRACK This lights when the display master deck s Auto Track function is o...

Page 18: ...GITAL OUTPUTS MD CD coaxial Terminals These are the digital output terminals coaxial The playback signals from the MD deck and the CD deck are output through their respective digital output terminals...

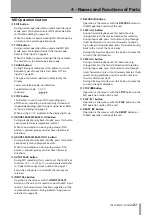
Page 19: ...ng is retained 4 INS button During MD Title Input mode this button inserts a space at the cursor position 5 DEL CLR button During track number input the track number is cleared when this button is pre...

Page 20: ...efer to Pitch control on page 30 Even when the power is turned off the pitch setting is retained CD Operation Section a SEARCH button During playback or playback standby press this button continuously...

Page 21: ...b AUTO TRACK button During MD recording this is used to set the Auto Track function OFF dBor Timecan be selected Refer to Update Move up a track number on page 37 Even when the power is turned off the...

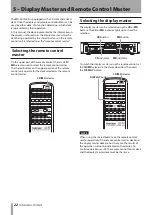
Page 22: ...l master The shared buttons on the upper portion of the remote control unit operate for the deck selected as the remote control master CD MD selector Selecting the display master The display master ca...

Page 23: ...ck 33 MP3 ACTION Setting the error handling during MP3 file playback Setting MP3 ACTION 33 CD VOL FUNC sub menu CD volume function options PLAY VOLUME Output level setting Output volume 33 FADE IN Fad...

Page 24: ...ED Dubbing speed setting Basic recording 36 SYNC LEVEL Operation level setting of Sync recording Sync recording 39 SYNC Sync recording mode on off Sync recording 39 A_TRK TIME Operation time setting o...

Page 25: ...Front panel operation Use the MULTI JOG dial to select then press the dial Remote control operation Use the MENU button to select then press the ENT YES button The setting screen will be displayed Mo...

Page 26: ...turn on the unit The display will indicate NO DISC 2 Press the OPEN CLOSE button and the CD tray opens 3 Place the CD in the tray label side up 4 Press the OPEN CLOSE button again and the CD tray clo...

Page 27: ...must be selected for the deck in use Refer to Display master and remote control master on page 22 To prevent operation errors we recommend that the display master and the remote control master be set...

Page 28: ...ton to cue the track and enter playback standby mode Example To specify 1 min 00 sec from the start of track 2 input 002 001 NOTE Following the above example if 0021 is input the same position will be...

Page 29: ...the desired A B section will be played repeatedly To cancel A B Repeat mode and resume normal playback Press the A B REPEAT button once more When the STOP button is pressed the specified A B section i...

Page 30: ...ayback This function enables playback of selected tracks in any desired order Up to 99 tracks can be selected from a CD or up to 25 tracks from an MD for Program playback Programs of up to 100 discs i...

Page 31: ...he DEL CLR button Program limitations With an MD if the Group playback mode is on programs that include more than one group cannot be created With data CDs if the Directory playback mode is on program...

Page 32: ...e following playback functions are for CD only and are not available for MD playback Changing the key of playback The key of the music can be changed during CD playback Please note that this feature d...

Page 33: ...layback When the mode is turned off all MP3 and WAV files stored on the disc are played regardless of the directory structure Please note that Program playback and Repeat playback only function within...

Page 34: ...ROUP button is pressed the current setting is changed For example if the Group playback mode is off when the button is pressed the mode is turned on and GRP ONis displayed You can also use the GRP MOD...

Page 35: ...ee below For the fade in fade out time setting see Fade in and fade out recording on page 38 Recording mode setting Using the REC MODE option on the REC submenu of the MD menu select the recording mod...

Page 36: ...recording cannot be performed If the level is set to anything other than 0dB in REC VOLUME Vol xx xdBblinks for three seconds xx x Setting value In this case check the level as necessary If a partial...

Page 37: ...during recording Set this function using the AUTO TRACK button on the remote control to select OFF dB DDor TIME You can also set the auto track function using the A_ TRK option in the REC sub menu of...

Page 38: ...ecording operation is actually started It operates by holding the input signal in a buffer memory that can be set to contain up to 6 seconds of data representing a normal stereo input signal Before fo...

Page 39: ...on to enter recording standby mode NOTE In this status recording will begin as soon as a source signal is input 4 Input the source signal When a source signal is detected recording begins automaticall...

Page 40: ...he disc UNDO an edit operation UNDO function It is possible to cancel the most recently performed editing operation 1 Stop the MD deck 2 Select the UNDO option from the EDIT sub menu Undo is displayed...

Page 41: ...s Divide tracks DIVIDE Tracks can be divided into two or more tracks Example To divide C and D contained in track number 3 into two tracks 1 Select the DIVIDE option on the EDIT sub menu of the MD men...

Page 42: ...be moved 2 Select the MOVE option on the EDIT sub menu of the MD menu Move is displayed with representing the number of the track to be moved and representing the track number where it will be moved 3...

Page 43: ...in Deleting a group Groups can also be deleted 1 In stop mode select the GRP CANCEL option from the EDIT sub menu of the MD menu GRP No 01is displayed 2 Use the MULTI JOG dial to select the number of...

Page 44: ...s code no indication Capital letters code CAPS Japanese For front panel operation use the DISPLAY button Input procedure Use the number buttons to input characters at the cursor position Press the num...

Page 45: ...ck title is shown on the character display Title Edit mode is entered and the cursor flashes NOTE If there is no track title only the cursor will flash and nothing will be displayed 3 Add a title foll...

Page 46: ...y with the letter and number keys To move the cursor Use the cursor arrow keys and To delete characters Delete key deletes the character in the cursor position Back space key deletes the character bef...

Page 47: ...nu mode Enter ENTER pressing MULT JOG dial YES button Direct track operation You can select a track number directly for the 10 tracks from the beginning of the disc using CTRL No keys or ALT No keys C...

Page 48: ...PANEL LOCK in the SYSTEM submenu of the CD menu When noneis selected The lock is released and all key operations are enabled When CDis selected Key operations for the CD deck are disabled Keys disabl...

Page 49: ...ewing service data You can view service data via the following items in the SYSTEM submenu of the CD menu CD P_TIME The total CD playback time is shown MD P_TIME The total MD playback time is shown MD...

Page 50: ...cs as a means of protecting artist copyrights Some of these discs do not comply with standard CD format specifications and may not be able to be played on this unit MD section Even when the maximum re...

Page 51: ...n tracks are not desired make the following settings before dubbing Connect the CD digital output to the MD digital input either the optical or the coaxial terminal Select OPTICAL or CIAXIAL as the in...

Page 52: ...condition limits Can t Rec Recording cannot start because the Group playback mode is on Can t Sel Menu selection cannot be performed due to selection prohibitions Can t Undo You can t undo since no ed...

Page 53: ...ling frequency 44 1 kHz Bit rate 32 kbps 320 kbps or VBR WAV playback specifications Sampling frequency 44 1 kHz Quantization bit rate 16 bit Input ratings MD inputs Analog inputs Unbalanced Connector...

Page 54: ...Dynamic range 100 dB or more CD playback JEITA 98 dB or more MD playback JEITA 95 dB or more MD recording playback JEITA Channel separation 90 dB or more CD playback JEITA 90 dB or mer MD playback JEI...

Page 55: ...TASCAM MD CD1MKIII 55 Notes...

Page 56: ...allace Street Mississauga Ontario L4Z 1Z8 Canada TEAC MEXICO S A de C V http www teacmexico net Phone 52 55 5010 6000 R o Churubusco 364 Colonia Del Carmen Delegaci n Coyoac n CP 04100 M xico DF M xic...

Reviews: