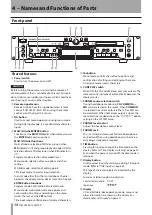
16
TASCAM MD-CD1MKIII
MD Operation
f
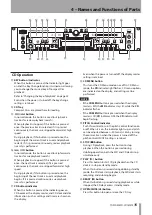
MD MENU button
This turns the MD Menu mode on or off. In MD Menu
mode, the
MD
indicator flashes, MD Menu options
are indicated on the display, and settings can be
performed.
NOTE
If the
•
MD MENU
button is pressed when the display
master is CD, the
CD
indicator stays lit, while the
MD
indicator flashes.
If the
•
MD MENU
button is pressed when the display
master is MD (
MD
indicator ON), the
MD
indicator will
begin flashing.
g
MD button/indicator
When this button is pressed, the indicator goes on,
MD becomes the display master, and MD deck and
disc information (such as settings and time) are shown
on the display. Even when the power is turned off, the
display master setting is retained.
h
Ô
/
Â
button
In normal mode, this button is used to skip back a
track or for review playback (search).
When playback is stopped, if this button is pressed
once, the previous track is selected; if it is pressed
continuously, the tracks are skipped backward at high
speed.
During playback, if this button is pressed once, the
beginning of the current track is cued, and playback
restarts; if it is pressed continuously, review playback
(search) is performed.
During Title Input mode, this button is used to move
the cursor to the left.
j
¯
/
button
In normal mode, this button is used to skip forward a
track or for cue playback (search).
When playback is stopped, if this button is pressed
once, the next track is selected; if it is pressed
continuously, the tracks are skipped forward at high
speed.
During playback, if this button is pressed once, the
beginning of the next track is cued, and playback
begins; if it is pressed continuously, cue playback
(search) is performed.
During Title Input mode, this button is used to move
the cursor to the right.
k
MD slot
Insert a MiniDisc here for playback or recording. With
the label side up, insert in the direction of the arrow.
l
DUBBING button
This is used when dubbing from CD to MD. For details,
see “Dubbing from CD to MD” on page 35.
;
INPUT SEL button
Select a recording source for the MD deck. The source
changes in the following order each time the key is
pressed:
ANALOG
œ
OPTICAL
œ
COAXIAL
During Dubbing mode, the CD output signal is
automatically selected as the source.
Even when the power is turned off, the input source
selection is retained.
z
INPUT (L/R) controls
These controls are used to adjust the input level when
recording analog signals to MD. The left and right
channels may be independently controlled.
x
EJECT (
ø
) button
Press this to eject the MD.
c
STOP (
ª
) button
Press this button to stop MD playback or recording.
If this button is pressed during dubbing, the MD deck
and the CD player stop simultaneously.
During MD Editing mode, when this button is pressed,
the Editing mode is cancelled, and the deck returns to
Normal mode.
v
PLAY (
Á
) button
Press this button to start playback when the MD deck
is in stop or standby mode.
When MD recording is in standby mode, pressing this
button starts MD recording.
When this button is pressed during dubbing standby
mode, the CD deck begins playback and the MD deck
begins recording, and dubbing begins.
b
READY (
π
) button
When this button is pressed during MD playback or
while stopped, the MD deck enters standby mode.
When this button is pressed during MD recording, the
MD deck enters recording standby mode.
n
RECORD (
–
) button
When this button is pressed and there is no MiniDisc
in the mechanism, the input signal can be monitored.
If a recordable MiniDisc is inserted into the mechanism
while it is stopped, when this button is pressed, the
MD deck enters recording standby mode, and the
input signal can be monitored.
When this button is pressed during recording, a track
mark is entered at that point and a new track is started.
m
KEYBOARD connector
An IBM PC/AT compatible keyboard with PS/2 interface
can be connected to this terminal to enable certain
operations of the MD-CD1MKIII with the keyboard.
The key arrangement of a keyboard is divided into two
types: US and JP. The setting of this unit needs to be
configured. Check the specified keyboard type in the
menu settings. (See “Keyboard type setting” on page
46.)
4 – Names and Functions of Parts

