TASCAM Mixcast 4
9
ENGLISH
Preparation
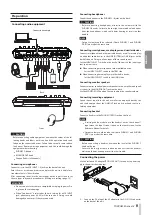
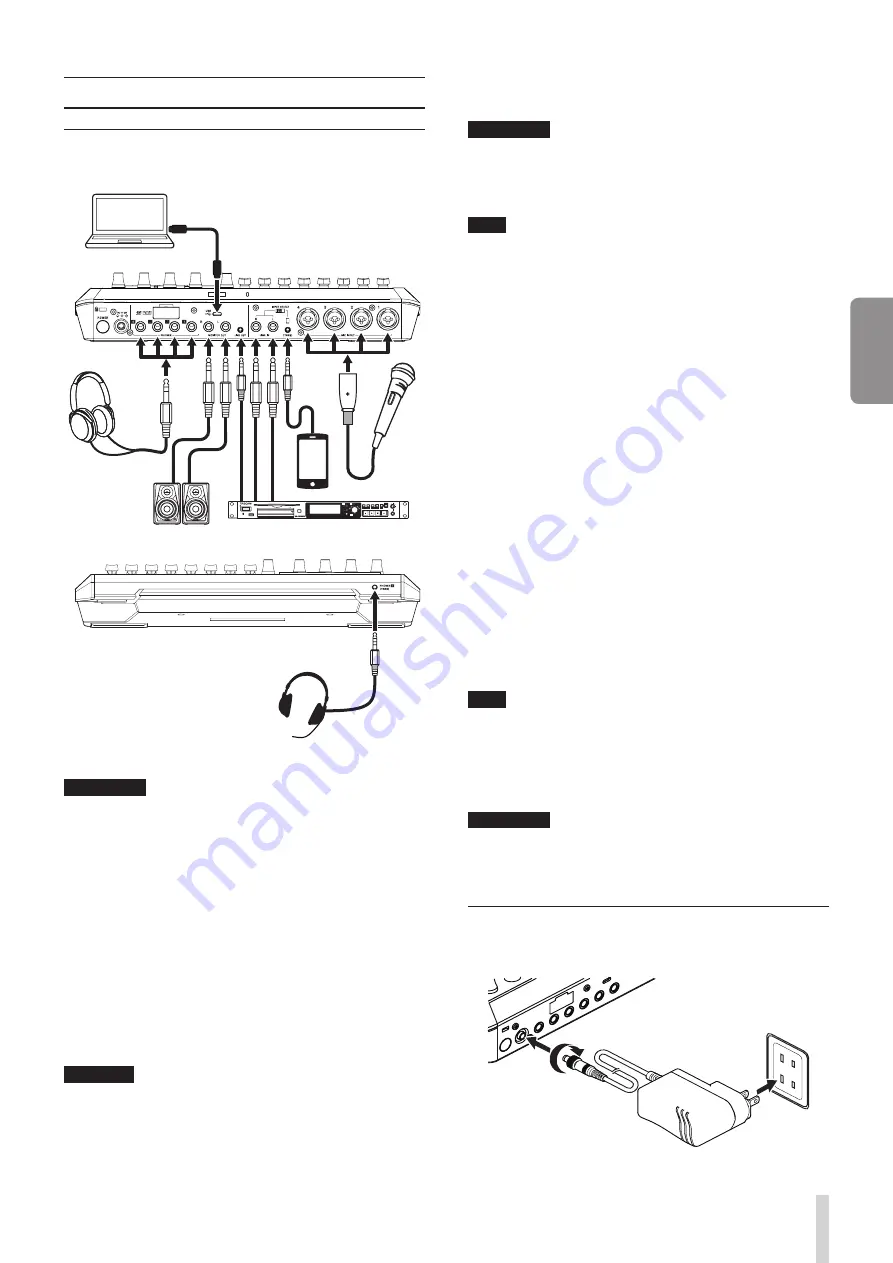
Connecting audio equipment
Front
Back
Connection example
V
CAUTION
Before connecting audio equipment, minimize the values of the fol-
lowing knobs and faders on this unit and the operation knobs and
faders on the connected devices. Failure to do so could cause sudden
loud noises from monitoring equipment, and this could damage the
equipment or harm hearing.
i
PHONES
1
–
4
knobs
i
MONITOR OUT knob
i
Channel faders (all channels)
Connecting microphones
Connect mics to the MIC INPUT 1–4 jacks on the back of the unit.
Point the mics at the sound sources and place the unit in a stable loca-
tion where there is little vibration.
After connecting them, use the mic settings on the Input Screen to set
the mic types to dynamic or condenser. (Making mic settings page 12)
ATTENTION
i
Do not connect mics that are compatible with plug-in power. Do-
ing so could cause damage.
i
When “Condenser” is selected as the mic setting for a MIC INPUT
jack, phantom power (+48V) will be turned on. Doing so could
damage dynamic mics if they are connected.
Connecting headphones
Connect headphones to the PHONES
1
–
4
jacks on the back.
V
CAUTION
Before connecting headphones, minimize the volumes with the
PHONES
1
-
4
knobs. Failure to do so might cause sudden loud noises
from the headphones, which could harm hearing or result in other
trouble.
NOTE
Output volume could be reduced if both PHONES 1 and PHONES
(TRRS) are used at the same time.
Connecting smartphones, media players and similar devices
Connect smartphones and other portable devices as well as media play-
ers and other audio devices to the LINE IN (TRRS) or LINE IN jacks on the
back of the unit. Doing so allows input of these sound sources.
Set the INPUT SELECT switch on the back of the unit to the input type
that you want to use.
p
When connecting a smartphone or other portable device:
Set the INPUT SELECT switch to the TRRS side.
p
When connecting a media player or other audio device:
Set the INPUT SELECT switch to the LINE IN side.
Connecting monitor speakers
Connect monitor speakers (powered speakers or an amplifier and speak-
er system) to the MONITOR OUT jacks on the back.
Use the MONITOR OUT knob on the top to adjust the speaker volume.
Connecting recording equipment
Sound sources input into this unit as well as sound played back by this
unit can be output from the LINE OUT jack on its back and sent to re-
cording equipment.
Connecting headset
Connect a headset to the PHONES (TRRS)
1
jack on the front.
NOTE
i
A setting can be made to use the headset mic as the channel 1
input when the Input Screen is open on the touchscreen. See the
Reference Manual for details.
i
Output volume could be reduced if both PHONES 1 and PHONES
(TRRS) are used at the same time.
V
CAUTION
Before connecting a headset, minimize the level of the PHONES
1
knob on the top.
Failure to do so might cause sudden loud noises from the headset,
which could harm hearing or result in other trouble.
Connecting the power
Use the included AC adapter (PS-P1220E NUT) to connect a power sup-
ply to the unit as shown below.
1. Connect the DC plug of the AC adapter to the DC IN 12V connector
on the back of the unit.
Summary of Contents for Mixcast 4
Page 114: ...114 TASCAM Mixcast 4 Pad Sounds SOUND PAD PAD Podcast Editor 1 PAD 1 8...
Page 117: ...TASCAM Mixcast 4 117 p p p p 1 p p p p o o Mixcast 4 o o Serial No o o o o o o p p p p 8 p p...
Page 120: ...120 TASCAM Mixcast 4 266 7 mm 263 6 mm 374 8 mm 71 2 mm 56 5 mm p p p p...
Page 122: ...122 TASCAM Mixcast 4...


