MMR-8
Tascam MMR-8 Owner’s Manual • Chapter 3 • MMR-8 Operation
53
As with the Setup menu system, the Wheel and arrow keys are used to navigate
through the available selections at a given level. Unlike the Setup menu system,
however, descending through the hierarchy of track information is accomplished
by repeatedly pressing LOAD TRACK. Pressing LOAD TRACK while at the
bottom or “track” level exits the Load Track state and returns the MMR-8 to the
Normal state.
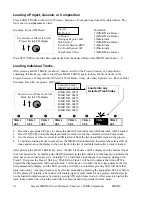
When LOAD TRACK is first pressed, the LCD will show a list of all WaveFrame
Projects, Pro Tools Sessions, or OMF Compositions on all mounted volumes. The
wheel or arrow keys are used to scroll through the various choices (if multiple
choices are available) and to display the name of each of the available files. To
view the next lower level of the EDL hierarchy (Episode, Reel, Act, Dub or Track),
for the currently displayed Project, Session, or Composition, press LOAD TRACK
again. Repeat this procedure to reach the lowest level available for the particular
EDL file type. Pro Tools Session files and OMF Compositions will exhibit only
two levels – the main EDL (Session or Composition) and Track.
Once the desired Project or track is located and displayed, press the Store (STO)
key to load the Project (up to eight tracks) or individual track into the MMR Track
index locations. The target Track index is designated by activating the SEL key
associated with the Track index (the LED above the SEL will be lit when the Track
index is chosen as a target). If a track listed in the display has already been loaded
into a track index, the display message will read “Move” rather than “Load”. This
allows you to move an already loaded track into a different track index. Which
operation is performed depends upon whether the source track file is already
loaded; if it is, then a track move is performed. If the source track file is not already
loaded, a track load is performed and the track file is loaded or “stored” into the
target track. If track information is stored into a track location that is already
occupied by a previously loaded track, the previously loaded track is automatically
“unloaded.” In Load Track mode, the bottom line of the LCD shows the names of
“unloaded” tracks preceded by a small box (the STOP character) in the first
character of the display. Loaded tracks are preceded by their track number
(indicating the track into which the sound file has been loaded).
The last target track (which defaults to Track 1 at the start of a session) is
remembered for the duration of the session. A store operation (either load or move)
automatically advances the target track by one, circularly advancing back to track
one after track eight. The target track may be selected manually by pressing the
appropriate SEL key before STO is pressed.
The Load Track key is also used to identify Projects or Tracks for Backup. Choose
(scroll to) the name of the desired Project or Track, then press SHIFT + SLIP to
enter the Backup state.
SHIFT + LOAD
TRACK
(DELETE)
Pressing SHIFT + LOAD TRACK deletes the currently displayed project or track
file. The deletion simply removes the EDL information, not the associated sound
file(s), so little disk drive space is reclaimed by this operation. However, sound
files not associated with the EDL (track) information are made available for
deletion by the Disk Cleanup operation accessed via Setup menu 720. This is the
typical method by which space on a given drive volume is reclaimed (the other
method is by using Destructive Record to record over existing material).
Summary of Contents for MMR-8
Page 5: ......
Page 6: ......
Page 7: ......
Page 8: ......
Page 9: ......
Page 38: ...32 Tascam MMR 8 User s Guide Chapter 3 MMR 8 Operation MMR 8...
Page 42: ...36...
Page 94: ...Tascam MMR 8 Owner s Manual Appendix A Control Panel Summary 88...
Page 110: ...Tascam MMR 8 Owner s Manual Appendix E Glossary 104...

