Tascam MMR-8 Owner’s Manual • Chapter 4 • MMR-8 Setup Menus
MMR-8
78
Recording new audio into a Tape Mode project while the Record Mode is set to either Auto Cleanup or
Non-Destructive turns the Tape Mode project into a non -Tape Mode project. Once changed in this
fashion, the mode cannot be reset to Tape Mode for this project. It is also not possible to set the Record
Mode to Tape Mode if a non-Tape Mode track is loaded into any of the track indexes. Note that it is
possible to convert a non-Tape Mode project into a Tape Mode project by using the MMR Backup
function with the Tape Mode Convert option. This is accessed by pressing LOAD TRACK, choosing the
project to be backed up, then pressing SHIFT + SLIP to enter the Backup state. Choose Tape Mode
Convert from the backup menu to rewrite the chosen project as a Tape Mode project on the target drive.
When Tape Mode is set as the Record Mode in menu 200, the Destructive machine status LED will light.
The MMR Bus
The operation of multiple MMR-8s may be synchronized by using the supplied 15-pin sync cable to
connect the MMR units together via the MMR bus sync connection (the two 15-pin connectors on the
SYNC card). Since this bus is self-terminating, simply daisy chain all the MMR-8s together in any order.
The MMR bus supports four independent Sync Groups, so any machine on the MMR bus can be assigned
to any of the four groups at any time without changing the physical connections. Also, since the MMR
bus carries system-wide frame and sample references, no other connections are required between the
various MMR-8s to provide sample accurate synchronization lock between them.
Each MMR Sync Group on the MMR bus must have a Master MMR, with the rest of the units in the Sync
Group acting as Slaves to the Master unit. It is only necessary for the Master unit to receive incoming
synchronization signals from external sources (digital clock, video sync, SMPTE/EBU, biphase, etc.)
since the remaining units on the associated MMR bus Sync Group will slave only to the Master unit. This
allows up 100 units to work synchronously and sample accurately together as one large machine without
having to feed duplicate sync reference signals independently to each unit.
Once the units to be linked using the MMR bus have been physically connected via the MMR bus
connection, their transports can be operated together as one large system. There are several Setup menus
which are used to govern how each unit behaves within the system. These are described here.
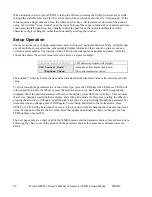
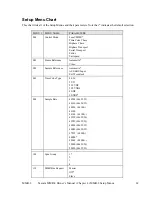
Menu 110 (MMR Bus Request) allows each MMR to request to be Master, Slave, or off the MMR bus
altogether. Only one MMR per sync group can act as master. If multiple units are set to request master
status through this menu, the MMR Bus system will automatically choose the unit with the lowest serial
number among those making the request to be set as the master for the sync group. The appropriate
MAST or SLAVE LED will light on the MMR front panel to show the unit’s status on the MMR bus.
Menu 111 (Ident Request) allows each unit to request an individual identity on the MMR bus. If no other
unit is requesting the same ID, the system will set the unit ID to the requested number and that number
will be displayed in the Ident window on the front panel of the MMR. If another unit has requested the
same ID, the system will resolve the conflict and automatically assign each unit a unique ID on the bus. If
an ID other than that requested is assigned due to a conflict, this field will not change, and the machine
will continue to request this ID whenever it is powered up or added to an MMR bus chain.
Menu 112 (Ident Assigned) is an information display only (data cannot be entered) that shows the
currently assigned identity for this unit on the MMR bus. This number may be different than the ID
requested if there is a conflict on the MMR bus and the system has assigned the unit a different ID.
To synchronize a slave unit to the master MMR on the bus once the above settings are confirmed, place
the slave unit online (press the ONLINE key on the transport).
Summary of Contents for MMR-8
Page 5: ......
Page 6: ......
Page 7: ......
Page 8: ......
Page 9: ......
Page 38: ...32 Tascam MMR 8 User s Guide Chapter 3 MMR 8 Operation MMR 8...
Page 42: ...36...
Page 94: ...Tascam MMR 8 Owner s Manual Appendix A Control Panel Summary 88...
Page 110: ...Tascam MMR 8 Owner s Manual Appendix E Glossary 104...

