background image

TASCAM  US-16x08

 73

V

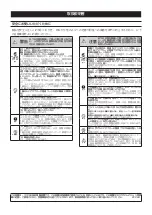
警告

以下の内容を無視して誤った取り扱いをする

と、人が死亡または重傷を負う可能性が想定

される内容を示しています。

P

ACアダプタ

ーの電源プ

ラグをコン

セントから

抜く

万一、異常が起きたら

煙が出たり、変なにおいや音がするときは

機器の内部に異物や水などが入ったときは

この機器を落としたり、カバーを破損したときは

すぐに機器本体の電源を切り、必ず AC アダプターの電

源プラグをコンセントから抜いてください。異常状態の

まま使用すると、火災・感電の原因となります。

販売店またはティアック修理センター ( 巻末に記載 ) に修

理をご依頼ください。

=

禁止

ACアダプターのコードを傷つけない

ACアダプターのコードの上に重い物をのせたり、コード

を壁や棚との間に挟み込んだり、本機の下敷きにしない

AC アダプターのコードを加工したり、無理に曲げたり、

ねじったり、引っ張ったり、熱器具に近づけて加熱した

りしない

コードが傷んだまま使用すると火災・感電の原因となり

ます。

万一、AC アダプターのコードが破損したら ( 芯線の露出、

断線など )、販売店またはティアック修理センター ( 巻末

に記載 ) をご依頼ください。

付属の AC アダプターや電源コードを他の機器に使用し

ない

故障、火災、感電の原因となります。

交流100ボルト以外の電圧で使用しない

この機器を使用できるのは日本国内のみです。表示され

た電源電圧 ( 交流 100 ボルト ) 以外の電圧で使用しない

でください。また、船舶などの直流 (DC) 電源には接続し

ないでください。火災・感電の原因となります。

この機器の隙間などから内部に金属類や燃えやすい物な

どを差し込んだり、落としたりしない

火災・感電の原因となります。

N

指示

ACアダプターの電源プラグにほこりをためない

AC アダプターの電源プラグとコンセントの間にゴミやほ

こりが付着すると、火災・感電の原因となります。定期

的(年1回くらい)にACアダプターの電源プラグを抜いて、

乾いた布でゴミやほこりを取り除いてください。

Y

分解禁止

この機器のカバーは絶対に外さない

カバーを外す、または改造すると、火災・感電の原因と

なります。

内部の点検・修理は販売店またはティアック修理センタ

ー ( 巻末に記載 ) にご依頼ください。

この機器を改造しない

火災・感電の原因となります。

V

注意

以下の内容を無視して誤った取り扱いをする

と、人が傷害を負う可能性が想定される内容

および物的損害のみの発生が想定される内容

を示しています。

P

ACアダプタ

ーの電源プ

ラグをコン

セントから

抜く

移動させる場合は、電源をオフ ( スタンバイ状態 ) にし、

必ず AC アダプターの電源プラグをコンセントから抜き、

外部の接続コードを外す

コードが傷つき、火災・感電の原因や、引っ掛けてけが

の原因になることがあります。

旅行などで長期間この機器を使用しないときやお手入れ

の際は、安全のため必ず AC アダプターの電源プラグを

コンセントから抜く

通電状態の放置やお手入れは、漏電や感電の原因となる

ことがあります。

N

指示

オーディオ機器を接続する場合は、各々の機器の取扱説

明書をよく読み、電源を切り、説明にしたがって接続す

また、接続は指定のコードを使用する

電源を入れる前には、音量を最小にする

突然大きな音が出て、聴力障害などの原因となることが

あります。また、モニター機器などを破損する原因とな

ることがあります。

この機器はコンセントの近くに設置し、ACアダプターの

電源プラグは簡単に手が届くようにする

異常が起きた場合は、すぐに AC アダプターの電源プラ

グをコンセントから抜いて、完全に電源が切れるように

してください。

この機器には、付属の専用 AC アダプターや電源コード

を使用する

それ以外の物を使用すると、故障、火災、感電の原因と

なります。

=

禁止

ぐらついた台の上や傾いた所など不安定な場所に置かな

湿気やほこりの多い場所に置かない。風呂、シャワー室では使用

しない

調理台や加湿器のそばなど油煙や湯気が当たる場所に置かない

火災・感電やけがの原因となることがあります。

AC アダプターの電源プラグを抜くときは、AC アダプタ

ーの電源コードを引っ張らない

コードが傷つき、火災・感電の原因となることがあります。

必ずプラグを持って抜いてください。

O

禁止

濡れた手で AC アダプターの電源プラグを抜き差ししな

感電の原因となることがあります。

V

注意

5 年に 1 度は、機器内部の掃除を販売店またはティアッ

ク修理センター ( 巻末に記載 ) にご相談ください。

内部にほこりがたまったまま、長い間掃除をしないと火

災や故障の原因となることがあります。特に、湿気の多

くなる梅雨期の前に行うと、より効果的です。なお、掃

除費用については、ご相談ください。

取扱説明書

安全にお使いいただくために

製品を安全に正しくお使いいただき、あなたや他の人々への危害や財産への損害を未然に防止するために、以下
の注意事項をよくお読みください。

この装置は、クラスB 技術情報装置です。この装置は家庭環境で使用することを目的としていますが、この装置がラジオやテレビジョン受信

機に近接して使用されると、受信障害を引き起こすことがあります。取扱説明書に従って正しく取り扱いをしてください。    VCCI-B

Summary of Contents for US-16X08

Page 1: ...D01236400A US 16x08 USB2 0 Audio Interface Mic Preamp ENGLISH FRAN AIS ESPA OL DEUTSCH ITALIANO OWNER S MANUAL MODE D EMPLOI MANUAL DEL USUARIO BEDIENUNGSANLEITUNG MANUALE DI ISTRUZIONI...

Page 2: ...817 Block A Hailrun Complex 6021 Shennan Blvd Futian District Shenzhen 518040 China TASCAM is a trademark of TEAC CORPORATION registered in the U S and other countries Microsoft Windows Windows 7 Win...

Page 3: ...s instructions 8 Do not install near any heat sources such as radiators heat registers stoves or other apparatus including amplifiers that produce heat 9 Do not defeat the safety purpose of the polar...

Page 4: ...l processing Included items This product includes the following items Keep the packing materials for transportation in the future Please contact TASCAM Customer Support see page 2 if any of these item...

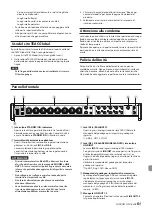
Page 5: ...2 jacks on the rear panel 7 PHONES jack knob Use this standard stereo jack to connect stereo headphones This jack outputs the same signal as the LINE OUT1 2 jacks Use the PHONES knob to adjust the he...

Page 6: ...input jacks Use the LEVEL switches to set the nominal levels to 10 dBV or 4 dBu Tip HOT Ring COLD Sleeve GND NOTE The input gain cannot be adjusted e Cord holder Use to hook the included AC adapter co...

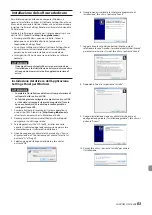
Page 7: ...UTION Complete the installation of the driver on the computer before connecting the unit to it with the USB cable If you already connected the unit to the computer using the USB cable and the Found Ne...

Page 8: ...ownload the latest Settings Panel for the operating system you are using from the TEAC Global Site http teac global com and save it on the computer to be used with the unit 2 Double click US 16x08_X X...

Page 9: ...ower outlet DC plug In order to prevent the cord from becoming disconnected during use wrap the cord around the cord holder CAUTION Always use the dedicated AC adapter GPE248 120200 Z DC12V that was s...

Page 10: ...s All Programs select US 16x08 Settings Panel under TASCAM 1 4 9 6 8 0 q w 2 3 5 7 Windows Settings Panel screen Mac OS X Select US 16x08_SettingsPanel from Applications and launch it to open the Sett...

Page 11: ...itor so all other tracks are muted 8 MUTE buttons Turn on a MUTE button to mute that channel 9 Pan sliders Use to adjust the position of the signal input to each channel 0 Faders level meters Use the...

Page 12: ...to 48 when connecting a mic that does not require phantom power Do not connect or disconnect mics while phantom power is set to 48 Doing so could cause a loud noise and might damage this unit and con...

Page 13: ...cedures in this manual If you are still unable to resolve your problems please contact the store where you bought the unit or TEAC customer support with the following information about the operating e...

Page 14: ...e Performance section of the Advanced tab of the System Properties window 5In the Visual Effects tab of the Performance Options window select Adjust for best performance Windows 7 a Turn Aero off 1Rig...

Page 15: ...B type Transfer rate USB 2 0 High Speed 480 Mbps Audio performance Mic preamp EIN equivalent input noise 125 dBu or less Frequency response Inputs to LINE OUT BALANCED 44 1 kHz 48 kHz 20 Hz to 20 kHz...

Page 16: ...pported audio drivers ASIO 2 0 WDM MME Core Audio Core MIDI General Power Dedicated AC adapter GPE248 120200 Z DC 12 V Power consumption 12 W External dimensions 445 59 219 mm width height depth Weigh...

Page 17: ...ire un courant nominal de veille de la prise secteur quand son interrupteur POWER ou STANDBY ON n est pas en position ON La fiche secteur est utilis e comme dispositif de d connexion et doit donc touj...

Page 18: ...de r f rence Ce mode d emploi explique les principales fonctions de cette unit Veuillez consulter le manuel de r f rence pour des informations sur toutes les fonctions de l unit Vous pouvez aussi t l...

Page 19: ...ssus et sur la gauche de chaque bouton de gain 1 10 s allume juste avant que l entr e ne se distorde lorsque 1 dBFS est d pass 6 Bouton LINE OUT1 2 Utilisez le pour ajuster le niveau de sortie des pri...

Page 20: ...les interrupteurs LEVEL pour r gler les niveaux nominaux sur 10dBV ou 4 dBu pointe point chaud bague point froid manchon masse NOTE Le gain d entr e ne peut pas tre ajust e Support de c ble Utilisez...

Page 21: ...NTION Terminez l installation du pilote sur l ordinateur avant de brancher l unit celui ci l aide du c ble USB Si vous avez d j branch l unit l ordinateur l aide du c ble USB et que l Assistant Ajout...

Page 22: ...z depuis le site mondial TEAC http teac global com le logiciel Settings Panel panneau de r glages le plus r cent pour le syst me d exploitation que vous utilisez et enregistrez le sur l ordinateur dev...

Page 23: ...ter que le c ble ne se d branche pendant l utilisation enroulez le autour du support de c ble ATTENTION Utilisez toujours l adaptateur secteur d di GPE248 120200 Z DC12V envoy avec l unit L emploi d u...

Page 24: ...s s lectionnez US 16x08 Settings Panel sous TASCAM 1 4 9 6 8 0 q w 2 3 5 7 cran Settings Panel sous Windows Mac OS X S lectionnez US 16x08_SettingsPanel dans Applications et lancez le pour ouvrir Sett...

Page 25: ...ur un bouton MUTE pour couper ce canal 9 Curseurs panoramiques Utilis s pour ajuster la position de l entr e de signal de chaque canal 0 Att nuateurs indicateurs de niveau Utilisez l att nuateur de ca...

Page 26: ...tation fant me sur 48 si vous branchez un micro qui ne la n cessite pas Ne branchez d branchez pas de micro quand l alimentation fant me est r gl e sur 48 Cela pourrait causer un grand bruit et endomm...

Page 27: ...conform ment aux proc dures indiqu es dans ce mode d emploi Si vous ne pouvez toujours pas r soudre vos probl mes veuillez contacter le magasin o vous avez achet l unit ou le service apr s vente TEAC...

Page 28: ...r Ordinateur et s lectionnez Propri t s 3Cliquez sur Param tres syst me avanc s 4Cliquez sur Param tres dans la section Performances de l onglet Param tres syst me avanc s de la fen tre Propri t s sys...

Page 29: ...r MIDI OUT Connecteur DIN 5 broches Format MIDI standard USB Connecteur USB 4 broches type B D bit de transfert USB 2 0 haute vitesse 480 Mbit s Performances audio Bruit rapport au pr ampli micro 125...

Page 30: ...io pris en charge ASIO 2 0 WDM MME Core Audio Core MIDI G n ral Alimentation Adaptateur secteur d di GPE248 120200 Z CC 12 V Consommation lectrique 12 W Dimensions externes 445 59 219 mm largeur haute...

Page 31: ...ci n Instale este aparato de acuerdo con las instrucciones del fabricante 8 No instale este aparato cerca de fuentes de calor como radiadores calentadores hornos u otros aparatos incluyendo amplificad...

Page 32: ...e eliminar un aparato el ctrico o electr nico junto con el resto de la basura org nica Este tipo de aparatos deben ser depositados en los puntos limpios creados a tal efecto por su Ayuntamiento o por...

Page 33: ...l uso de este aparato es entre 5 35 C Para evitar degradar la calidad del sonido o que se produzcan aver as no instale la unidad en los siguientes tipos de lugares Lugares sujetos a fuertes vibracione...

Page 34: ...9 Puerto USB Use el cable USB incluido para conectar esta unidad a un ordenador o un dispositivo iOS Admite USB 2 0 0 Conector MIDI OUT DIN de 5 puntas que es un conector de salida MIDI standard Emit...

Page 35: ...ordenador antes de conectarlo a la unidad mediante el cable USB Si ya ha conectado la unidad al ordenador por medio del cable USB y se ha abierto el Asistente para hardware nuevo encontrado cierre el...

Page 36: ...per consulte Nota acerca de Gatekeeper en el Manual de referencia 1 Desc rguese la ltima versi n del panel de ajustes para el sistema operativo que est usando de la p gina web global de TEAC http teac...

Page 37: ...200 Z incluido Salida de corriente Conector DC Para evitar que el cable se desconecte durante el uso haga pasar el cable por el sujetacables CUIDADO Utilice siempre el adaptador de corriente espec fic...

Page 38: ...os programas elija US 16x08 Settings Panel dentro de TASCAM 1 4 9 6 8 0 q w 2 3 5 7 Pantalla Settings Panel en Windows Mac OS X En Aplicaciones elija US 16x08_SettingsPanel e in cielo para abrir el pa...

Page 39: ...n bot n MUTE para silenciar ese canal 9 Controles deslizantes selos para ajustar la posici n de la se al entrante a cada canal 0 Faders y medidores de nivel Utilice el fader de cada canal para ajustar...

Page 40: ...limentaci n fantasma No conecte ni desconecte ning n micr fono mientras la alimentaci n fantasma est en la posici n 48 El hacer esto puede dar lugar a un fuerte ruido e incluso posibles da os en esta...

Page 41: ...ando de ganancia del canal correspondiente Resoluci n de problemas Lea este cap tulo si no puede usar esta unidad correctamente despu s de haberla ajustado de acuerdo a lo indicado en este manual Si t...

Page 42: ...l bot n derecho en la pantalla de inicio habitual la pantalla de la interfaz de usuario Metro y despu s haga clic en Todas las aplicaciones 2Haga clic con el bot n derecho en Equipo y elija Propiedade...

Page 43: ...n 88 2 kHz 96 kHz 20 Hz a 40 kHz 2 0 dB JEITA compatible con alta resoluci n Medias de entrada salida de control Conector MIDI IN Conector DIN de 5 puntas Formato MIDI standard Conector MIDI OUT Cone...

Page 44: ...or Dispositivos iOS iPad 4 o posterior Drivers audio admitidos ASIO 2 0 WDM MME Core Audio Core MIDI General Alimentaci n Adaptador de corriente espec fico GPE248 120200 Z DC 12 V Consumo 12 W Dimensi...

Page 45: ...ckt werden kann insbesondere am Stecker und am Netzkabelausgang des Ger ts und verlegen Sie es so dass man nicht dar ber stolpern kann 11 Verwenden Sie nur Zubeh r oder Zubeh rteile die der Hersteller...

Page 46: ...ausschlie lich den zum Lieferumfang geh renden Wechselstromadapter GPE248 120200 Z mit dem US 16x08 Verwenden Sie den zum Lieferumfang geh renden Wechselstromadapter niemals mit anderen Ger ten Andern...

Page 47: ...ln einstellen Die bersteuerungsl mpchen oben links der Eingangspegelregler 1 10 leuchten auf kurz bevor der Pegel zu hoch ist wenn 1 dBFS berschritten wird 6 Regler LINE OUT1 2 Mit diesem Regler k nne...

Page 48: ...DI Signale eingegeben w BALANCED Buchsen LINE IN11 16 symmetrisch LEVEL Schalter Die Buchsen LINE IN11 16 sind Klinkenbuchsen bzw Lineeing nge Mit den LEVEL Schaltern stellen Sie die Nennpegel auf 10...

Page 49: ...Mal via USB mit dem Computer verbinden Falls Sie das Interface bereits ber das USB Kabel mit dem Computer verbunden haben und Windows den Assistent f r das Suchen neuer Hardware bereits ausf hrt schl...

Page 50: ...triebssystem das Sie verwenden von der globalen TEAC Website http teac global com herunter Speichern Sie die Datei auf dem Computer den Sie mit dem Interface verwenden wollen 2 Doppelklicken Sie auf d...

Page 51: ...Steckdose GPE248 120200 Z im Lieferumfang enthalten Steckdose DC Stecker Damit das Kabel w hrend des Betriebs nicht getrennt wird wickeln Sie es um die Kabelhalterung Wichtig Verwenden Sie ausschlie...

Page 52: ...ows Start Alle Programme TASCAM US 16x08 Settings Panel 1 4 9 6 8 0 q w 2 3 5 7 Das Einstellungsfeld unter Windows Mac OS X W hlen Sie im Ordner Anwendungen den Eintrag US 16x08_SettingsPanel aus um d...

Page 53: ...ei der alle anderen Kan le stumm geschaltet werden 8 MUTE Tasten Durch Aktivieren einer MUTE Taste wird der jeweilige Kanal stumm geschaltet 9 Schieberegler Mit den Schiebereglern legen Sie f r jeden...

Page 54: ...Phantomspeisung ben tigt W hrend die Phantomspeisung auf 48 eingestellt ist stellen Sie keine Mikrofonverbindungen her oder trennen diese Andernfalls kann es zu lauten Ger uschen kommen die Ihr Ger t...

Page 55: ...bwohl Sie es wie in diesem Handbuch beschrieben eingerichtet haben finden Sie in diesem Kapitel einige L sungsvorschl ge Sollten Sie das Problem auch dann nicht beheben k nnen wenden Sie sich bitte an...

Page 56: ...cken Sie mit der rechten Maustaste auf den normalen Startbildschirm und w hlen Sie Alle Apps 2Klicken Sie mit der rechten Maustaste auf Computer und w hlen Sie Eigenschaften 3Klicken Sie auf Erweitert...

Page 57: ...8 2kHz 96kHz 20 Hz bis 40kHz 2 0 dB JEITA Hi Res Kompatibilit t Weitere Eing nge und Ausg nge MIDI IN Anschluss MIDI Eingang Anschlusstyp 5 polige DIN Buchse Format MIDI Signal MIDI OUT Anschluss MIDI...

Page 58: ...essor 2 GHz oder schneller Arbeitsspeicher 2 GB oder mehr Unterst tzte iOS Ger te iPad 4 oder h her Unterst tzte Audiotreiber ASIO 2 0 WDM MME Core Audio Core MIDI Stromversorgung und sonstige Daten S...

Page 59: ...e il suo interruttore POWER o STANDBY ON non in posizione ON La presa di rete utilizzata come dispositivo di sconnessione il quale dovrebbe restare sempre operabile Si deve usare cautela quando si usa...

Page 60: ...scosse elettriche Nota sul manuale di riferimento Il presente manuale illustra le funzioni principali di questa unit Si prega di consultare il manuale di riferimento per le informazioni su tutte le f...

Page 61: ...di regolare separatamente il guadagno di ciascun canale IN1 10 L indicatore di sovraccarico sopra e a sinistra di ogni manopola del guadagno 1 10 si illumina poco prima del momento in cui l ingresso v...

Page 62: ...ck LINE IN11 16 BALANCED Interruttori LEVEL Le prese IN11 16 sono ingressi di linea TRS standard Gli interruttori LEVEL permettono di impostare i livelli nominali a 10 dBV o a 4 dBu Tip HOT Ring COLD...

Page 63: ...gare l unit con il cavo USB Se l unit gi stata collegata al computer con il cavo USB e si avviata sul computer la procedura guidata Trovato un nuovo hardware chiudere la procedura guidata e scollegare...

Page 64: ...del software Settings Panel per il sistema operativo in uso dal sito TEAC Global Site http teac global com e salvarlo sul computer che si utilizzer con l unit 2 Fare doppio clic su US 16x08_X XX dmg...

Page 65: ...Connettore CC Per evitare che il cavo si scolleghi durante l uso avvolgerlo sul supporto per cavo ATTENZIONE Utilizzare sempre l alimentatore CA dedicato GPE248 120200 Z CC 12 V fornito in dotazione...

Page 66: ...mmi selezionare US 16x08 Settings Panel nella sezione TASCAM 1 4 9 6 8 0 q w 2 3 5 7 Schermata Settings Panel su Windows Mac OS X Selezionare US 16x08_SettingsPanel nella sezione Applicazioni e avviar...

Page 67: ...cce vengono silenziate 8 Pulsanti MUTE Attivare un pulsante MUTE per silenziare il canale corrispondente 9 Cursori centratura Consentono di regolare la posizione del segnale di ingresso per ciascun ca...

Page 68: ...i collega un microfono che non richiede alimentazione phantom Non collegare n scollegare microfoni quando l alimentazione phantom impostata su 48 Ci potrebbe causare un forte rumore e potrebbe dannegg...

Page 69: ...ado di risolvere i problemi contattare il negozio presso il quale stato acquistato l apparecchio o il supporto clienti TEAC indicando le seguenti informazioni sull ambiente operativo e dettagli sul pr...

Page 70: ...stra Opzioni prestazioni selezionare Regola in modo da ottenere le prestazioni migliori Windows 7 a Disattivare Aero 1Fare clic destro sul desktop e selezionare Personalizza 2Selezionare un tema di ba...

Page 71: ...cit di trasferimento USB 2 0 ad alta velocit 480 Mbps Prestazioni audio EIN preamplificazione microfono rumore di ingresso equivalente 125 dBu o inferiore Risposta in frequenza Ingressi LINE OUT BALAN...

Page 72: ...ssive Driver audio supportati ASIO 2 0 WDM MME Core Audio Core MIDI Informazioni generali Alimentazione Alimentatore CA dedicato GPE248 120200 Z 12 V CC Consumo 12 W Dimensioni esterne 445 59 219 mm l...

Page 73: ...V P AC AC AC AC AC AC AC 100 100 DC N AC AC 1 AC Y V P AC AC AC N AC AC AC AC AC O AC V 5 1 B VCCI B...

Page 74: ...8 0 0 x1 0 0 AC GPE248 120200 Z x1 A B 0 0 USB x1 0 0 x1 0 0 x2 0 0 x4 0 0 x1 US 16x08 AC GPE248 120200 Z AC 74 74 75 75 75 75 75 75 76 77 78 Windows Settings Panel 78 Mac OS X Settings Panel 79 80 80...

Page 75: ...TASCAM US 16x08 75 0 0 5 35 0 0 0 0 0 0 0 0 1U 1 2 TASCAM http tascam jp support registration 1 2 0 0 0 0 1 88 0 0 88 0 0 88 0 0 i i US 16x08 i i Serial No i i i i i i 0 0 0 0 8 0 0...

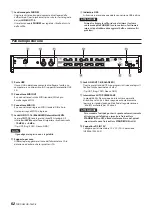
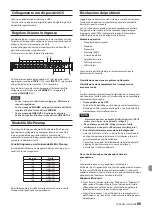
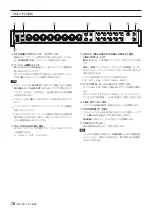
Page 76: ...i 48 OFF PHONES LINE OUT1 2 i i 48 i i i i 3 IN1 8 BALANCED XLR 1 GND 2 HOT 3 COLD 4 IN9 10 BALANCED UNBALANCED LINE INST IN9 10 TRS LINE INST Tip HOT Ring COLD Sleeve GND 5 1 10 IN1 10 1 10 1dBFS 6 L...

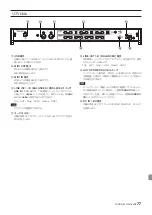
Page 77: ...IDI IN DIN 5 MIDI MIDI w LINE IN11 16 BALANCED LEVEL LINE IN11 16 TRS LEVEL 10dBV 4dBu Tip HOT Ring COLD Sleeve GND e AC r LINE OUT1 8 BALANCED TRS 4dBu Tip HOT Ring COLD Sleeve GND t AUTO POWER SAVE...

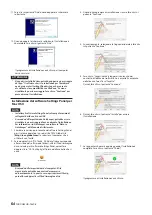
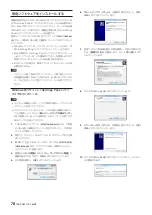
Page 78: ...Mac DSP Settings Panel TASCAM http tascam jp OS i i Windows Settings Panel i i Mac Settings Panel OS i i iOS Windows Settings Panel i i USB i i USB USB 1 TASCAM http tascam jp OS 2 zip 3 US 16x08_ In...

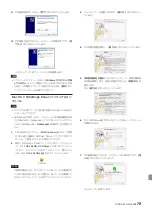
Page 79: ...11 12 F i i Windows Mac OS X Settings Panel i i USB Settings Panel i i Gatekeeper Gatekeeper Gatekeeper 1 TASCAM http tascam jp OS Settings Panel 2 Settings Panel US 16x08_X XX dmg X XX US 16x08 pkg...

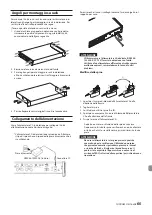
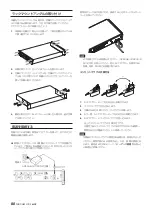
Page 80: ...80 TASCAM US 16x08 1 4 2 3 4 AC 0 0 AC 2 GPE248 120200 Z DC AC GPE248 120200 Z DC12V AC 2 1 5 3 4 1 AC 2 3 A B 4 AC 5 AC 88...

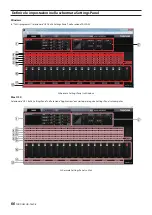
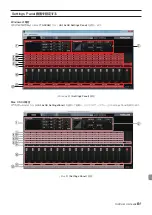
Page 81: ...M US 16x08 81 Settings Panel Windows TASCAM US 16x08 Settings Panel 1 4 9 6 8 0 q w 2 3 5 7 Windows Settings Panel Mac OS X US 16x08_SettingsPanel Settings Panel 1 4 9 6 8 0 q w 2 3 5 7 Mac Settings P...

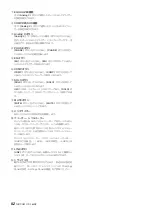
Page 82: ...LIZER 3 Analog X 2 COMPRESSOR 3 Analog X 3 Analog X Analog X X 1 2 4 PHASE PHASE PHASE 5 EQ EQ EQ 6 COMP COMP COMP 7 SOLO SOLO SOLO SOLO 8 MUTE MUTE MUTE 9 0 12dB 12dB 6dB 6dB q LINK LINK L R w 6 Sett...

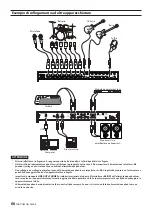
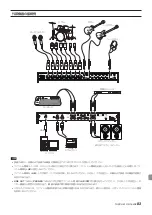
Page 83: ...TASCAM US 16x08 83 USB i i i i 4 48 i i 48 i i LINE OUT PHONES 48 OFF i i...

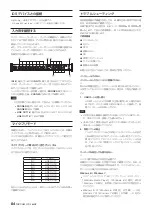
Page 84: ...E OUT1 2 USB IN1 LINE OUT1 IN2 LINE OUT2 IN3 LINE OUT3 IN4 LINE OUT4 IN5 LINE OUT5 IN6 LINE OUT6 IN7 LINE OUT7 IN8 LINE OUT8 88 0 0 0 0 0 0 CPU 0 0 0 0 OS 0 0 0 0 0 0 LAN 1 USB USB USB i i USB USB USB...

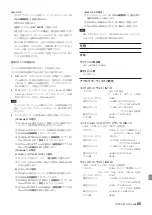
Page 85: ...ntosh 44 1 48 88 2 96kHz 16 24 IN1 8 XLR 3 31 1 GND 2 HOT 3 COLD 2 4k 68dBu 0 0003Vrms MAX 12dBu 0 195Vrms MIN 8dBu 1 947Vrms 56dB IN9 10 LINE INST INST 6 3mm 1 4 TS Tip HOT Sleeve GND 1M 57dBV 0 0014...

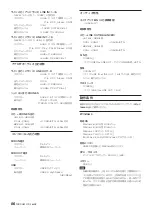
Page 86: ...2 wPHONES 44 1kHz 48kHz 20Hz 20kHz 1 0dB JEITA Hi Res 88 2kHz 96kHz 20Hz 40kHz 2 0dB JEITA Hi Res MIDI IN Din 5 MIDI MIDI OUT Din 5 MIDI USB USB B 4 USB 2 0 High Speed 480Mbps EIN 125dBu wLINE OUT BAL...

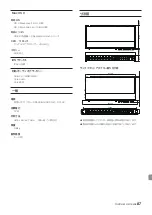
Page 87: ...X Mavericks 10 9 1 OS X Mountain Lion 10 8 4 USB2 0 Apple Macintosh CPU 2GHz 2GB iOS iPad 4 ASIO2 0 WDM MME Core Audio Core MIDI AC GPE248 120200 Z DC12V 12W 445 x 59 x 219mm 2 8kg 5 35 PP PP PP PP P...

Page 88: ...88 TASCAM US 16x08 10 00 12 00 13 00 17 00 206 8530 1 47 0570 000 809 PHS IP 042 356 9137 FAX 042 356 9185 9 30 17 00 358 0026 858 0570 000 501 PHS IP 0570 04 2901 1033 FAX 04 2901 1036...

Page 89: ...TASCAM US 16x08 89...

Page 90: ...90 TASCAM US 16x08...

Page 91: ...rface shipping charges to any destination within the United States LIMITATIONOFIMPLIEDWARRANTIES Any implied warranties INCLUDING WARRANTIES OF MERCHANTABILITY AND FITNESS FOR A PARTICULAR PURPOSE are...

Page 92: ...Model Serial No Date of purchase http teac global com Owner s name Address Dealer s name Dealer s address US 16x08 Memo WARRANTY...

Reviews: