background image

7

CAMERA OPERATION INSTRUCTIONS

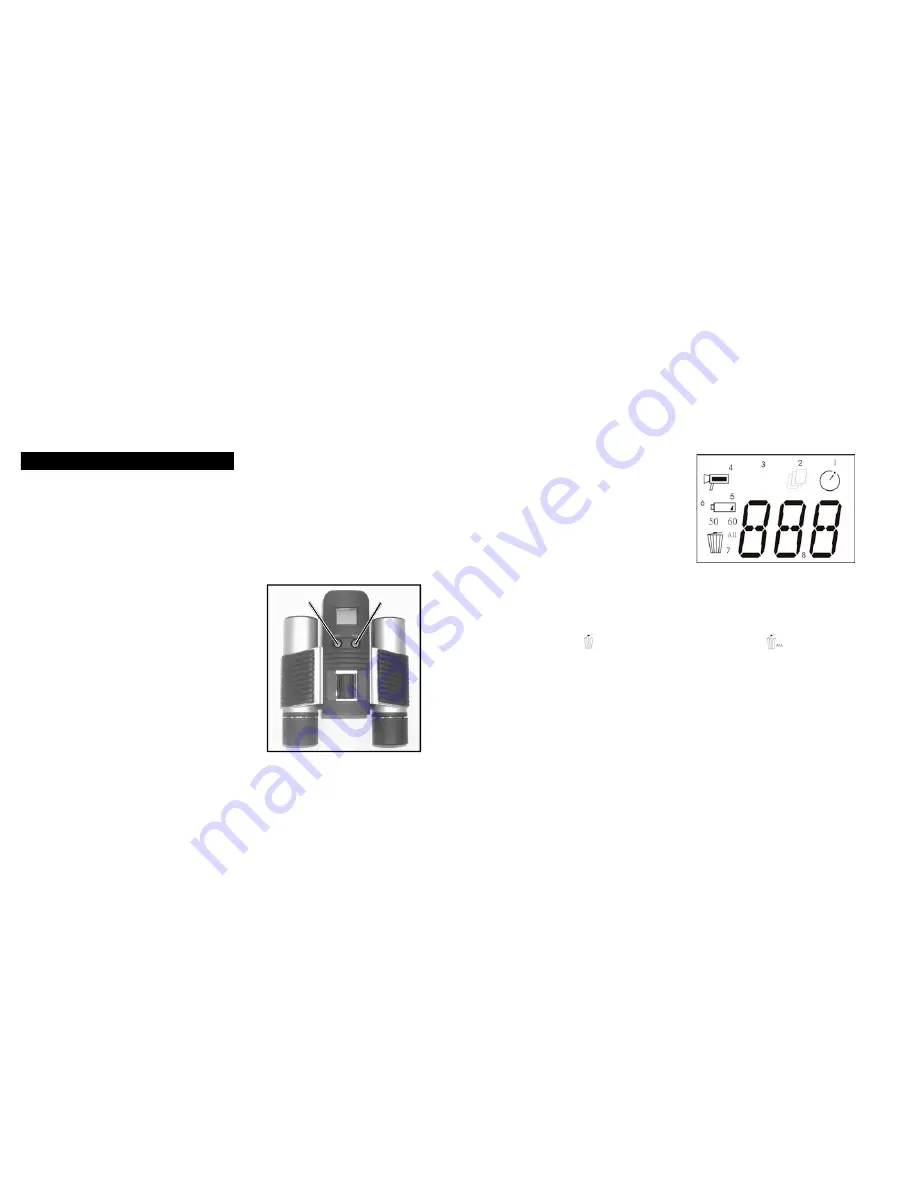
A. Button Descriptions

a. The 

MODE

button has 

three functions:

1. 

Power on:

Press and hold button until camera turns on. When camera is 

connected to a PC via the USB cable provided, the camera will power 
on automatically

2. 

Power off:

While camera is on, press and hold button until camera turns off.

If  camera  has  not  been  used  or  if  a  button  has  not  been  pressed  for  over
2  minutes,  the  camera  will  automatically  power  off  to  save  battery  life.  If
camera  is  connected  via  USB,  camera  will  not  power  off  except  when  PC
powers off.

3. 

Mode change:

press this button rapidly 

to change modes.

b. The 

SNAP

button has 

two functions:

1. 

Take a picture:

press this button to take 

a picture when the camera is on. (But not 
in the pc mode and mode change)

2. 

Select:

in "Mode Change", press this 

button to confirm the function that 
is flashing.  

6

B. LCD Display

1. 

Timer:

Select the timer to take a delayed 

picture. This gives you approximately a 
10 second delay.

2. 

Repeat  Shot:

Takes  3  continuous  shots,

with  only  one  press  of  the 

S N A P

b u t t o n .

Shots are approximately 1 second apart.

3. 

Hi/Low  Quality:

No  icon  shows  when

camera  is  in  High  Resolution  Mode
(640 X 480). "LQ" shows when camera is in
Low Resolution Mode (320 X 240).

4. 

AVI Mode:

This mode allows you to take short movie clips, saved as ".avi" files.

5. 

Battery Indicator:

Shows the amount of battery life left.

6. 

50/60:

Shows  electrical  power  frequency  output.   "50"  corresponds  to  50Hz

electrical  power  frequency,  and  "60"  corresponds  to  60Hz  electrical  power
frequency, which is the frequency used in the United States.   The correct setting
(i.e. 60 in the U.S., 50 in some countries) will not cause any flickering on images.

7. 

Delete Last/All:

"       " deletes the last picture taken, and "       " deletes all the

pictures in the memory.

8. 

Picture Number/PC/Memory-Full:

This area will show the number of pictures in

the memory when camera is in "Normal" mode.   "PC" will appear when unit is
plugged  in  via  USB  cord  to  your  PC.   When  memory  is  full  in  "Normal"  mode,
display will show "FUL" and alarm will sound.

MODE

SNAP

LQ

Summary of Contents for Snapshot 1025S

Page 1: ...Model 1025S LIT 9301930403...

Page 2: ...English 4 17 French 18 31 Spanish 32 45 German 46 59 Italian 60 73 Portuguese 74 87 3 2...

Page 3: ...ions If your computer does not have an auto play function and will not automatically run CDs open the CD in the My Computer window and click on the Install Drivers folder After drivers are successfull...

Page 4: ...e This gives you approximately a 10 second delay 2 Repeat Shot Takes 3 continuous shots with only one press of the SNAP button Shots are approximately 1 second apart 3 Hi Low Quality No icon shows whe...

Page 5: ...that mode by then pressing the SNAP button 7 When changing modes if no buttons are pressed for 5 seconds the camera will return to normal mode 8 8 When in Normal mode press SNAP to take a picture 9 W...

Page 6: ...ect this mode The Low icon will then stop blinking Entering this mode later and pressing SNAP again will re t u rn you to High Resolution mode 13 When in Normal mode press the MODE button 4 times to e...

Page 7: ...zero and view a distant object 3 Keep both eyes open at all times 4 Using a lens cover or your hand cover the objective front lens of the same side of the binocular that has 13 18 If the camera is con...

Page 8: ...ble 6 Uncover the objective lens on the diopter side cover the other objective lens then view the same object 7 Using the diopter setting adjustment ring focus the same object being viewed Caution sho...

Page 9: ...ty must be accompanied by the items listed below 1 A check money order in the amount of 10 00 to cover the cost of postage and handling 2 Name and address for product return 3 An explanation of the de...

Page 10: ...1 1...

Page 11: ...re automatique et ne d marre pas automatiquement les CD ouvrez le CD dans la fen tre Mon ordinateur et cliquez sur le r pertoire Installer les pilotes Une fois que les pilotes ont t install s cliquez...

Page 12: ...inuterie S lectionnez la minuterie pour prendre une photo avec d lai Elle donne un d lai d environ 10 secondes 2 Rafale Prend 3 images en continu sur une seule pression du bouton SNAP Les prises de vu...

Page 13: ...clignoter S lectionnez alors ce mode en appuyant sur le bouton SNAP 7 Lors du changement de mode si aucun bouton n a t actionn depuis 5 secondes l appareil retourne au mode Normal 22 Appuyez sur MODE...

Page 14: ...Low cesse alors de clignoter Une entr e dans ce mode plus tard et une nouvelle pression sur SNAP ram nent au mode de Haute r solution 13 Au mode Normal appuyez 4 fois sur le bouton de MODE pour entre...

Page 15: ...terpupillaire figure 1 2 Placez le r glage dioptrique figure 2 sur z ro et observez un objet loign 3 Gardez toujours les deux yeux ouverts 4 En utilisant un couvre objectif ou votre main couvrez l obj...

Page 16: ...oom 5 En utilisant la molette de mise au point centrale effectuez la mise au point sur un objet loign comportant de fins d tails un mur de briques des branches d arbre etc par exemple jusqu ce qu il a...

Page 17: ...gn des articles indiqu s ci dessous 1 Un ch que ou mandat d une somme de 10 00 US pour couvrir les frais d envoi et de manutention 2 Le nom et l adresse pour le retour du produit 3 Une description du...

Page 18: ...1 1...

Page 19: ...ducci n autom tica y no ejecuta autom ticamente los CD abra el CD en la ventana Mi ordenador y haga clic en la carpeta Instalar controladores Despu s de haber instalado los controladores con xito haga...

Page 20: ...rar el n mero de fotograf as que hay en la memoria cuando la c mara est en la modalidad Normal PC aparecer cuando la unidad est conectada por medio de un cable USB a su PC Cuando la memoria est llena...

Page 21: ...IONAMIENTO 1 La c mara est alimentada por dos pilas AAA no incluidas o por medio de un cable USB incluido 2 Inserte dos pilas AAA alcalinas en el hueco de las pilas 3 Pulse y mantenga pulsado el bot n...

Page 22: ...ja dejar de destellar Si introduce esta modalidad m s tarde y pulsa otra vez el bot n SNAP volver a la modalidad de High Resolution Alta resoluci n 13 Cuando este en la modalidad Normal pulse el bot n...

Page 23: ...mire a un objeto distante 3 Mantenga ambos ojos abiertos en todo momento 4 Use el protector de lente o la mano para cubrir el objetivo frontal del mismo lado de los prism ticos que el ajuste di ptrico...

Page 24: ...ladrillos las ramas de un rbol etc hasta que aparezca tan n tido como sea posible 6 Descubra el objetivo del lado del ajuste di ptrico cubra el otro objetivo luego mire al mismo objeto 7 Usando el ani...

Page 25: ...deber venir acompa ado por lo siguiente 1 Un cheque giro postal por la cantidad de 10 d lares para cubrir los gastos de manejo y envio 2 Nombre y direcci n donde quiere que se le env e el producto 3...

Page 26: ...1 1...

Page 27: ...cht mit einer Autoplay Funktion ausger stet ist und CDs daher nicht automatisch abspielt m ssen Sie die CD im Fenster Arbeitsplatz My Computer ffnen und auf das Verzeichnis Treiber installieren Instal...

Page 28: ...ch die Kamera im Modus Normal befindet PC erscheint wenn das Ger t per USB Kabel an Ihren PC angeschlossen ist Wenn der Speicher im Modus Normal voll ist erscheint auf dem Display die Anzeige FUL und...

Page 29: ...tigen Sie die Auswahl dieses Modus dann durch Dr cken der Taste SNAP 7 Wird bei der Modus nderung 5 Sekunden lang keine Taste gedr ckt kehrt die Kamera in den Modus Normal zur ck 50 MODE dr cken SNAP...

Page 30: ...auf zu blinken Um wieder in den Modus High Resolution umzuschalten noch einmal in diesen Modus gehen und erneut auf die Taste SNAP dr cken 13 Zum Modus AVI gelangen Sie wenn Sie im Modus Normal die T...

Page 31: ...REN 1 Stellen Sie den Augenabstand ein Abbildung 1 2 Stellen Sie den Dioptrienausgleich Abbildung 2 auf Null und richten Sie den Blick auf ein entferntes Objekt 3 Halten Sie beide Augen stets ge ffnet...

Page 32: ...fl che der Linse auftragen 57 4 Decken Sie die Objektivlinse Vo rderlinse der mit dem Dioptrienausgleich ausgestatteten Fernglash lfte entweder mit einer Linsenabdeckung oder mit der Hand ab Es handel...

Page 33: ...ben beigef gt werden 1 Ein Scheck eine Zahlungsanweisung in H he von 10 00 USD zur Abdeckung der Porto und Bearbeitungskosten 2 Name und Anschrift f r die R cksendung des Produkts 3 Eine Erl uterung d...

Page 34: ...1 1...

Page 35: ...ete bisogno del software MGI PhotoSuite necessario installare questi driver Seguite le istruzioni sullo schermo Se il CD non si avvia automaticamente apritene l icona da Risorse del computer e fate cl...

Page 36: ...camera in modalit Normale Quando la fotocamera collegata al computer mediante il cavo USB si visualizza la dicitura PC Quando la memoria esaurita in modalit Normale si visualizza FUL e viene emesso un...

Page 37: ...tilo non incluse o mediante la porta USB il cavo incluso 2 Inserite due pile AAA ministilo nell apposito vano 3 Premete il pulsante MODE e mantenetelo premuto finch la fotocamera non si accende 4 Prem...

Page 38: ...tempo si passa a questa modalit e si preme di nuovo SNAP si ritorna alla modalit Alta risoluzione 13 Con la fotocamera in modalit Normale premete quattro volte MODE per passare alla modalit AVI l icon...

Page 39: ...ione diottrica Figure 2 e osservate un oggetto lontano 3 Mantenete sempre aperti entrambi gli occhi 4 Coprite con un coperchietto o una mano l obiettivo lente frontale dello stesso barilotto su cui si...

Page 40: ...ssibile 6 Scoprite l obiettivo sul lato dell anello di regolazione diottrica coprite l altro obiettivo e osservate lo stesso oggetto 7 Girate l anello di regolazione diottrica per mettere a fuoco l og...

Page 41: ...a occorre allegare quanto segue 1 Assegno ordine di pagamento per l importo di 10 US per coprire i costi di spedizione 2 Nome e indirizzo da utilizzare per la restituzione del prodotto 3 Una spiegazio...

Page 42: ...1 1...

Page 43: ...abra o CD no quadro My Computador e clique na pasta Instalar Drivers Depois que os drivers unidades tiverem sido devidamente instalados clicar Instalar MQI PhotoSuite 4SF para instalar o software do...

Page 44: ...mostra o n mero de fotosna mem ria quando a c mara est no modo Normal Aparecer PC quando a unidade estiver ligada ao PC atrav s do cabo USB Quando n o existe espa o suficiente no modo Normal o v deo m...

Page 45: ...PERA ES 1 A c mara alimentada por duas baterias AAA n o inclu das ou for a USB inclu da 2 Inserir duas baterias alcalinas AAA no compartimento da bateria 3 Apertar e segurar o bot o MODO at que a c ma...

Page 46: ...iscar Aperte o bot o SNAP para selecionar este modo O cone Low deixar ent o de piscar Entrando neste modo posteriormente apertando SNAP novamente possibilitar que volte ao modo High Resolution Alta Re...

Page 47: ...erve um objeto distante 3 Mantenha os seus olhos sempre abertos 4 Utilizando a cobertura da lente ou a sua m o cubra o objetivo frente da lente do mesmo lado que o bin culo tem o ajustamento de dioptr...

Page 48: ...um muro de tijolos ramos de rvore etc at que este apare a o mais nitidamente poss vel 6 Descubra a lente objetiva do lado di ptrico cubra a outra lente objetiva e em seguida olhe o mesmo objeto 7 Uti...

Page 49: ...uir 1 Um cheque ordem de pagamento no montante de 10 00 para cobrir as despesas de porte e gastos administrativos 2 Nome e endere o para a devolu o do produto 3 Uma explica o do defeito 4 Comprovante...

Page 50: ...1 1...

Page 51: ...www tasco com...

Reviews: