background image

8

TO SHUT DOWN

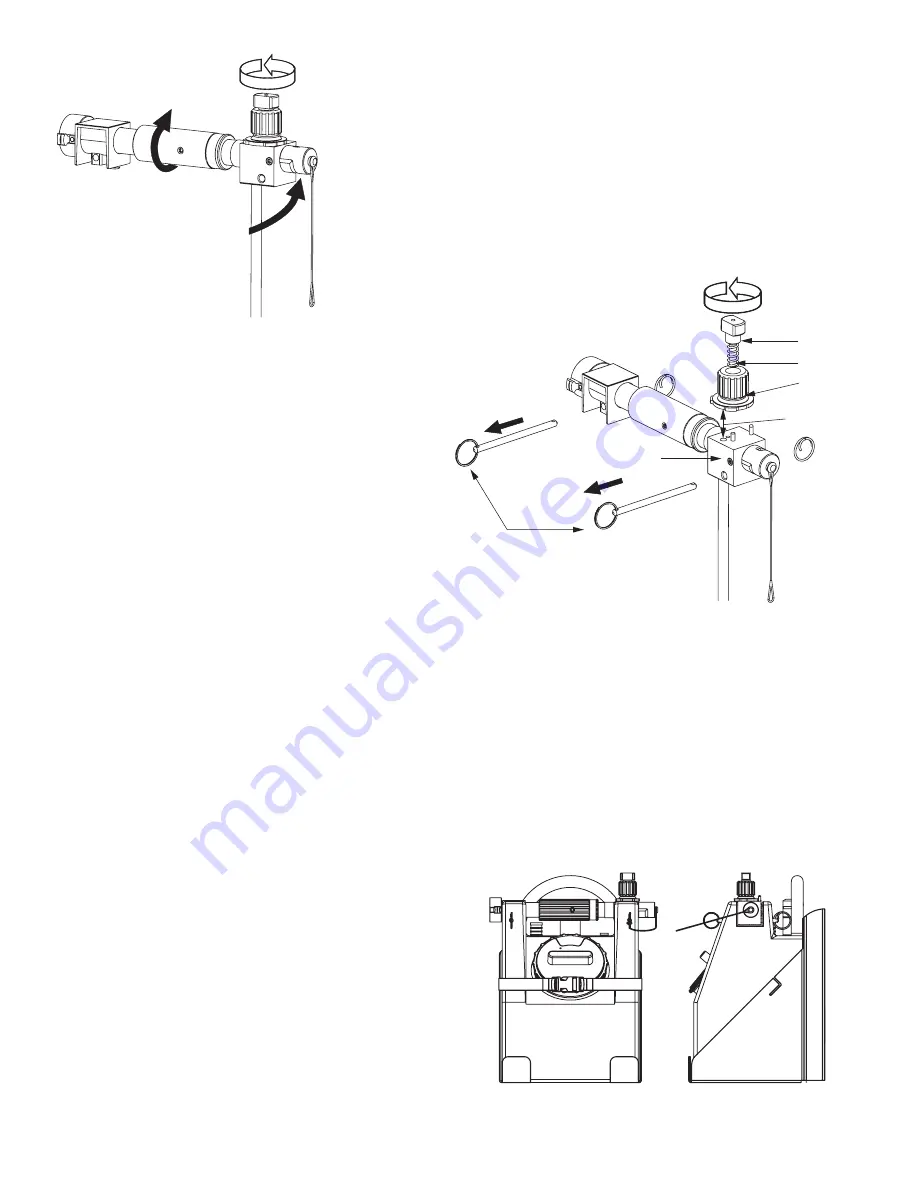
To prevent concentrate from drying in the foam passages the following is
recommended. While still connected to water supply, remove Circle
Cotters and Pull Pins. Remove Control Unit from tank. Attach the Cap
directly to the Quick-Connect on the Control Block. Turn the valve half way
on till the discharge is foam free. This will back flush a small amount of water
through the foam passage. Rotate the Percentage Knob back and forth to
make sure all foam passages are flushed.

INSTALL CAP

ROTATE

OPEN SLIGHTLY

PULL

CLEAN

UNSCREW

#1

#2
#3
#4

#5

TO CLEAN OUT IF PLUGGED

Remove screw #2, spring #3, and knob #4. Inspect the
underside of the knob. Make sure the foam passages are
clear. Do not scratch the flat face of the knob. Inspect the 2
holes in the top of the Control Block #5. If they are plugged,
pull pins #1, remove Block Assembly and clean out Pickup
Tube and holes.

6.7 SHUT DOWN AFTER USE (FLUSHING)

PRO/pak should be flushed with water after each use to prevent foam concentrate from drying out inside
of the Control Block and Percentage Knob.

1) Reduce pump pressure to 100 psi or less.

2) Remove the nozzle and/or hose from the quick-connect on the front of the Control Block.

3) Remove the Circle Cotters and pull out the two Pull Pins that hold the Control Unit to the tank.

4) Pull straight up to remove the Control Unit and Pickup Tube from the tank.

5) Make sure the Percentage Knob is NOT in the OFF position.

6) Install the Cap on the outlet of the Control Block.

7) Turn the Flow Control valve until a trickle of clean water is flowing out the end of the Pickup Tube.

8) Turn the Percentage Knob back and forth to make sure all foam passages are flushed.

9) Shut off water and reinstall the Control Unit on the tank and insert the Pull Pins and circle cotters.

10) Remove the Cap.

The exterior of the PRO/pak can be washed off with the hose or straight stream nozzle with the
percentage knob in the OFF position.

6.8 STORAGE

The PRO/pak can be stored with foam concentrate in it.

S

is recommended

the PRO/pak is

(See figure 6.8)

Make

sure the control block and valve assembly is mounted on the
tank and the fill port is securely closed to prevent evaporation.

torage in the upright position

to avoid foam

leaking when

not in use.

Figure 6.8

PRO/pak shown placed in a U-B

mounting bracket in an upright position.

Summary of Contents for PRO/pak

Page 1: ...n manual before use Operation of this device without understanding the manual and receiving proper training is a misuse of this equipment Users who have not read and understood all operating and safet...

Page 2: ...ot used at the correct percentage Make sure that the Percentage Make sure that the foam concentrate in the foam tank is the right type for the situation Do not use Class A foam on Class B fires or Cla...

Page 3: ...n area greater than 120 square feet 10 x 12 feet or 11 square meters The PRO pak should not be used on burning Polar Solvents with an area greater than 60 square feet 6 x 10 feet or 5 5 square meters...

Page 4: ...ersal Gold AFFF concentrate The Control Block and Valve Assembly can be mounted on the Foam Tank for right or left hand operation To switch hands remove the Shoulder Strap from the Pull Pins Remove th...

Page 5: ...TION MOP UP OVERHAUL OPERATIONS Apply with MEDIUM EXPANSION NOZZLE for vapor suppression Apply with MEDIUM EXPANSION NOZLE for vapor suppression 4 2 CLASS B FOAM LIQUID FUEL CLASS B HYDROCARBONS Fuels...

Page 6: ...solutions Foam expansion will be negligible It should be used where maximum reach or penetration is desired 5 0 NOZZLE SELECTION Straight Stream Low Expansion Reach 37 ft 100 psi 11 m 6 8 bar Reach 5...

Page 7: ...12 and U HS25 6 3 CONNECT DISCHARGE HOSE AND NOZZLE The PRO pak s eductor will not work if the backpressure from the outlet hose or nozzle is too high The 25 7 5m U HS25 optional hose is the maximum l...

Page 8: ...ce pump pressure to 100 psi or less 2 Remove the nozzle and or hose from the quick connect on the front of the Control Block 3 Remove the Circle Cotters and pull out the two Pull Pins that hold the Co...

Page 9: ...IFICATIONS Turn the percentage knob to the OFF position Use the hose or hose and straight stream nozzle to rinse off the PRO pak Reset percentage knob to proper percentage when finished For years of s...

Page 10: ...r Label 124 O Ring 1 4 20x3 4 Stud Knob Nut Knob Spring PART U180 V2120 VT25 28SS500 V3040 U260 V3030 U265 VOQ 4316 U270 U182 VO 024 U240 UL500 VO 022 U241 U250 UL504 VO 124 U223 U221 U222 23 24 25 26...

Page 11: ...65 U166 VM4290 U170 UL501 U161 UL521 VT10 24BH625 VW500X203 60 U100 Specify Language using identification number on tank graphic TANK SUBASSEMBLY PART U805 1 2 3 4 5 6 7 8 9 10 3 XXXX UL503 TANK GRAPH...

Page 12: ...iens and encumbrances This is a limited warranty The original purchaser of the equipment any person to whom it is transferred and any person who is an intended or unintended beneficiary of the equipme...

Reviews: