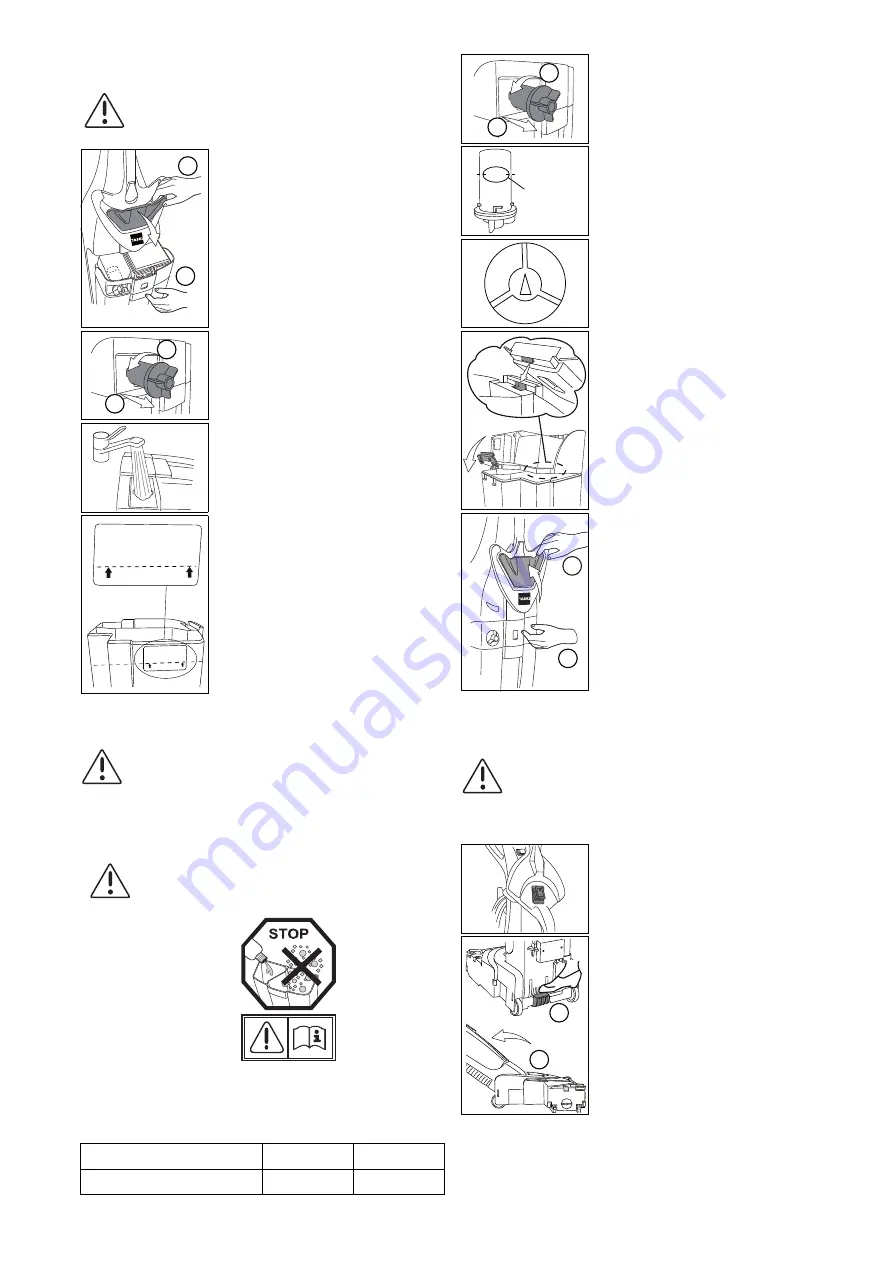
background image

30

Filling water

Dosage:

Only use chemical products recommended by the manufacturer.

The dosing aid is marked for a 1% cleaning solution.
Dosing example:

Beginning work

Caution:

Maximum permissible water temperature 35 °C/95 °F.

• Remove the tank from the machine by pulling 

on the tank unlocking device (1).

Hold the tank (2) with your other hand so that it 

does not fall out of the holder when unlocked 

and pull the solution tank out of the holder.

• Remove the dosing lid. The dosing lid can be 

removed from the filter housing by turning it to 
the left.

• Fill the solution tank up to the marking.

• The marking is indicated by a label on the side 

of the solution tank.

Caution:

Wear protective gloves, goggles and the corresponding 
(protective) work clothing when handling chemical products!

Caution:

Do not use any products that produce foam. Read the 
instructions on the sticker on the front side of the tank.

Dosage

Tank capacity

Dosing aid

1%

MAX

1 x MAX

2

1

1

2

M A X

WATER      LEVEL

LIVELLO    ACQUA

WASSER   NIVEAU

NIVEAU DE L`EAU

NIVEL DE L`AGUA

Temperature

+5°C    +  +35°C
+41°F  +  +95°F

M A X

WATER      LEVEL

LIVELLO    ACQUA

WASSER   NIVEAU

NIVEAU DE L`EAU

NIVEL DE L`AGUA

Temperature

+5°C    +  +35°C
+41°F  +  +95°F

• Use the dosing lid for the dosing. The dosing lid 

can be removed from the filter housing by 
turning it to the left.

• Fill the dosing lid with detergent up to the 

indicated mark (26 ml =1%).
Empty the contents of the dosing lid into the 
solution tank.

• Screw the dosing lid back into the cutout 

provided.

Ensure that the dosing lid is screwed in exactly 

as shown in the illustration. The Taski lettering 

must be below. Only in this way will the ribs on 

the dosing lid fit into the cutouts provided in the 

tank.

• Place the filter housing on the tank and lock it.

Ensure that the filter housing is lying correctly 

on the tank. The locking pattern on the front side 

of the tank is intended to ensure this. (see the 

detail in the illustration)

The tank could open during the cleaning

.

• Replace the tank (1) in the machine until it locks 

into place, and then press in the tank locking 
device (2) again.

Caution:

Before starting the cleaning operation, ensure that there are no 
objects such as metal bits, screws, etc. lying on the floor.

These object copuld be vacuumed up and thereby damage the 

machine!

• Plug the power supply cord into the mains socket.

• Press the main (ON/OFF) switch to turn the 

machine on (switch lights up)

• Hold the machine firmly by the handle and bring 

it into nthe working position (2) by pressing the 
red foot pedal (1).
The electric brushes turn on

.

1

2

-  1% / 26ml  -

-  1% / 26ml  -

TASKI

1

2

1

2

Summary of Contents for CO150.5

Page 1: ...swingo 150 V007 12089 59 1003 I25 I24 I23 I22 I21 I20 I19 I18 I17 I16 tr sv sl pt pl no nl it fr fi es en de da cz 12089 59 ...

Page 2: ...2 Swingo 150 1 3 5 2x M6x20 7 2x CLICK 2 4 2x M6x20 6 2x ...

Page 3: ... a person responsible for their safety Children should be supervised to ensure that they do not play with the appliance Do not use this machine in rooms in which explosive and easily inflammable materials such as petrol solvents fuel oil dusts etc are stored or processed The electrical or mechanical components could lead to the ignition of these materials This machine must not be used in rooms tha...

Page 4: ...C Directive 2006 95 EG of the European Parliament and of the Council dated 12th December 2006 for the harmonisation of the legal regulations of the Member States regarding electrical equipment for use within specific voltage limits Harmonised standards applied EN 60 335 1 EN 60 335 1 A1 EN 60 335 1 A11 EN 60 335 1 A13 EN 60 335 2 2 ed 5 A1 A2 EN 50 366 2003 A1 2006 EN 55 014 1 2000 A1 2001 A2 2002...

Page 5: ...fore the machine can be put into operation the two parts of the machine must be connected electrically and the handle must be screwed onto the body of the machine To do this follow the assembly instruction on Page 2 of these instructions for operation 11 10 12 14 13 15 8 6 1 2 5 3 4 9 7 Y G WHITE BLACK BLACK BROWN GREEN WHITE WHITE WHITE BLACK BLACK RED BLUE GREEN RED WHITE BLACK GREEN RED WHITE Y...

Page 6: ...Use the dosing lid for the dosing The dosing lid can be removed from the filter housing by turning it to the left Fill the dosing lid with detergent up to the indicated mark 26 ml 1 Empty the contents of the dosing lid into the solution tank Screw the dosing lid back into the cutout provided Ensure that the dosing lid is screwed in exactly as shown in the illustration The Taski lettering must be b...

Page 7: ...machine off main ON OFF switch and plug when carrying out work on the machine Remove the tank from the machine by pulling on the tank unlocking device 1 Hold the tank 2 with your other hand so that it does not fall out of the holder when unlocked and pull the solution tank out of the holder 1 2 MAX BRUSH PRESSURE MIN RED GREEN 1 2 2 1 Empty the soiled solution from the tank through the opening pro...

Page 8: ...ueegees are different The position is shown on the upper side of the squeegee FRONT REAR Caution Danger of injury through sharp objects Wear gloves for your own protection Check the brush roller for wear after every use Bristles that are too short or damaged suction lips could lead to damage to the floor covering and could impair the cleaning result Place the machine on its side so that the side b...

Page 9: ...wn the machine with a damp cloth Caution Only TASKI branded spare parts must be used otherwise warranties and liabilities will be omitted Symbols after use every week every month Activity page Wash out the squeegee 32 Clean the brush roller 32 Periodically check the length of the bristles Replace the brush roller 32 Suction channel service cover 29 Clean replace the motor protection filter 31 Wash...

Page 10: ...34 Dimensions of the machine Dimensions in centimetres swingo 150 112 43 38 ...

Reviews: