


32
Index
A
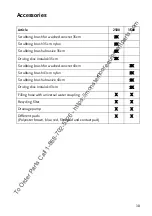
Accessories
. . . . . . . . . . . . . . . . . . . . . . . . . . . . . . . . . . 30
Adjust the seat
After cleaning
. . . . . . . . . . . . . . . . . . . . . . . . . . . . . . . . 16
Angle of inclination
. . . . . . . . . . . . . . . . . . . . . . . . . . . . 28
Attach squeegee
. . . . . . . . . . . . . . . . . . . . . . . . . . . . . . 10
B
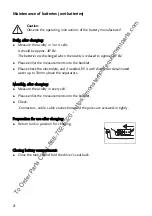
Batteries
. . . . . . . . . . . . . . . . . . . . . . . . . . . . . . . . . . 5
Battery indicator
. . . . . . . . . . . . . . . . . . . . . . . . . . . . . . . 7
before putting into service
. . . . . . . . . . . . . . . . . . . . . . . 8
. . . . . . . . . . . . . . . . . . . . . . . 11
Beginning work
. . . . . . . . . . . . . . . . . . . . . . . . . . . . . . . 11
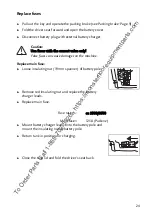
Blades replacement
. . . . . . . . . . . . . . . . . . . . . . . . . . . 23
Brush pressure on / off
. . . . . . . . . . . . . . . . . . . . . . . . . 7
C
Charging procedure (traction block batteries with
external charging unit)
. . . . . . . . . . . . . . . . . . . . . . . . . . 8
Clean the fresh water tank
. . . . . . . . . . . . . . . . . . . . . . 17
. . . . . . . . . . . . . . . . . . . . . . . . 17
Cleaning method
. . . . . . . . . . . . . . . . . . . . . . . . . . . . . 13
Cleaning solution on/off
. . . . . . . . . . . . . . . . . . . . . . . . . 7
Cleaning the machine
. . . . . . . . . . . . . . . . . . . . . . . . . . 19
Content
. . . . . . . . . . . . . . . . . . . . . . . . . . . . . . . . . . . . . . 2
D
Declaration of Conformity
. . . . . . . . . . . . . . . . . . . . . . 34
Disposal
. . . . . . . . . . . . . . . . . . . . . . . . . . . . . . . . . . . . . 5
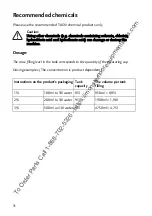
Dosage
. . . . . . . . . . . . . . . . . . . . . . . . . . . . . . . . . . . . . 31
Drain the fresh water tank
. . . . . . . . . . . . . . . . . . . . . . 16
Drain the recovery tank
. . . . . . . . . . . . . . . . . . . . . . . . . 16
E
Emptying soiled recovery tank
. . . . . . . . . . . . . . . . . . . 15
. . . . . . . . . . . . . . . . . . . . . . . . . . . . . . 16
Error code
. . . . . . . . . . . . . . . . . . . . . . . . . . . . . . . . . . . . 7
F
Fault accelerator pedal
. . . . . . . . . . . . . . . . . . . . . . . . . . 7
. . . . . . . . . . . . . . . . . . . . . . . . 10
Finishing work
. . . . . . . . . . . . . . . . . . . . . . . . . . . . . . . . 16
Fixing tools
. . . . . . . . . . . . . . . . . . . . . . . . . . . . . . . . . . 10
H
Height setting
. . . . . . . . . . . . . . . . . . . . . . . . . . . . . . . . 28
Hours in total
. . . . . . . . . . . . . . . . . . . . . . . . . . . . . . . . . 7
Hours of operation
. . . . . . . . . . . . . . . . . . . . . . . . . . . . . 7
I
. . . . . . . . . . . . . . . . . . . . . . . . 25
Index
. . . . . . . . . . . . . . . . . . . . . . . . . . . . . . . . . . . . . . . 32
Intended use of machinery
. . . . . . . . . . . . . . . . . . . . . . 2
M
Machine is idle
. . . . . . . . . . . . . . . . . . . . . . . . . . . . . . . 19
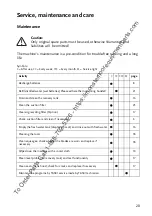
Maintenance
. . . . . . . . . . . . . . . . . . . . . . . . . . . . . . . . . 20
Maintenance of batteries (dry batteries)
Maintenance of batteries (wet batteries)
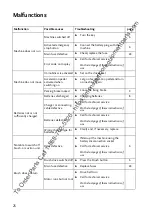
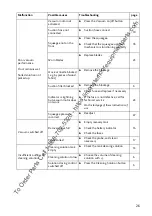
Malfunction
. . . . . . . . . . . . . . . . . . . . . . . . . . . . . . . . . 25
O
Overview
. . . . . . . . . . . . . . . . . . . . . . . . . . . . . . . . . . . . . 6
P
Parking brake
. . . . . . . . . . . . . . . . . . . . . . . . . . . . . . . . . 9
R
Recommended chemicals
. . . . . . . . . . . . . . . . . . . . . . 31
Recycling mode (Option)
. . . . . . . . . . . . . . . . . . . . . . . 13
Refilling the solution tank
. . . . . . . . . . . . . . . . . . . . . . 14
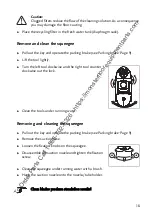
Remove and clean the squeegee
. . . . . . . . . . . . . . . . . 18
Removing and cleaning the squeegee
Replace fuses
. . . . . . . . . . . . . . . . . . . . . . . . . . . . . . . . 24
S
Safety instructions
. . . . . . . . . . . . . . . . . . . . . . . . . . . . . 3
Service
. . . . . . . . . . . . . . . . . . . . . . . . . . . . . . . . . . . . . . 20
Service centre
. . . . . . . . . . . . . . . . . . . . . . . . . . . . . . . . 22
Service indicator
. . . . . . . . . . . . . . . . . . . . . . . . . . . . . . 22
Service intervals
. . . . . . . . . . . . . . . . . . . . . . . . . . . . . . 22
Service, maintenance and care
. . . . . . . . . . . . . . . . . . 20
Soiled solution pump (Option)
. . . . . . . . . . . . . . . . . . 17
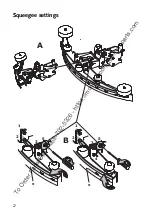
Squeegee settings
. . . . . . . . . . . . . . . . . . . . . . . . . . . . . 27
. . . . . . . . . . . . . . . . . . . . 19
Symbols
. . . . . . . . . . . . . . . . . . . . . . . . . . . . . . . . . . . . . 2
T
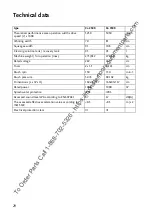
Technical data
. . . . . . . . . . . . . . . . . . . . . . . . . . . . . . . . 29
Tool aggregate hour indicator
. . . . . . . . . . . . . . . . . . . . 7
Transport
. . . . . . . . . . . . . . . . . . . . . . . . . . . . . . . . . 5
,
W
Water temperature
. . . . . . . . . . . . . . . . . . . . . . . . . . . . 11
To Order Parts Call 1-888-702-5326 - https://monsterfloorequipmentparts.com


