background image

2

3

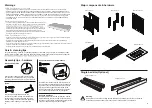
Assembly tips - hardware

Wooden dowel pins

Connector bolts and lunar washers

Bolts

We recommend tightening all bolts and 

connectors by hand. If using a cordless driver, 

set the speed to a slow setting and the clutch 

to a low setting to prevent excessive tightening 

that may result in damage to your furniture.

Recheck tightness

Re-tighten all connector bolts (at least two months 

after assembling the cot), as some connectors may 

loosen as the cot settles. Periodically check all of the 

connector bolts, making sure they are tight.

Gently push or tap dowel pins into place using 

your thumb or a small hammer. Note, excessive 

force may result in damage to the pin or furniture.

Insert the lunar washer into the locating hole, with 

the curved face against the wall of the locating hole. 

Insert the connector bolt into the washer and push 

it through until it engages with the thread of the 

insert on the panel you are attaching it to. Tighten 

Warnings

Safety Consideration for your Child.

  Follow the manufacturer’s assembly instructions in detail to ensure the safety features of the cot are not compromised.

  ENSURE THE COT IS NOT PLACED TOO CLOSE TO HEATERS, BLINDS, CURTAINS, WINDOWS OR POWER POINTS.

  DO NOT HANG ANYTHING NEARBY WHERE THERE IS A POTENTIAL DANGER OF THE ITEM FALLING INTO THE COT.

  KEEP ANY MEDICATION, STRING, ELASTIC, SMALL TOYS OR SMALL ITEMS SUCH AS MONEY OUT OF REACH FROM 

ANY POSITION IN THE COT.  It is advisable to keep all items out of your child’s cot to prevent suffocation or strangulation. 

  TO PREVENT FALLS, THE BASE OF THE COT SHOULD BE ADJUSTED TO THE LOWEST POSITION BEFORE YOUR 

CHILD CAN SIT UP.

Recommended Mattress Size. 

  This cot has been manufactured for use with a mattress which measures 750 

mm (wide) x 1310 mm (long) x 120 mm (maximum thickness). The width and 

mattress and the sides and ends of the cot do not exceed 40 mm. This is to 

minimise the risk of a child’s limb becoming caught in the gap. The thickness 

greater than 500 mm with the mattress base in the lower position to minimise 

the risk of a child climbing or falling out of the cot.

Safety Consideration for Cot.

  Re-tighten all connector bolts (at least two months after assembling the cot), as some may loosen as the cot settles. Regularly 

check all of the connecting bolts, making sure they are tight.

  Regularly check cot for weakness in timber joints and timber panels. If any weaknesses are found, report immediately to 

Tasman Eco via: www.tasmaneco.com.au

  Do not use cot if it has been damaged in any way and always use genuine Tasman Eco parts. Contact your nearest Tasman Eco 

stockist or original place of purchase for spare parts

  Report any fault with this furniture to Tasman Eco immediately. See website for details.

Small parts can present a choking hazard. Always keep small parts out of reach of children 

both during and after assembly. Store any spare or unused parts in a safe place. 
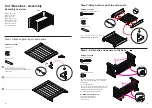
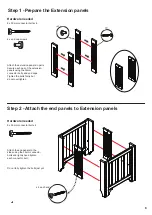
Side panels x 2

End panels x 2

Corner Post x 4                                            Extension Panel x 4
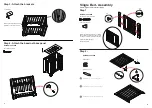
Base x 1

Major components & hardware

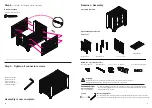
Single bed kits (Optional)

Warning

Care & cleaning tips

For general dusting / cleaning - periodically wipe the cot over with a dry soft cloth. To remove day to day 

spills or dirt, wipe down with a soft cloth and mild solution of warm soapy water. Avoid scourers and steel 

Bassinet Base x 1

Single bed bases x 2

Single Bed rail x 2

the connector bolt firmly but do not overtighten.

Summary of Contents for Alfresco cot

Page 1: ...5000 f 02 9603 7000 e info tasmaneco com au w www tasmaneco com au Alfresco cot Packaging and instructions printed on recycled materials Cot Bassinet Junior Bed Single Bed Optional Kit Chaise lounge Save these instructions for future reference Due to the heavy nature of the cot it is recommended assembly is undertaken by two people This cot can be assembled in a number of configurations Instructio...

Page 2: ...EST POSITION BEFORE YOUR CHILD CAN SIT UP Recommended Mattress Size This cot has been manufactured for use with a mattress which measures 750 mm wide x 1310 mm long x 120 mm maximum thickness The width and mattress and the sides and ends of the cot do not exceed 40 mm This is to minimise the risk of a child s limb becoming caught in the gap The thickness greater than 500 mm with the mattress base ...

Page 3: ...es Tighten firmly Fit locking pins to end panels 1 2 3 Insert the camlock to support legs as shown Fit each support leg to the end panel as shown A B C Use camlock and locking pins attached support leg to corner post M6 x 50mm Botls x 4 4 x lunar washers M6 x 15mm cap bolts x 4 Fit the small cap bolts to the 4 remaining unused base holes 2 on each side A Attach each end panel to the base Note the ...

Page 4: ...ways keep small parts out of reach of children both during and after assembly Store any spare or unused parts in a safe place Warning We recommend tightening all screws and connectors by hand If using a cordless driver set the speed to a slow setting and the clutch to a low setting to prevent execessive tightening that may result in damage to your furniture Recheck tightness Re tighten all connect...

Page 5: ...ion panels in pairs Secure each pair of the extension panels using the 35mm connector bolts and end caps Tighten the bolts firmly but do not overtighten Attach the end panels to the sides using the 35mm connector bolts and lightly hand tighten each connector bolt Do not fully tighten the bolts just yet x 4 each end Step 2 Attach the end panels to Extension panels ...

Page 6: ...ls Step 2 x 4 x 4 M6 x 50mm connector blot x 8 8 x end cap screws Hardware needed Hardware needed Step 3 Attach the brackets 4 x Brackets Attach each brackets into the hole provided on each corner frame Step 4 Attach the bassinet base panel 4 x self tapping screw Attach the extension panels to end panels Secure each pair of the end panels using the 35mm connector bolts and end caps Tighten the bol...

Page 7: ...n each corner post Secure each corner with the lunar washer and connector bolts Lightly hand tighten all initial assembly fully tighten all bolts but do not overtighten Step 3 Attach the corner posts to the end panels Hardware needed 4 x 50mm connector bolts 4 x lunar washers M6 x 20mm cap screw x 16 Hardware needed A M6 x 60mm connector bolt x 8 B Camlock x 4 C Locking pin x 4 A B C Attach the co...

Page 8: ...e 3 Gently spread the side frames apart and carefully remove the inner front panel 5 Fit the small cap bolts to the 4 unused locating holes 2 on each bed head This is a required safety step to prevent the entry of 4 Re tighten all the connector bolts between the side frames and base Do not overtighten Place a throw rug over the mattress add a few colourful pillows and your child has their very own...

Page 9: ... workmanship of this product SJC Brands Pty Ltd will replace the product free of charge subject to the conditions below The replacement product will be identical to the originally purchased product wherever possible though in situations where the identical model is discontinued or out of stock then SJC Brands Pty Ltd will replace the product with a model that is functionally equivalent This Warran...

Reviews: