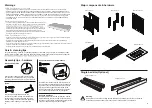
background image

x 4

9

10

Step 1 

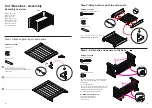
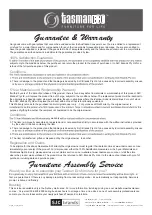
Single Bed - Assembly

Optional single bed kit purchased separately

Hardware needed

A:Camlockx 4

B:Locking pin x 4

A

A

B

B

I

Fit locking pins to end panels

Fit locking cams to support leg2

Fit support legs to end panels
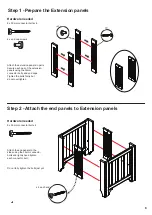
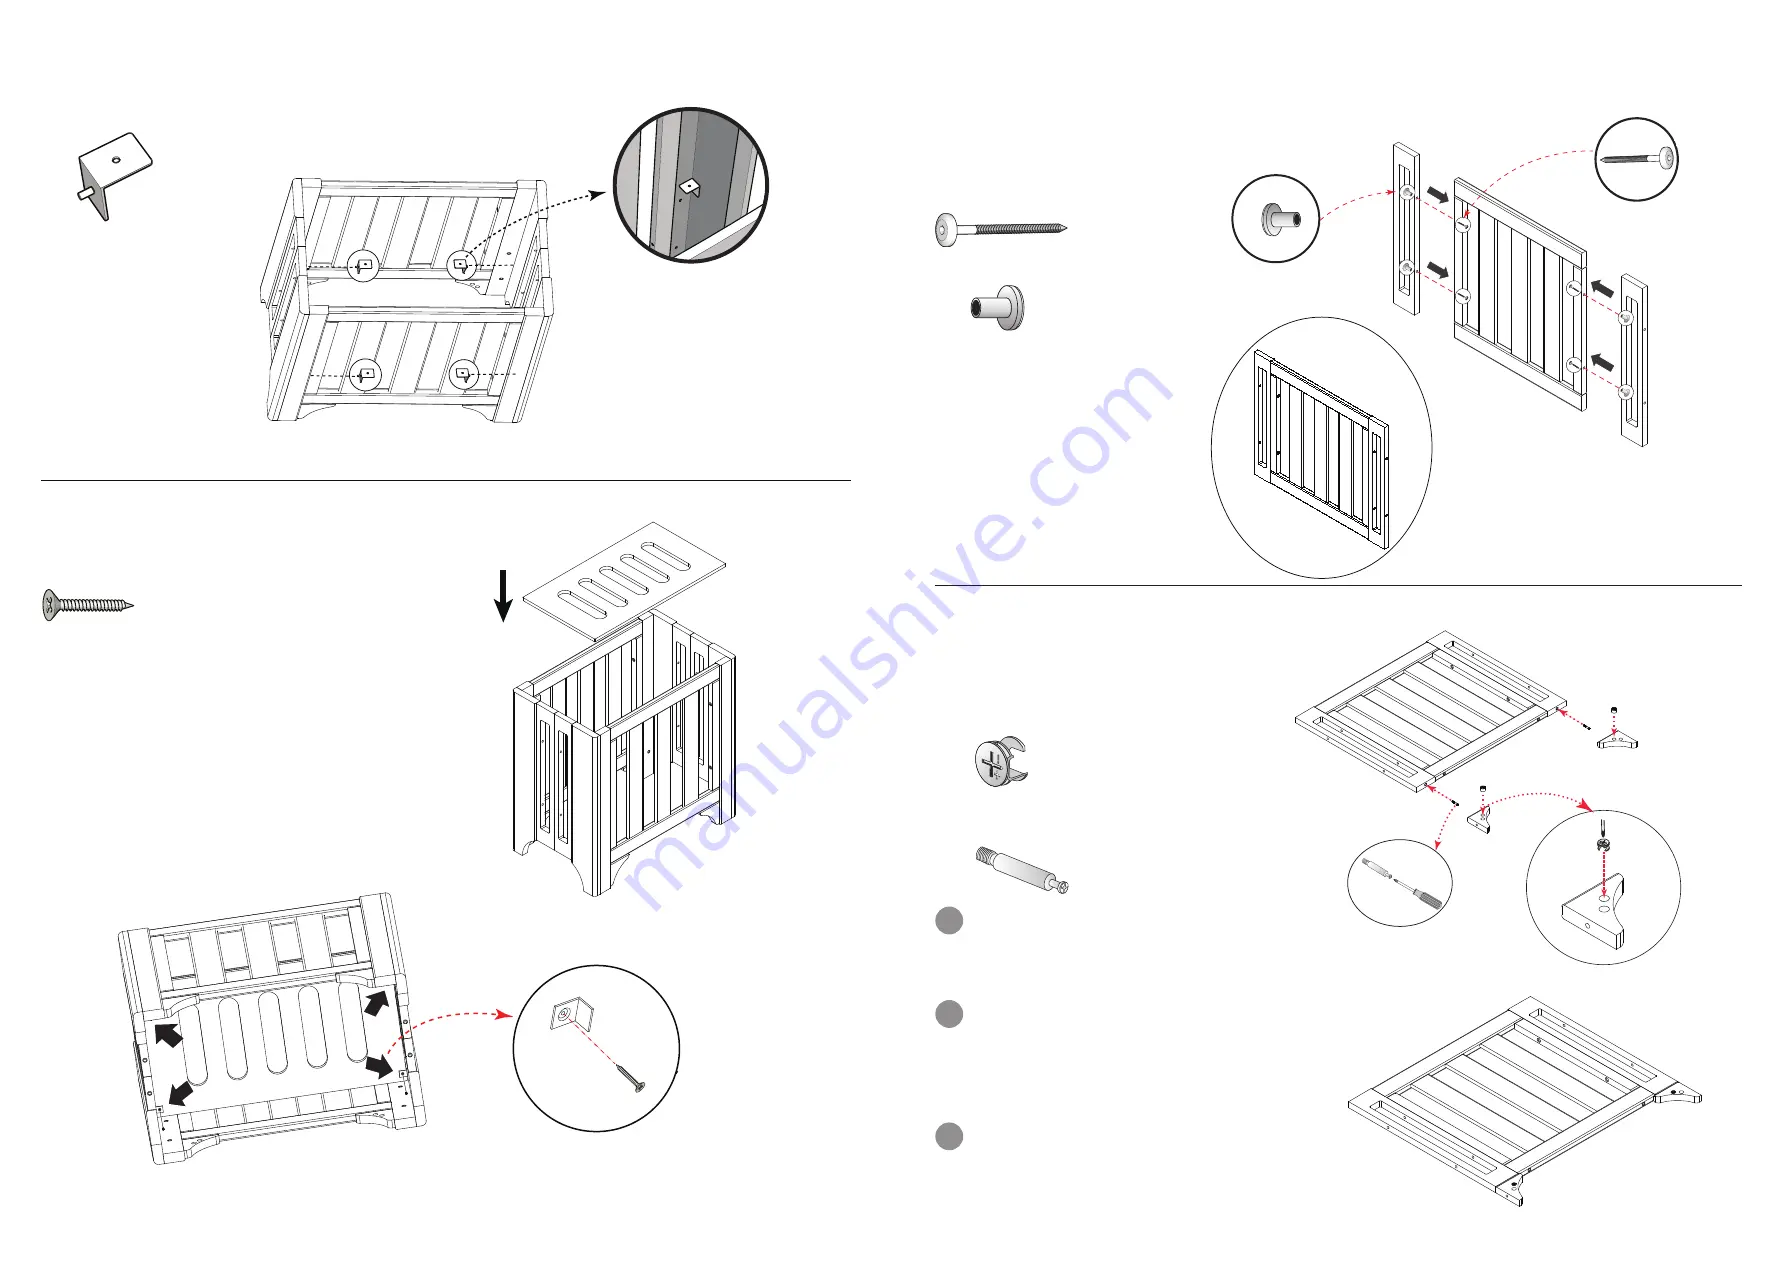
Step 2 -

x 4

x 4

M6 x 50mm connector blot x 8

8 x end cap screws

Hardware needed

Hardware needed

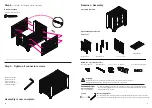
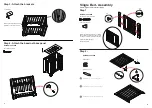
Step 3 - Attach the brackets

4 x  Brackets

Attach each brackets into the hole

provided on each corner frame

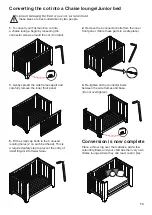
Step 4 - Attach the bassinet base panel

4 x self tapping screw

.

Attach the extension panels to end panels.
Secure each pair of the end panels  using

 the 35mm connector  bolts and end caps.

Tighten the bolts firmly but 

do not overtighten.

Summary of Contents for Alfresco cot

Page 1: ...5000 f 02 9603 7000 e info tasmaneco com au w www tasmaneco com au Alfresco cot Packaging and instructions printed on recycled materials Cot Bassinet Junior Bed Single Bed Optional Kit Chaise lounge Save these instructions for future reference Due to the heavy nature of the cot it is recommended assembly is undertaken by two people This cot can be assembled in a number of configurations Instructio...

Page 2: ...EST POSITION BEFORE YOUR CHILD CAN SIT UP Recommended Mattress Size This cot has been manufactured for use with a mattress which measures 750 mm wide x 1310 mm long x 120 mm maximum thickness The width and mattress and the sides and ends of the cot do not exceed 40 mm This is to minimise the risk of a child s limb becoming caught in the gap The thickness greater than 500 mm with the mattress base ...

Page 3: ...es Tighten firmly Fit locking pins to end panels 1 2 3 Insert the camlock to support legs as shown Fit each support leg to the end panel as shown A B C Use camlock and locking pins attached support leg to corner post M6 x 50mm Botls x 4 4 x lunar washers M6 x 15mm cap bolts x 4 Fit the small cap bolts to the 4 remaining unused base holes 2 on each side A Attach each end panel to the base Note the ...

Page 4: ...ways keep small parts out of reach of children both during and after assembly Store any spare or unused parts in a safe place Warning We recommend tightening all screws and connectors by hand If using a cordless driver set the speed to a slow setting and the clutch to a low setting to prevent execessive tightening that may result in damage to your furniture Recheck tightness Re tighten all connect...

Page 5: ...ion panels in pairs Secure each pair of the extension panels using the 35mm connector bolts and end caps Tighten the bolts firmly but do not overtighten Attach the end panels to the sides using the 35mm connector bolts and lightly hand tighten each connector bolt Do not fully tighten the bolts just yet x 4 each end Step 2 Attach the end panels to Extension panels ...

Page 6: ...ls Step 2 x 4 x 4 M6 x 50mm connector blot x 8 8 x end cap screws Hardware needed Hardware needed Step 3 Attach the brackets 4 x Brackets Attach each brackets into the hole provided on each corner frame Step 4 Attach the bassinet base panel 4 x self tapping screw Attach the extension panels to end panels Secure each pair of the end panels using the 35mm connector bolts and end caps Tighten the bol...

Page 7: ...n each corner post Secure each corner with the lunar washer and connector bolts Lightly hand tighten all initial assembly fully tighten all bolts but do not overtighten Step 3 Attach the corner posts to the end panels Hardware needed 4 x 50mm connector bolts 4 x lunar washers M6 x 20mm cap screw x 16 Hardware needed A M6 x 60mm connector bolt x 8 B Camlock x 4 C Locking pin x 4 A B C Attach the co...

Page 8: ...e 3 Gently spread the side frames apart and carefully remove the inner front panel 5 Fit the small cap bolts to the 4 unused locating holes 2 on each bed head This is a required safety step to prevent the entry of 4 Re tighten all the connector bolts between the side frames and base Do not overtighten Place a throw rug over the mattress add a few colourful pillows and your child has their very own...

Page 9: ... workmanship of this product SJC Brands Pty Ltd will replace the product free of charge subject to the conditions below The replacement product will be identical to the originally purchased product wherever possible though in situations where the identical model is discontinued or out of stock then SJC Brands Pty Ltd will replace the product with a model that is functionally equivalent This Warran...

Reviews: