background image

STOWAGE AREAS 

55 

5) 

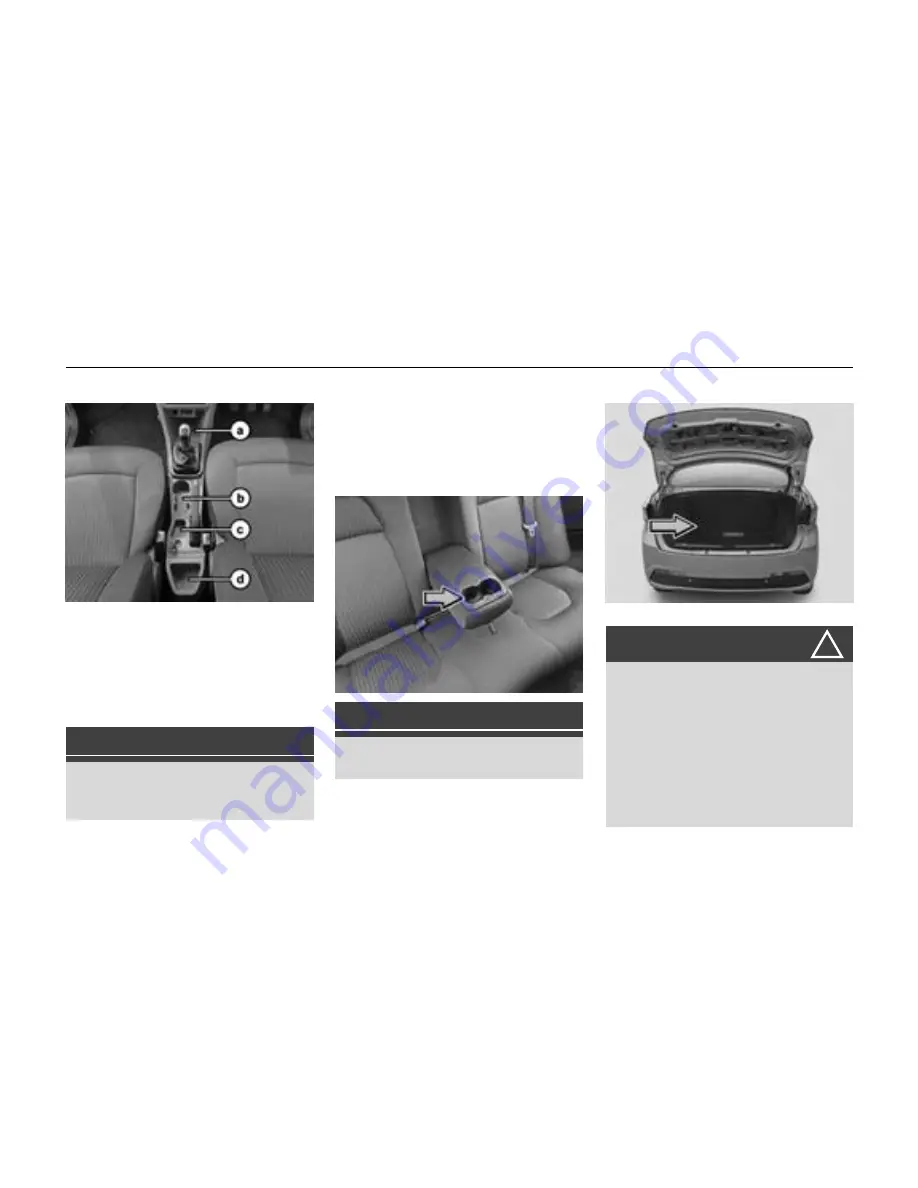
Center console


a) Stowage compartment   

Stowage  compartment  provided  for 
keeping  cell  phones,  iPod’s,  chargers 
etc.


b) Cup holder          c) Coin storage  
d) Bottle holder  

6) 

Foldable arm rest 

A foldable arm rest has been provided in 
the rear seat. It also has two cup holders, 
which  can  be  accessed  by  opening  the 
cover. When not required, fold the arm-
rest back into the seat.


7) 

Trunk lid Compartment 


Store the luggage in 

trunk lid

.  

WARNING


Distribute  the  items  of  luggage  as 
evenly as possible. 
Position heavy loads as far forwards 
as  possible  and  as  low  down  in  the 

trunk lid 

as possible. 

The load must not protrude above the 
luggage  cover.  Never  allow  occu-
pants  to  travel  in  the  luggage  com-
partment. 

NOTE 

Use cups, containers, bottles of right 
size and which have lids. The drinks 
could otherwise spill. 

NOTE 

Remove  all  items  and  cups  before 
folding the cup holders 

Summary of Contents for tigor

Page 1: ...https tigor tatamotors com...

Page 2: ...________ TRANSAXLE NO ______________________________________________________ BATTERY MAKE ______________________________________________________ BATTERY SR NO _________________________________________...

Page 3: ...OWNER S MANUAL...

Page 4: ...r Assistance Centre will be glad to assist you on our Toll Free no 1800 209 7979 You can also approach nearest TATA MOTORS dealer A sepa rate Dealer network address booklet is provided with the Owner...

Page 5: ...driving Always carry out prescribed service maintenance work as well as any required repairs at an authorized TATA MOTORS Dealers or Authorized Service Centre s TASCs Use only genuine parts for conti...

Page 6: ...not be equipped with all features described TATA MOTORS Limited reserves the right to introduce changes in the design equipment and technical features without any obligation to install them on the ve...

Page 7: ...Bags 19 ABS 20 EBD 20 2 Opening Closing Flip Key 21 Doors 23 Windows 24 Bonnet 26 Trunk lid 27 Fuel lid 28 3 Dashboard Features Cockpit 29 Instrument Cluster 30 Driver Information Display 34 Driver I...

Page 8: ...Holder 52 4 Stowage Areas Storage Compartments 53 Glove Box 54 Utility pockets on doors 54 Pocket on Dashboard 54 Center Console 55 Trunk lid Compartment 55 Card Holder 56 Hooks 56 5 Climate Control...

Page 9: ...Equipment 85 Hazard Warning Switch 86 In Case of Flat Tyre 87 Jump Lead Starting 92 Towing 93 Fuses 95 Bulb Specification 101 Bulb Replacement 102 24x7 Road Side Assistance 107 8 Maintenance Maintenan...

Page 10: ...fication 133 Vehicle Dimensions 137 Aggregate Identification Nos 138 10 Car Care and Value Added Services Car Care 139 Washing 139 Waxing 140 Polishing 140 Interior Fabric Cleaning 140 Paint Care 141...

Page 11: ...men tal exertion that impairs judgment Driver fatigue may be due to inade quate sleep extended work hours strenuous work or non work activities or combination of other factors Take rest at regular in...

Page 12: ...day Check wiper blades lights and brakes for proper functioning and condition Check the tyre treads depth the con dition of the tread and tyre Avoid harsh braking and sharp turns It may cause loss of...

Page 13: ...ow a lack of power If this happens shift to a lower gear and apply power smoothly so that there is no loss of traction When driving down a hill the engine braking should be used by shifting into a low...

Page 14: ...angular collisions that are not enough to activate the air bag Reduces the risk of harm in rollover side or rear impact collisions WARNING Never wear seat belt over rigid or breakable objects such as...

Page 15: ...n of the belt should be worn across the pelvis not across the waist 6 To unlatch the belt press the red but ton on the buckle Guide the belt to the pillar as it retracts WARNING The seat belts are int...

Page 16: ...loose end of the webbing To unfas ten press the button in the buckle WARNING Position the lap belt as low as possi ble on your hip bone and not across the abdomen If the lap belt is posi tioned across...

Page 17: ...ly installed in the vehicle For installation please refer CRS man ufacturer s instruction manual Recommended CRS position The suitability of seat position for carriage of children and recommended cate...

Page 18: ...neuver or an accident This could cause injuries to the travelling oc cupants WARNING Replace CRS that has withstood any force during an accident as it could have sustained damage which may not be visi...

Page 19: ...are keys Remember that it is not possible to prepare new spare keys without the key Tag number Take pre caution about E key as without E key vehicle cannot be started Vehicle Condi tion Immobilizer La...

Page 20: ...key with any type of metal wound around its grip or in con tact with it This may be detected as abnormal condition by immo bilizer and prevent engine from starting Do not leave the E key in areas of h...

Page 21: ...t and trigger the inflators The in flators inflate the air bags with nitrogen or argon gas The movement of the driver and of the front passenger is cush ioned when they make contact with the fully inf...

Page 22: ...eering the vehicle when braking NOTE When ABS is active the driver will feel the brake pedal pulsating which is normal WARNING The stopping distance required for vehicles with ABS may be slightly more...

Page 23: ...automatically turns OFF after 60 seconds Trunk lid opening if equipped Electric trunk lid opening can be done through long press 4 sec approach light button on remote key 3 Locking all doors To lock a...

Page 24: ...e control set of this security system is protected against the use of devices called scanners and grabbers which can record and reproduce some types of remote codes Sleep Mode If remote key is not use...

Page 25: ...Insert the key and turn it clockwise to lock and counter clockwise to open the door Locking without a key from inside All the doors can also be locked from in side by pressing knob 1 on driver door a...

Page 26: ...the main control panel located on the driver s arm rest They work only when the key is in the IGN ON position NOTE Power windows can be operated for 3 minutes in IGN OFF position and when key is take...

Page 27: ...operated It can only be operated by using the win dow switches on driver s arm rest WARNING If children operate the windows they could be get trapped partic ularly if they are left unsuper vised There...

Page 28: ...lever The bonnet will pop up slightly 3 Raise the bonnet slightly and with your finger slide the secondary lock lever located under the bonnet cen tre to the left side NOTE Make sure that the wiper ar...

Page 29: ...ver is located on the right hand side of the driver seat Lift the lever to unlock trunk lid Lift the trunk lid Option II It can also be opened by using door key The lock is located on the trunk lid Fo...

Page 30: ...l it gets locked WARNING Fuel vapour is extremely hazard ous Always switch OFF the en gine before refueling and never refill near sparks or open flames Do not use cell phone while refu eling Do not co...

Page 31: ...7 Instrument Cluster 8 Horn pad Air Bag DAB if fitted 9 Steering Wheel Switches if fitted 10 Accelerator Pedal 11 Brake Pedal 12 Clutch Pedal 13 Foot Rest 14 Power Socket 15 Cup Holder 16 Parking Brak...

Page 32: ...D AND FEATURES 30 Instrument Cluster Version 1 NOTE All indicators shown may not be applicable to your vehicle Tachometer Speedometer Set knob Mode knob Fuel Gauge Temperature Gauge Driver Information...

Page 33: ...DASHBOARD AND FEATURES 31 Instrument Cluster Version 2 Fuel Gauge Set knob Mode knob Driver Information Display Tachometer Speedometer NOTE All indicators shown may not be applicable to your vehicle...

Page 34: ...imate in dication of the amount of fuel in the fuel tank F stands for full and E stands for empty Version 1 Version 2 When fuel in the tank is near to empty position low fuel warning telltale turns ON...

Page 35: ...D bar If the coolant temperature reading is very high the warning tell tale flashes with an audible buzzer In this case stop the vehicle switch OFF the engine and cool it down for some time Contact a...

Page 36: ...re the distance travelled on short trips or between fuel stops It can be reset to 0 Trip meter reading becomes 0 0 after it crosses 9999 9 kms Average Fuel Economy for Trip A and Trip B Displays Avera...

Page 37: ...der Indicates the number of days kilometers in which service is due If service is overdue it will display 0 km or 0 days and spanner symbol will blink Never reset the display between service intervals...

Page 38: ...ndicated when driver door is open NOTE If any other door is open roof lamp will be ON provided that roof lamp switch is in position Gear indicator Indicates the current gear engaged Up or down arrow w...

Page 39: ...e covered for particular trip if Average Fuel Economy is displayed as then take your vehi cle to TATA MOTORS Authorized Service Centre NOTE AFE value is estimate of fuel econ omy It may vary significa...

Page 40: ...DASHBOARD AND FEATURES 38 Driver Information Settings Version 1...

Page 41: ...DASHBOARD AND FEATURES 39 Driver Information Settings Version 2...

Page 42: ...value Instrument Cluster Illumination For Instrument Cluster illumination level settings it is necessary to turn the Park Lamp ON and then Press the SET knob on Instrument Cluster Press SET knob to c...

Page 43: ...continuously if a fault arises in Engine Management System Contact a TATA MOTORS Authorised Service Centre Immobilizer Red 1 Illuminates when the system disables engine start if the original key is n...

Page 44: ...am Blue Illuminates when the high beam headlamps are switched ON or flashed Low Oil Pressure Red 1 Illuminates when ignition is switched ON Once engine is started it turns OFF once required oil pressu...

Page 45: ...ove 4 kmph When the vehicle speed goes above 25 kmph seat belt alarm will be audible Airbag status if applicable Red Illuminates momentarily when ignition is switched ON It will continuously illuminat...

Page 46: ...is switched ON Illuminates continuously if there is any malfunction in ABS Normal braking sys tem will be operational without assistance of ABS Contact a TATA MOTORS Authorised Service Centre immediat...

Page 47: ...ult mode This mode is used to achieve optimum torque Speed Limit lamp If applicable Amber This symbol comes ON when vehicle speed is more than 120 Kmph This symbol blinks and audible buzzer sounds sim...

Page 48: ...y drain your vehicle battery Park brake ON reminder If Park Brake is applied and vehicle is driven telltale will turn ON and buzzer will provide audio warning continuously Disengage the park brake to...

Page 49: ...Parking Lamp Rotate stalk to turn ON the Parking lamps iii Low Beam Rotate stalk to turn ON the Low Beam function 6 Lane Change Signal To signal a lane change move the lever slightly up or down respe...

Page 50: ...4 Flick wipe spring re turn Pull the stalk downwards and hold it for continuous wipe the wiper continuously wipes across the windshield at low speed till the stalk is released 5 Front Windshield Wash...

Page 51: ...er in STARTING and DIV ING section Trunk lid To open the trunk lid press the switch located on fascia switch Steering Wheel Switches LHS If equipped Volume To increase decrease volume of music system...

Page 52: ...refer infotainment manual Speakers if equipped Speakers and tweeters are provided on models with infotainment system While provisions are given for music system and speakers on versions without info t...

Page 53: ...s electrical system Make sure that any electrical accessories you use are designed to plug into this type of socket Antenna If equipped Antenna is located on the roof Turn an tenna counter clockwise...

Page 54: ...Roof grab handles are provided on all seats except driver s seat This helps in comfortable positioning of passengers during a journey Boot Lamp if equipped Boot lamp is provided in the luggage compart...

Page 55: ...STOWAGE AREAS 53 STORAGE COMPARTMENTS 1 Glove box 2 Utility pockets on front doors 3 Utility pockets on rear doors 4 Pocket on dashboard 5 Center console 6 Foldable arm rest 7 Trunk lid Compartment...

Page 56: ...y It cools the glove box only when the front A C is ON Shut OFF the vent by rotating the knob whenever cooling is not required 2 Utility pockets on front doors 3 Utility pockets on rear doors Utility...

Page 57: ...equired fold the arm rest back into the seat 7 Trunk lid Compartment Store the luggage in trunk lid WARNING Distribute the items of luggage as evenly as possible Position heavy loads as far forwards a...

Page 58: ...nger right side grab handle WARNING The coat hook cannot restrain heavy objects or items of luggage Never hang hard sharp edged or fragile objects on the coat hook Collapsible hook Collapsible hook is...

Page 59: ...ng and blower is ON The Climate control regulates the temperature in the vehicle interior and filters dust particles You can manually set the desired temperature Air Distribution The air is distribute...

Page 60: ...ontrol D Air Intake Selector E AC ON OFF Switch A Air distribution control This is to select the air distribution pat tern as described in the table Directs air through the cen ter and side air vents...

Page 61: ...Driving on a dusty road or through tunnel On signals or slow traffic to avoid traffic pollution Maximum cooling is required Fresh Air mode Indicator light OFF Fresh air is drawn into the vehicle Alway...

Page 62: ...Desired temp Fresh air mode Switched OFF Quick heating To MAX speed and then 2nd or 3rd dot To the right up to the stop Briefly switch ON to Fresh air mode then Recirculation mode Switched OFF Normal...

Page 63: ...illes in the vehicle interior If the AC is not used for a long pe riod such as during winter it may not give the best performance when you start using it again Op erate the AC at least once a month to...

Page 64: ...ode 9 Auto on selection button 10 Temperature control knob GENERAL DESCRIPTION FATC system controls the in cabin Temperature of the vehicle automatically and provides maximum passen ger convenience re...

Page 65: ...evant Cli mate Information Also when the display is not in climate mode then climate information will be displayed on the all time display provide on the bottom bar 1 AC COMPRESSOR ON OFF BUTTON Press...

Page 66: ...tem will be deactivated after 15 min of continu ous operation 6 FRESH AIR RE CIRCULATION BUTTON A When the recircula tion Button or LED is switched ON air from the vehicle s interior is sent throughou...

Page 67: ...tton B Set the desired temperature by turn ing temperature control knob The display will show all the functions during AUTO mode C The system automatically selects the proper mix of conditioned and or...

Page 68: ...sired temperature will be increased by steps of 0 5 C User can se lect temperature range from 18 C to 30 C Whereas the anticlockwise direc tion decreases the temperature When you set the temperature t...

Page 69: ...ed OFF ON Normal Cooling Desired speed To the right up to the stop Switched OFF ON Switched OFF Switched OFF Switched OFF ON Quick Cooling Max speed To the right up to the stop Switched OFF ON Switche...

Page 70: ...urn on A C by pressing the button Make sure the temperature control is set to maximum cool In case of FATC set temperature to Low mode C Set the fan to maximum speed for ETC manual HVAC variants D Ope...

Page 71: ...elts Objects luggage or loads are se cured properly against slipping or tip ping Sufficient fuel for the trip Daily check Tyres for abnormal wear cracks or damage and embedded foreign ma terial such a...

Page 72: ...adapt your driving style to suit the prevailing road and weather con ditions and maintain a safe distance from the vehicle in front Drive care fully Avoid frequent sudden acceleration and braking Sel...

Page 73: ...ting specially while going down a hill Tips for obtaining better fuel effi ciency Always maintain the specified tyre pressure during fuel top ups and also before a long trip Vehicle running with low t...

Page 74: ...ignal only if the stoppage time is high typically more than 30 sec While driving on highways drive with windows closed The more you open the windows the higher will be the resistance to the vehicle at...

Page 75: ...curely latched NOTE Adjust the seat backrest until your arms are slightly angled when hold ing the steering wheel WARNING Never travel in a moving vehicle with the seat backrest in an excessively recl...

Page 76: ...head restraints Head restraints are intended to help reduce injuries during an accident NOTE Head restraint are not adjustable for seats with integrated head restraints Rear seats Fixed rear seats are...

Page 77: ...lancing over your shoulder Motorized outer rear view mirrors if equipped The switch to adjust the motorized mir rors is located on the driver s door You can adjust the mirrors when the ignition switch...

Page 78: ...ion 4 Pull release lever up completely to lock the steering column 5 Make sure that steering wheel is se curely locked by checking up and down direction NOTE When adjusting the steering wheel make sur...

Page 79: ...l gear Depress the clutch pedal fully and crank the engine Do not press the accelerator pedal when starting the engine NOTE The Starter protection system fit ted in this vehicle does not allow you to...

Page 80: ...ervice center Current gear indication The Driver Information display DIS in the Instrument Cluster indicates the cur rent gear position engaged Gear recommendation Up or down arrow will be displayed i...

Page 81: ...to fail There is a risk of an accident Never depress the brake pedal and the accelerator pedal at the same time If you have driven for a long time in heavy rain without braking there may be a delayed...

Page 82: ...not switch the engine off when it is running at high speed This will lead to premature turbocharger bear ing wear Climbing Sharp Gradients on Loose Surfaces Start off smoothly in a suitable gear Ac c...

Page 83: ...Brake application under such situations should be done very Parking Brake Mechanical parking brake acting only on the rear wheels is provided on the vehi cle Parking brake applied To apply the parkin...

Page 84: ...They could also operate the vehicle s equipment There is a risk of an accident and in jury NOTE Do not use parking brake for braking unless unavoidable circumstances like when service brake is not wor...

Page 85: ...ature Park assist indications In case of Reverse park assist system malfunctions the following screen may appear on the infotainment system Reason for this fault may be a Park assists control failure...

Page 86: ...sist field of detection Driver should use extreme caution while parking the vehicle WARNING Due to any reason if the sensor gets misaligned or loses its intended fit ment position contact your dealer...

Page 87: ...tment The kit contains items that can be used in case of minor injuries only NOTE Check contents of the first aid kit pe riodically and replenish consumed or expired items Tool kit and tow hook Tool k...

Page 88: ...reflecting side of the triangle should face the oncoming traffic and it should be free from any obstacles Remove the advance warning triangle carefully from the bag and assemble Re fer instructions gi...

Page 89: ...vance warning triangle at a suitable distance behind the vehicle as an indication of breakdown Clear all passengers and luggage from the vehicle Close all the doors WARNING If you drive with a flat ty...

Page 90: ...ust be checked as soon as possible Recommended tyre pressure is 36 psi 2 5 bar for temporary spare wheel Snow chains cannot be used on the temporary spare wheel WARNING Never use more than one tempo r...

Page 91: ...pply equal pressure at the circumference of the wheel cover to fix it in the wheel rim NOTE Do not use any sharp tools such as screw driver etc to remove the wheel cover Changing flat tyre Loosen the...

Page 92: ...provided on jack with jacking point as shown below Front jacking Location Rear jacking Location Assemble the Jack handle and wheel spanner as shown in jacking fig Raise it by turning the jack handle c...

Page 93: ...ach nut by hand until the wheel is securely seated on the hub Lower the jack completely then tightens the wheel nuts one by one using wheel spanner Press fit the wheel cover back if equipped Restore a...

Page 94: ...ories except those necessary for safety like hazard warning lamps Make jump lead connections as follows Connect one end of the first jump lead to the positive terminal of the discharged battery Connec...

Page 95: ...f a connected battery does not come into con tact with vehi cle parts Never place metal ob jects or tools on a battery It is important that you observe the described order of the bat trey terminals wh...

Page 96: ...he tow hook cover provided on the front bumper by pressing it at the bottom part and simultaneously pull ing it at the top as shown in fig Screw in and tighten the tow hook in clockwise direction Afte...

Page 97: ...Fuse Box 2 Engine Compartment Fuse Box 3 Cabin Compartment Fuse Box Checking and replacing fuses If any electrical unit in your vehicle is not functioning check the fuses first Please follow the step...

Page 98: ...lenished Ensure that all other fuses are pressed firmly in position If a newly inserted fuse also blows have the cause traced and rectified at nearest TATA MOTORS Authorized Service Centre immediately...

Page 99: ...o Function Fuse Rating PF1 STARTER MOTOR CAL 1 WARNING If Fuse box cover is removed for any reason it should be refitted properly at its original position Engine compartment fuse box NOTE Check the ty...

Page 100: ...0 IGNITION LOAD 60A 11 12 COMPRESSOR 10A 13 STARTER SOLENOID 20A 14 ABS ECU 25A 15 16 HORN HIGH LOW TONE 15A 17 FRONT FOG 10A 18 EMS BATTERY 10A 19 20 FUEL PUMP 20A 21 BRAKE LAMP 10A 22 RELAY COIL 5A...

Page 101: ...rocedure given below 1 Fuse box cover is mounted on dash board with the help of lugs at the top and bottom of the cover from inside 2 To remove the cover gently pull the cover from bottom side such th...

Page 102: ...A 15A 6 MIRROR AD JUST MOTOR 5A 7 POS PARK LAMP RH BCM 5A 15A 8 CLUSTER OBD 10A 9 BCM POSITION LH 5A 15A 10 KEY IN 5A 11 IMMOBILIZER EPAS 5A 12 ACC FUSE 5A 13 BLOWER MO TOR 30A 14 CDL ACCES SORY CONN...

Page 103: ...H16 2 5 STOP POSITION LAMP REAR 12V LED 2 6 POSITION LAMP FRONT 12V 5W W5W 2 7 TURN SIGNAL REAR 12V PY21W PY21W 2 8 REVERSE LAMP 12V P21W P21W 1 9 REAR REGISTRATION PLATE LAMP 12V LED 2 10 SIDE REPEA...

Page 104: ...r to replacing bulbs in the headlight housing please keep in mind that components in the en gine compartment will be hot Replacing High Low beam bulb 1 Remove the rubber press fit cover by simply pull...

Page 105: ...b to heat unevenly and explode when lit Never touch the glass portion of the bulb with your bare hands and al ways wear eye protection when han dling or working around halogen bulbs Always keep haloge...

Page 106: ...bonnet to access the head lamps 2 Remove the socket cover on the backside of the headlamp 3 Disconnect lamp connection 4 Unlock low beam bulb holder clip by pushing it backward 5 Remove low beam bulb...

Page 107: ...ect the connectors of low beam and refit low beam lamp cover 8 Disconnect motor connection if required high beam lamp con nection 9 Unlock position high beam bulb from its place 10 Remove position hig...

Page 108: ...positon bulb from its place 13 Remove position bulb 14 Refit positon bulb 15 Unlock side indicator lock in anti clockwise direction remove front direction indicator bulb 16 Refit front direction indi...

Page 109: ...warranty Response Time for the On Road Assistance Program Within City Lim its 60 minutes On State or Na tional Highways 90 minutes Ghat Roads and other places 120 minutes The response time will depen...

Page 110: ...bles and la bour for such repairs not covered un der warranty These charges are to be settled with ASP in cash Toll or ferry charges paid by ASP in reaching to the breakdown site to be settled with AS...

Page 111: ...stomer are advised to take ac knowledgment from the ASP for the list of accessories extra fittings and other belongings in the vehicle as well as the current condition related to dents scratches break...

Page 112: ...gine coolant level Brake fluid level Washer fluid level checking top ping up Battery electrolyte level Tyre inflation pressure including spare wheel NOTE Refer Opening and Closing section for engine b...

Page 113: ...MAINTENANCE 111 Engine Compartment Diesel 1 Brake fluid reservoir 4 Windshield washer container 7 Battery 2 Dip Stick Engine Oil 5 Air Filter 8 Auxiliary tank 3 Engine oil filling cap 6 Fuse relay box...

Page 114: ...MAINTENANCE 112 Engine Compartment Petrol 1 Dip Stick Engine Oil 4 Windshield washer container 7 Battery 2 Brake fluid reservoir 5 Air Filter 8 Auxiliary tank 3 Engine oil filling cap 6 Fuse relay box...

Page 115: ...x amine the oil level It should be between MIN and MAX level If not top up with recommended engine oil NOTE The oil consumption depends up on the driving style and the conditions under which the vehic...

Page 116: ...Level Check whether the coolant level is be tween the MIN and MAX marks on the coolant reservoir When the coolant levels is low top up with recommended coolant through filler of auxiliary tank until t...

Page 117: ...OTE Do not use detergent or any other additive in the wind shield washer reservoir This can se verely impair visibility when sprayed on the wind shield and can also damage your vehicle s paint Do not...

Page 118: ...y to explode causing very serious inju ries Keep all sparks open flames and smoking materials away from the battery The battery contains sulphuric acid electrolyte which is poi sonous and highly corro...

Page 119: ...s are more prone to uneven wear and damage from road hazards Under inflated tyres reduce your comfort in vehicle handling and are prone to fail ures due to high temperature They also cause uneven wear...

Page 120: ...layer of rubber from inside which holds the air inside the tyre Removal of this layer due to scratching may cause gradual loss of air and defla tion If wheel rim gets damaged in service get the wheel...

Page 121: ...175 60 R15 tyres with temporary spare wheel if equipped NOTE Do not use spare wheel for tyre ro tation in case of temporary spare wheel used Two or more temporary tyres should not be used on one vehi...

Page 122: ...ich is housed under the cover If red LED remote flashes for 5 times af ter placing and releasing any button on remote It is recommended to replace battery at a TATA MOTORS Authorised Service Centre Yo...

Page 123: ...ed with emissions This system warns the driver by turning ON the Malfunction Indication lamp MIL on the instrument cluster when a fault causes emission levels to increase The OBD system also has a dia...

Page 124: ...g dealer while availing free services 1st free service At 1000 2000 kms OR 2 months whichever is earlier 2nd free service At 7000 8000 kms OR 6 months whichever is earlier 3rd free service At 14500 15...

Page 125: ...120 General 1 Wash the vehicle Clean Con denser Fins Every Service 2 Check Top up Fluids If re quired Trans axle Oil Coolant Brake Fluid Bat tery Electrolyte Wind Screen washer fluid Every Service 3...

Page 126: ...for damage re place if required Suspension First at 15K 12M then at every service 7 5K 6M 7 Check for all bolts nuts Tighten 7 5K 6M Engine Diesel 1 Clean air filter el ement more fre quently for veh...

Page 127: ...4 120 6 Replace Diesel Pressure Regu lator 75K 36M 7 Check accessory belt condition vis ually replace if found damage 15K 12M 8 Check timing belt visual condition replace if found damage 105K 24M 9 Re...

Page 128: ...an air filter el ement more fre quently for vehi cle operating as TAXI 15K 12M 2 Change engine oil and Oil filter 15K 12M 3 Gasoline Re place Fuel Filter 30K 24M 4 Change Spark plugs 45K 36M 5 Check a...

Page 129: ...2 6 12 18 24 30 36 42 48 54 60 66 72 78 84 90 96 102 108 114 120 Transaxle 1 Replace trans axle oil 75K 60M Brakes 1 Check front brake pads rear brake lin ings Replace if necessary 15K 12M 2 Replace...

Page 130: ...90 96 102 108 114 120 Wheels Tyres 1 Check Adjust Wheel alignment 15K 18M 2 Check for Tyre pressure condi tion rotate 7 5K 12M Electrical 1 Check specific gravity of battery electrolyte OR Every 6 Mon...

Page 131: ...nd protect the painted parts using protective wax 5 Clean and protect the shiny metal parts using commercially available special compounds 6 Sprinkle talcum powder on the rub ber windscreen wiper and...

Page 132: ...se of any other diesel fuel can increase the pol lutants At very low temperature fluidity of diesel may become insuffi cient due to paraffin separation It is therefore necessary to mix supplementary f...

Page 133: ...rol conforming to IS 2796 2008 and BS IV specification and RON not less than 91 is recommended It is always recommended to use correct fuel to get optimum emission performance NOTE Always use petrol o...

Page 134: ...nth 5W30 3 5 Liters Petrol 4 Liters Diesel Coolant Premixed Antifreeze agent Soft water 40 60 ra tio Class II JIS K2234 TATA SS7700S1 SUNSTAR CCI Golden Cruiser LLC 2200NP IOCL TATA MOTORS GENUINE COO...

Page 135: ...50 rpm 70 ps 4000 50 rpm 62 5 kw 6000 rpm 85 ps 6000 rpm Max Torque 140 Nm 1800 to 3000 rpm 114 4 Nm 3500 70 rpm Clutch Type Single plate dry friction diaphragm type Outside diameter of clutch 200 mm...

Page 136: ...re Tyres 155 80 R13 79T Tubeless XE XE O 175 65 R14 82T Tubeless XM XM O XT XT O XZ XZ O 155 80 R13 79T Tubeless XE XE O 175 65 R14 82T Tubeless XM XM O XT XT O 175 60 R15 Tubeless XZ XZ O Wheel rims...

Page 137: ...14 5 V 110 Amp Battery 12V 50Ah 12V 44Ah Main chassis dimension in mm Wheel base 2450 2450 Track front 1400 1400 Track rear 1420 1420 Overall length 3992 3992 Overall height 1537 1537 Max Width 1677...

Page 138: ...kg Gross vehicle weight 1485 XE 1500 XE O 1490 XM 1505 XM O 1510 XT 1525 XT O XZ 1530 XZ O 1420 XE 1435 XE O 1422 XM 1437 XM O 1442 XT 1457 XT O XZ 1462 XZ O Kerb weight unladen 1085 XE 1100 XE O 109...

Page 139: ...TECHNICAL INFORMATION 137 Vehicle Dimensions...

Page 140: ...TECHNICAL INFORMATION 138 Aggregate Identification Numbers Chassis No punching near driver seat VIN plate near front passenger seat Transaxle No Punching Engine No Plate Diesel Engine No Plate Petrol...

Page 141: ...el kerosene benzene thinner or other sol vents that cause damage to paint 6 Dry your vehicle thoroughly to prevent any damp spots 7 Rinse all surfaces thoroughly to pre vent any traces of soap and oth...

Page 142: ...ers can restore shine to the painted surface that has oxidized and become dull They normally contain mild abrasives and solvents that remove the top layer of the finish coat Polish your vehicle if the...

Page 143: ...ee months In addition to regularly washing your car the following precautions need to be taken Periodic Inspection Regularly inspect your vehicle for any damage in the paint film such as deep scratche...

Page 144: ...ou have purchased your vehicle We strongly recommend purchase of Extended Warranty at time of purchase of your vehicle Extended Warranty can be availed till 421 days from date of purchase of vehicle T...

Page 145: ...to the owner for parts or labour Such defective parts which have been replaced will become property of TATA MOTORS LIMITED Comprehensive list of parts covered is mentioned in the page 9 12 of the Ext...

Page 146: ...corrosion creeps onto the vehicle from the inside and from the outside The most dangerous kind of corrosion is often not discovered until it is too late Benefits of Anti Rust treatment A professional...

Page 147: ...ine wax is sprayed Life of over a year Sound Deadening System Door vibration deadeners These pads when stuck on the insides of the sheet metal increase sheet metal rigidity reduce vibra tions and incr...

Page 148: ...e available in all authorized workshops The Dealer Service Marketing Executive will explain to you the benefits and terms and conditions of this treatment I We have been explained the Benefits Terms a...

Page 149: ...e enemy Ultraviolet Rays Pollution Tree Sap Bird Droppings Car W ash Chemicals Road Salt Acid Rain Benefits Vehicle Exterior Enrichment Removal of medium scratches orange peel oxidation dust nibs etc...

Page 150: ...Dressing of all internal plastics eg door pad trims and rubber parts The treatment involves cleaning and dressing of all parts of the exposed interiors Specialised protection for seat fabric from liqu...

Page 151: ...In maintaining correct balance of fuel and air in system Resulting in Comprehensive clean up of combustion chamber induction system fuel injector deposits Better fuel economy Increased engine perform...

Page 152: ...pecial products from BG RF7 and Bardhal Special Duty are added to new engine oil This makes it suitable for petrol and diesel engine applications Resulting in Improved engine compression Increased pow...

Page 153: ...le in all authorized workshops The Dealer Service Marketing Executive will explain to you the ben efits and terms and conditions of this treatment I We have been explained the Benefit s Terms and cond...

Page 154: ...r service establishments our authorized deal ers service centres or service points in any way so as in our judgment which shall be final and binding to affect its reliability nor shall it apply if in...

Page 155: ...buyer shall have no other rights except those set out above and have in particular no right to repudiate the sale or any agreement or to claim any reduction in the purchase price of the car or to dema...

Page 156: ...he engine running avoid un necessary revving it up or stopping and starting It is not necessary to rev up the engine before turning it off as it unnecessarily burns the fuel Shift to higher gears as s...

Page 157: ...leakages 3 Cylinder head for valve leakage 4 All filters such as air oil and fuel filters check periodically 5 Turbocharger 6 Electrical connections 7 If the Service lamp continuously glows please tak...

Page 158: ......

Page 159: ......

Reviews: