background image


Pleiades - Taurus                                                                                            User Guide 

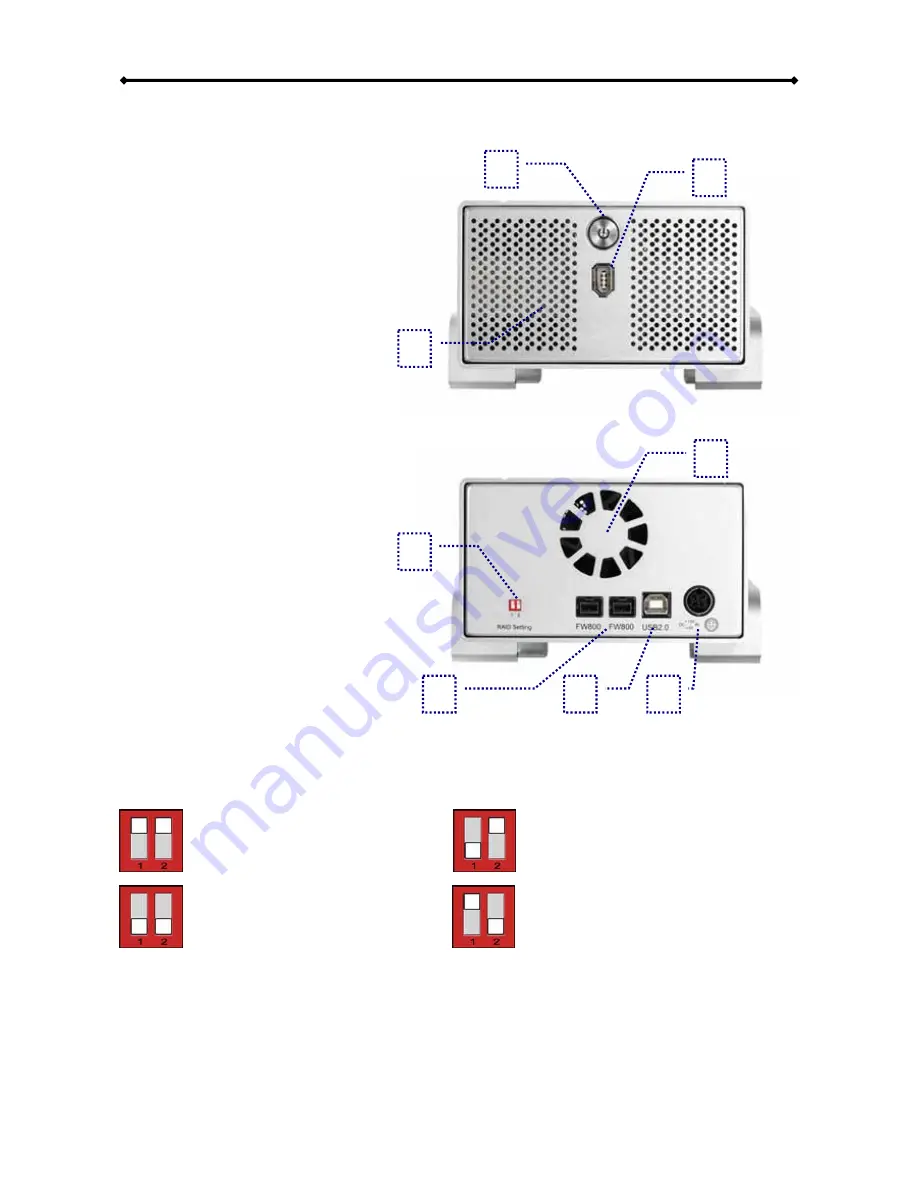
Detailed View 


Front View 

1. ON/OFF Switch 

2. Firewire 400 port 

3. Ventilation Holes 


Rear View 

1. Switch for RAID Setting 

2. Fan for Ventilation 

3. Firewire 800 ports 

4. USB 2.0 port 

5. Power Receptacle 


RAID Setting 


     Non-RAID 


RAID 0 - Striping 

     1 = Up, 2 = Up   


1 = Down, 2 = Up 


     Not in Use (Non-RAID)    RAID 

Spanning 

     1 = Down, 2 = Down 


1 = Up, 2 = Down 


Note: Changing the RAID setup will require you to re-format the drives. Make sure you 

backup all data before doing so! 


- 2 - 

Summary of Contents for Dual-Bay Storage Enclosure for 3.5" Serial ATA Hard...

Page 1: ...Pleiades Taurus Dual Bay Storage Enclosure for 3 5 Serial ATA Hard Drives User Manual v1 0 EN...

Page 2: ...IEW 2 RAID 0 SPANNING 6 REAR VIEW 2 RAID 0 STRIPING 6 RAID SETTING 2 INSTALLATION ON A PC 7 SYSTEM REQUIREMENTS 3 REMOVE PROCEDURE 7 PC REQUIREMENTS 3 INSTALLATION ON A MACINTOSH 8 MAC REQUIREMENTS 3...

Page 3: ...and rugged offering more than enough capacity to store all your digital media files Not only that the Pleiades Taurus can also back up and secure all of your data thanks to RAID protection Great perf...

Page 4: ...itch for RAID Setting 2 Fan for Ventilation 3 Firewire 800 ports 4 USB 2 0 port 5 Power Receptacle RAID Setting Non RAID RAID 0 Striping 1 Up 2 Up 1 Down 2 Up Not in Use Non RAID RAID 0 Spanning 1 Dow...

Page 5: ...ve USB 2 0 equipped Mac Mac OS 10 2 or above 1394a equipped Mac Mac OS 9 2 10 1 5 or above 1394b equipped Mac Mac OS 10 2 or above Package Contents Pleiades Taurus External Power Adapter Input 100 240...

Page 6: ...Assembly Your unit may come with a pre installed hard drive Before opening such an enclosure please read the warranty and any other notes from your vendor carefully before doing so as this could void...

Page 7: ...Install the second hard drive and mount it with two screws on each side 5 Connect the SATA and power cables to your hard drives Be careful not to damage any components and confirm that the cables are...

Page 8: ...device is next restarted When not in use turn off the power For the hard drives to go into stand by with the Operating System we recommend using SATA II hard drives set up as RAID 0 RAID Setup Non RAI...

Page 9: ...you do not need to change anything unless you prefer a different setup Turn on your Computer and start Windows Connect the Taurus and turn it on Let Windows search and install the driver automatically...

Page 10: ...a Macintosh Before connecting the device setup the RAID using the switches at the back of the enclosure See page 2 and 6 for more details about the RAID setup If the drives have been pre installed and...

Page 11: ...a 3rd party software running MS DOS we recommend you to format the drive using FAT32 Partitioning Formatting Be aware that this will destroy all your existing data on the drive so make sure you have a...

Page 12: ...y Computer and choose Manage Select Disk Management Choose the drive you want to format and right click on it for further commands Choose New Partition Follow the Partition Wizard For Win2000 or WinXP...

Page 13: ...the Disk Utility to format and create partitions on your external disk Select Disk Utility in the utilities folder Choose your external drive and format it according to your requirement For Mac OS X...

Page 14: ...ower Tytech Technology Co Ltd all Rights Reserved The information contained in this manual is believed to be accurate and reliable Macpower Tytech Technology assumes no responsibility for any errors c...

Reviews: