background image

33

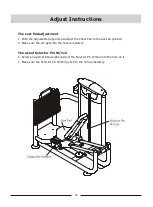
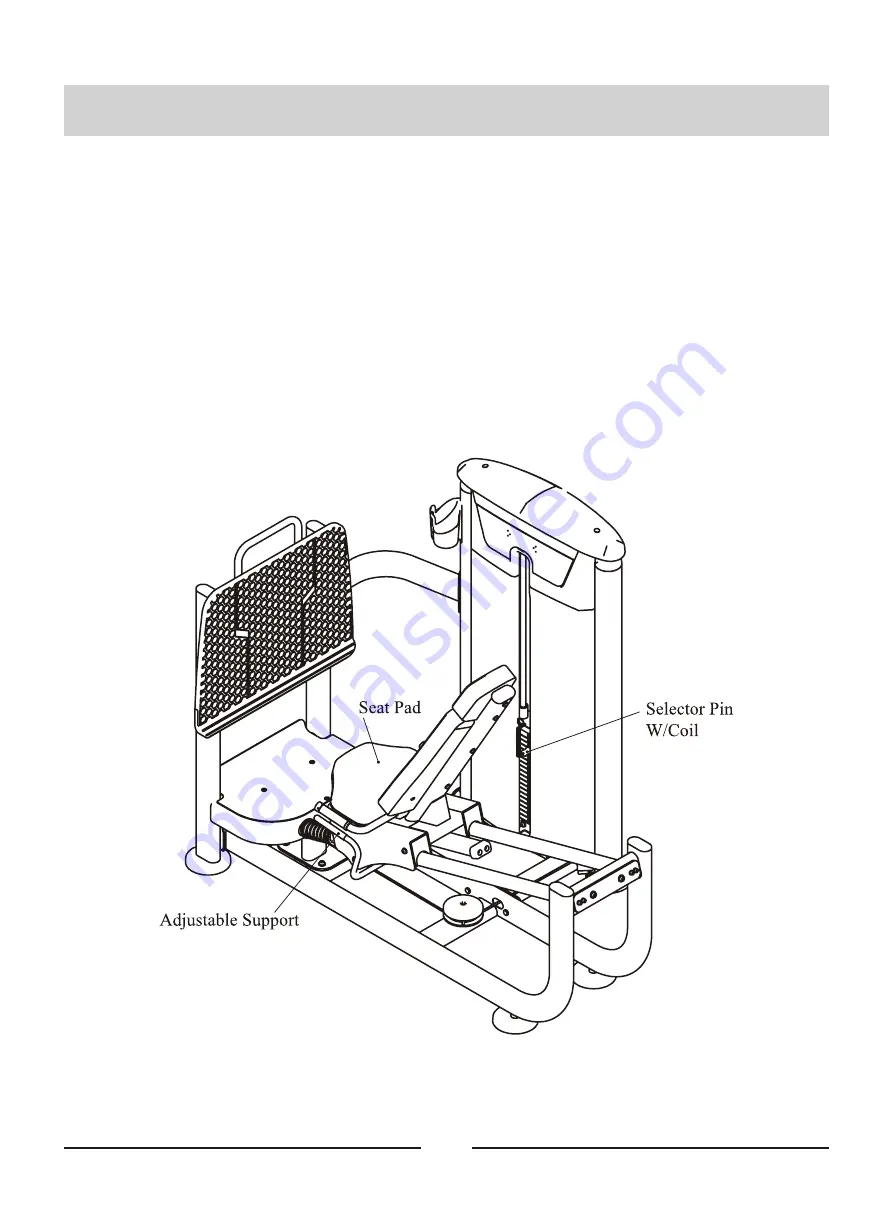
The seat Pad adjustment

1. Push the Adjustable Support and adjust the Chest Pad to the desired position.

2. Make sure the pin gets into the hole completely.

The use of Selector Pin W/Coil

1. Select an appropriate weight and put the Selector Pin W/Coil into the hole on it.

2. Make sure the Selector Pin W/Coil gets into the hole completely.

Adjust Instructions

Summary of Contents for LEG PRESS IT95

Page 1: ...Manual TF IT9510 LEG PRESS IT95 TAURUS is a registered brand of the company Sport Tiedje GmbH All rights reserved Any use of this trademark without the explicit written permission of Sport Tiedje is prohibited ...

Page 2: ...assemble according to the actual Weights you buy Important Safety Instructions 3 Instructions 5 Exploded View and Parts List 6 Measurement Guide 19 Assembly Instructions 20 Assembly 21 Adjust Instructions 33 Exercise Instructions 34 Maintenance Schedule 35 General Maintenance Information 36 Weight Training Tips 37 ...

Page 3: ...not allowed to use this equipment Teenagers should use this equipment with adult supervision 5 Do not overexert yourself or work to exhaustion Do not attempt to lift more weight than you can control safely If you feel any pain or abnormal symptoms stop your workout immediately and consult your physician 6 This equipment is not used as medical apparatus and instruments 7 Never operate the unit when...

Page 4: ... and follow the steps in sequence Do not skip ahead If you skip ahead you may learn later that you have to disassemble components and that you may have damaged the equipment Assemble and operate the equipment on a solid level surface Locate the unit a few feet from walls or furniture to provide easy access The equipment is designed for your enjoyment By following these precautions and using common...

Page 5: ... Be sure to have your serial number and this manual when calling When all parts have been accounted for continue on Ratchet Wrench and Socket Adjustable Wrench Rubber Mallet Hex Key Wrench Set Phillips Screwdriver Before beginning assembly please take the time to read instructions thoroughly Please use the various lists in this manual to make sure that all parts have been included in your shipment...

Page 6: ... Cable ASSY 1 12 12 IT95101900 Big Spring 2 13 13 IT95102000 Nylon Baffle Ring 4 14 14 IT95081800 Seat Pad 1 15 15 IT950172ASSY Head Pad ASSY 1 16 16 IT950171ASSY Back Pad ASSY 1 17 17 IT95031200 Ellipse Plate 1 18 18 SG500110400V5 4 5 Pulley 3 19 19 SD1000B3000ASSY Adjustable Foot Plate 4 20 20 IT801210300P11C Cup Holder 1 21 21 IT950121ASSY Top Bracket ASSY 1 22 22 IT950122ASSY Bottom Bracket AS...

Page 7: ...cket Head Cap Screw M10 75 2 44 44 GB70BTM10 50DN18 Socket Head Cap Screw M10 50 3 45 45 GB70BTM10 30DN18 Socket Head Cap Screw M10 30 6 46 46 GB70M8 30 30DN19 Socket Head Cap Screw M8 30 4 47 47 GB70M8 20N19 Socket Head Cap Screw M8 20 2 48 48 GB818M6 20DHS2 Cross Recessed Pan Head Screw M6 20 18 49 49 GB818M6 16DHS2 Cross Recessed Pan Head Screw M6 16 4 50 50 GB818M6 10DHS2 Cross Recessed Pan He...

Page 8: ...8 Exploded View and Parts List Overall ...

Page 9: ... Description QTY 1 1 1 IT95100100 Weight Stack Frame 1 2 1 2 GB17880 5M6 16 5DS17 Rivet Nut M6 14 3 1 3 AC32705800 U nut M6 4 4 1 4 IT95015700 Foot Plate 2 5 1 5 IT95015900 Plastic Block 2 6 1 6 IT95015800 Plug φ95 81 1 2 7 1 7 GB818M6 20DHS2 Cross Recessed Pan Head Screw M6 20 2 ...

Page 10: ... 1 IT95100200 Bottom Frame 1 2 2 2 IT90013800P11C Plug RT50 100 2 3 2 3 IT95016400 Pulley Cover 1 4 2 4 FE97122300 Limit Shaft 1 5 2 5 IT95057800 4 5 Pulley 1 6 2 6 FE97122100 Bushing φ22 φ17 5 7 5 1 7 2 7 DQ10N19B Flat Washer φ11 φ25 2 1 8 2 8 GB70BTM10 25DN18 Socket Head Cap Screw M10 25 1 ...

Page 11: ...95100400 Front Frame 1 2 4 2 GB17880 5M8 16 5DCS17 Rivet Nut M8 3 3 4 3 IT95102100 Urethane Bumper 1 4 4 4 SG500110400V5 4 5 Pulley 1 5 4 5 IT90013800P11C Plug RT50 100 2 6 4 6 GB70BTM10 55DN18 Socket Head Cap Screw M10 55 1 7 4 7 GB9510DN2 Flat Washer φ11 φ20 2 2 8 4 8 NM10DN2 Nylon Lock Nut M10 1 ...

Page 12: ...Y ItemNo Grade No Part No Description QTY 1 6 1 IT951007ASSY Adjustable Handle Frame ASSY 1 2 6 2 IT951008ASSY Seat Frame ASSY 1 3 6 3 IT951009ASSY Sliding Frame ASSY 1 4 6 4 GB70M8 25N19 Socket Head Cap Screw M8 25 1 5 6 5 DQ8DS2B Flat Washer φ9 φ16 1 6 1 ...

Page 13: ...Pin 1 3 6 1 3 FS522800 Grip 1 4 6 1 4 GB T1243 199708BN19 Chain 1 5 6 1 5 SG80071200B Spring 1 6 6 1 6 KPS18002701V1 Nut M20 1 5 18 1 Item No Grade No Part No Description QTY 1 6 3 1 IT95100900 Sliding Frame 1 2 6 3 2 RS17000400 Bumper 1 3 6 3 3 BNH0514 Bumper 1 4 6 3 4 GB70M8 30N19 Socket Head Cap Screw M8 30 3 5 6 3 5 NMM8DN2 Nylon Lock Nut M8 1 6 6 3 6 IT95101300 Securing plate 1 ...

Page 14: ...inum Tube Guide 1 6 6 2 6 IT95016300 Plastic Corner Tube Glide 4 7 6 2 7 IT90013800P11C Plug RT50 100 1 8 6 2 8 HVCORE5300 Bushing Φ19 2 9 6 2 9 GB70BTM10 105DN18 Socket Head Cap Screw M10 105 6 10 6 2 10 GB70M6 10N19 Socket Head Cap Screw M6 10 1 11 6 2 11 GB9510DN2 Flat Washer Φ11 Φ20 2 8 12 6 2 12 NM10DN2 Nylon Lock Nut M10 6 13 6 2 13 GB845ST4 8 13DS2 Cross RecessedPan HeadSelf drillingTapping...

Page 15: ...er1 2 5 6 2 2 5 GB2766203 2Z Deep Groove Ball Bearing φ17 φ40 12 2 Roller Group 1 Roller Group 2 15 Exploded View and Parts List ItemNo Grade No Part No Description QTY 1 6 2 3 1 IT95102200 Pin 1 2 6 2 3 2 BNH2472 01V1 Roller 1 3 6 2 3 3 GB2766203 2Z Deep Groove Ball Bearing φ17 φ40 12 2 4 6 2 3 4 BNH2472 03 Roller Spacer 1 5 6 2 3 5 GB894 117FH12 Circlip For Shaft 2 ...

Page 16: ...ip Frame ASSY ItemNo Grade No Part No Description QTY 1 7 1 IT95100600 Assist Grip Frame 1 2 7 2 026 01PL0206 5 Grip 2 3 7 3 V39500 Aluminum Grip Cap 2 4 7 4 V39600 Aluminum Grip Ring 2 5 7 5 YZGB7710 32 3 2N19 Socket Set Screw 10 32UNF 3 2 8 ...

Page 17: ...n QTY 1 8 1 IT95101500 Front Pedal Frame 1 2 8 2 FE97102000 Pedal Plate 1 ItemNo Grade No Part No Description QTY 1 11 1 IT95101801 Cable1 1 2 11 2 HF900 03A1002 Hex Flange Nut 2 3 11 3 HS11757602 Screw1 2 13 50 8 1 4 11 4 HS11757603 Terminal Block 2 5 11 5 IT95101400 Screw1 2 13 45 1 6 11 6 YLM0 5 13 11DS2 Hex Nut 1 2 13 1 ...

Page 18: ...1 3 15 3 GB846ST4 2 19DHS Cross Recessed Countersunk Head Tapping Screw ST4 2 19 4 ItemNo Grade No Part No Description QTY 1 16 1 IT95017100 Back Pad 1 2 16 2 IT95017300 Back Pad Cover 1 3 16 3 IT95017500 Back Pad Support Plate 1 4 16 4 GB70M10 15DS20 Socket Head Cap Screw M10 15 2 5 16 5 GB846ST4 2 19DHS Cross Recessed Countersunk Head Tapping Screw ST4 2 19 6 ...

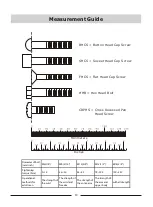
Page 19: ...meter of bolt mm inch M6 1 4 M8 5 16 M10 3 8 M12 1 2 M16 5 8 Tightening torque N m 9 12 22 30 45 59 78 104 193 257 Operational methods for adult men The strength of the wrist The strength of the wrist and forearm The strength of the entire arm The strength of the arm and upper body with all strength 19 CRPHS Cross Recessed Pan Head Screw ...

Page 20: ...ome of components may be large heavy or awkward to handle alone It is important that you assemble your product in a clean clear uncluttered area This will enable you to move around the product while you are fitting components and reduce the possibility of injury during assembly As with any assembled part proper alignment and adjustment is critical While tightening the fasteners be sure to leave ro...

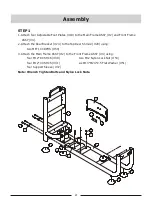
Page 21: ... Rear Bracket 23 to the Top Rear Shroud 28 using two M6 10 CRPHS 50 3 Attach the Main Frame ASSY 2 to the Front Frame ASSY 4 using four M12 80 SHCS 39 two M12 Nylon Lock Nut 54 four M12 30 SHCS 41 six Φ13 Φ24 2 5 Flat Washer 51 four Support Sleeve 37 Note Wrench Tighten Bolts and Nylon Lock Nuts Assembly 21 ...

Page 22: ... Stack Frame ASSY 1 using two M12 90 SHCS 38 two M10 Nylon Lock Nut 55 four M12 30 SHCS 41 four Φ13 Φ24 2 5 Flat Washer 51 four M10 80 SHCS 42 four Φ11 Φ20 2 Flat Washer 52 two Support Sleeve 37 one Ellipse Plate 17 Note Wrench Tighten Bolts and Nylon Lock Nuts Adjust the Adjustable Foot Plates to make the machines stable ...

Page 23: ... 52 two M10 Nylon Lock Nut 55 3 Attach Assist Grip Frame ASSY 7 to Seat Carriage Frame ASSY 6 using two M10 45 SHCS 40 two Washer Φ10 74 4 Take the two Sliding Guide Rods 9 Through the rear hole of the Main Frame ASSY 2 Through the rollers of Seat Carriage Frame ASSY 6 two Big Spring s four Nylon Baffle Ring into the hole on the Front Frame ASSY 4 Attach the Connecting Plate on using four M12 30 S...

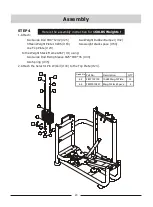
Page 24: ...Top Plate 24 to the Weight Stack Frame ASSY 1 using two Guide Rod Fixing Sleeve Φ25 Φ19 45 34 two Spring 35 2 Attach the Selector Pin W Coil 33 to the Top Plate 24 Assembly 24 Here is the assembly instruction for 160LBS Weights Grade No Part No Description QTY 63 FE97193100 10LBS Weight Plate 15 64 FEWS01ASSY Weight Stack Space 2 ...

Page 25: ...42 25 two Weight Rubber Bumper 32 nineteen Weight Plate 10LBS 63 one Top Plate 24 to the Weight Stack Frame ASSY 1 using two Guide Rod Fixing Sleeve Φ25 Φ19 45 34 two Spring 35 2 Attach the Selector Pin W Coil 33 to the Top Plate 24 Grade No Part No Description QTY 63 FE97193100 10LBS Weight Plate 19 ...

Page 26: ...Top Plate 24 to the Weight Stack Frame ASSY 1 using two Guide Rod Fixing Sleeve Φ25 Φ19 45 34 two Spring 35 2 Attach the Selector Pin W Coil 33 to the Top Plate 24 Assembly 26 Here is the assembly instruction for 235LBS Weights Grade No Part No Description QTY 65 FE97193200 15LBS Weight Plate 15 64 FEWS01ASSY Weight Stack Space 2 ...

Page 27: ...FE97193200 15LBS Weight Plate 19 STEP 4 1 Attach two Guide Rod Φ19 1242 25 two Weight Rubber Bumper 32 nineteen Weight Plate 15LBS 65 one Top Plate 24 to the Weight Stack Frame ASSY 1 using two Guide Rod Fixing Sleeve Φ25 Φ19 45 34 two Spring 35 2 Attach the Selector Pin W Coil 33 to the Top Plate 24 ...

Page 28: ......

Page 29: ...ack Frame ASSY 1 using two M10 50 SHCS 44 four Φ11 Φ20 2 Flat Washer 52 two M10 Nylon Lock Nut 55 2 Attach the two ends of the Cable ASSY 11 to the Top Plate 24 and the Seat Carriage Frame ASSY 6 Note Wrench tighten bolts and Nylon Lock Nuts Assembly 29 ...

Page 30: ... the Weight Stack Frame ASSY 1 and the Bottom Bracket ASSY 22 using four M6 20 CRPHS 48 two M6 16 CRPHS 49 3 Attach the Training Placard Cover 27 to the Weight Stack Frame ASSY 1 and the Top Bracket ASSY 21 using two M6 20 CRPHS 48 two M6 10 CRPHS 50 4 Attach the Top Rear Shroud 28 to the Weight Stack Frame ASSY 1 and the Top Bracket ASSY 21 using four M6 20 CRPHS 48 5 Attach the Top Cover 26 to t...

Page 31: ...Assembly 31 STEP 6 ...

Page 32: ...k Pad ASSY 16 to the Seat Carriage Frame ASSY 6 Attach the Auxiliary Pedal 71 to Front Frame ASSY 4 using four M10 80 SHCS 42 ten Φ11 Φ20 2 Flat Washer 52 six M10 30 SHCS 45 three M8 20 FHCS 72 Note Wrench tighten bolts and Nylon Lock Nuts Assembly 32 ...

Page 33: ... Pad to the desired position 2 Make sure the pin gets into the hole completely The use of Selector Pin W Coil 1 Select an appropriate weight and put the Selector Pin W Coil into the hole on it 2 Make sure the Selector Pin W Coil gets into the hole completely Adjust Instructions ...

Page 34: ......

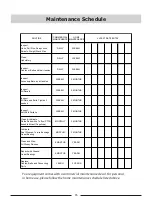
Page 35: ...r tension DAILY WEEKLY Inspect Accessory Bars and Handles WEEKLY 3 MONTHS Inspect All Decals WEEKLY 3 MONTHS Inspect All Nuts and Bolts Tighten if needed WEEKLY 3 MONTHS Inspect Anti Skid Surface WEEKLY 3 MONTHS Clean Lubricate Guide Rods with a Teflon PTFE based lubricant Superlube MONTHLY 3 MONTHS Lubricate Seat Sleeves Turcite Bushings Linear Bearing MONTHLY 3 MONTHS Clean and Wax All Glossy Fi...

Page 36: ...s are designed to supply secure footing and need to be replaced if they appear worn or become slippery Belts and Cables We uses only high quality belt and mil spec cables Visually inspect the belts and cables for fraying cracking peeling or discoloration While the machine is not in use carefully run your fingers along the belt or cable to feel for thinning or bulging areas Replace belts and cables...

Page 37: ...ourself By deciding on an exercise plan that is right for you prior to starting you will contribute significantly to your success Warm up properly before engaging in weight resistance training Stretching yoga jogging calisthenics or other cardiovascular exercise can help prepare your body for the heavier workload of lifting weights Learn how to perform the exercise correctly before using heavy wei...

Page 38: ......

Reviews: