background image

Dear customer,

Thank you for choosing to purchase a TAURUS brand product. 
Thanks to its technology, design and operation and the fact 
that it exceeds the strictest quality standards, a fully satisfac-
tory use and long product life can be assured.

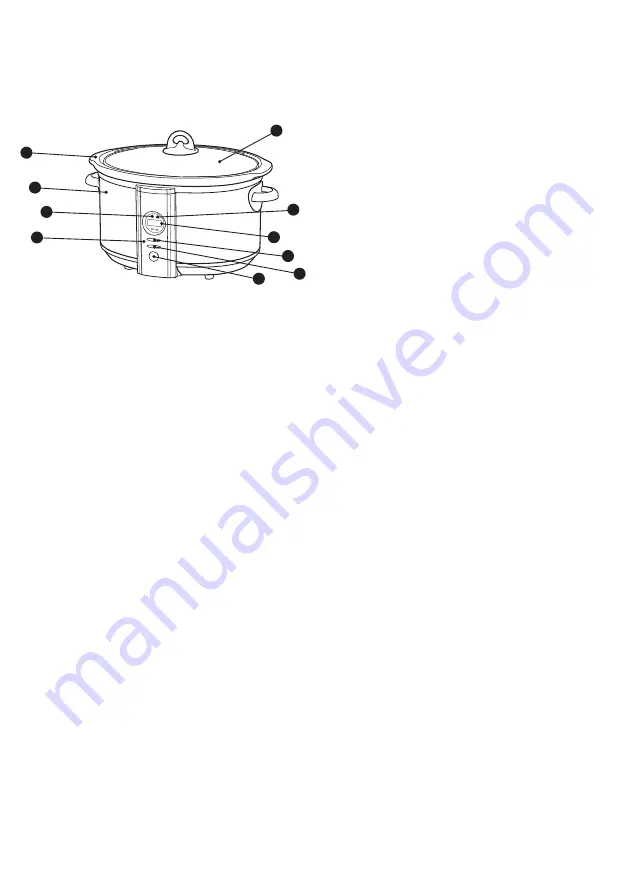
1. Parts Description

1. Removable ceramic bowl
2. Stainless steel housing
3. Control panel
4. Tempered glass lid 
5. Power light
6. Function display
7. Mode and time button
8. Down and up button
9. ON/OFF button
10. Keep warm indicator light

2. Safety advice and warnings!

Read these instructions carefully before switching on the 
appliance and keep them for future reference. Failure to follow 
and observe these instructions could lead to an accident. 
Clean all the parts of the product that will be in contact with 
food, as indicated in the cleaning section, before use.

2.1.   Use or working environment:

2.1.1. Keep the working area clean and well lit. Cluttered and 

dark areas invite accidents.

2.1.2. Use the appliance in a well ventilated area.
2.1.3. Do not place the appliance on hot surfaces, such as 

cooking plates, gas burners, ovens or similar items.

2.1.4. Keep children and bystanders away when using this 

appliance.

2.1.5. Place the appliance on a horizontal, flat, stable surface, 

suitable for withstanding high temperatures and away 
from other heat sources and contact with water.

2.1.6. Keep the appliance away from flammable material such 

as textiles, cardboard or paper, etc.

2.1.7. Do not place flammable material near the appliance.
2.1.8. Do not use the appliance in association with a 

programer, timer or other device that automatically 
switches it on.

2.1.9. Do not use the appliance if the cable or plug is dam-

aged.

2.1.10. Ensure that the voltage indicated on the rating label 

matches the mains voltage before plugging in the 
appliance.

2.2.11. Connect the appliance to the mains power supply 

with an earth socket withstanding a minimum of 10 
amperes.

2.1.12. The appliance’s plug must fit into the mains socket 

properly. Do not alter the plug. 

2.1.13. If using a multi plug check ratings carefully as the 

current used by several appliances could easily exceed 
the rating of the multi plug. 

2.1.14. If any of the appliance casings breaks, immediately 

disconnect the appliance from the mains to prevent the 
possibility of an electric shock.

2.1.15. Do not use the appliance if it has fallen on the floor or 

if there are visible signs of damage.

2.1.16. Do not force the power cord. Never use the power 

cord to lift up, carry or unplug the appliance.

2.1.17. Do not wrap the power cord around the appliance.
2.1.18. Do not clip or crease the power cord.
2.1.19. Do not allow the power cord to hang or to come into 

contact with the hot surfaces of the appliance.

2.1.20. Check the state of the power cord. Damaged or 

tangled cables increase the risk of electric shock.

2.1.21. The appliance is not suitable for outdoor use.
2.1.22. Supply cord should be regularly examined for signs 

of damage, and if the cord is damaged, the appliance 
must not be used.

2.1.23. Do not touch the plug with wet hands.

2.2.    Personal safety:

2.2.1. 

CAUTION:

 Do not leave the appliance unattended during 

use as there is a risk of an accident.

2.2.2.  Do not touch the heated parts of the appliance, as it 

may cause serious burns.

2.2.3. This appliance is only for domestic use, not for indus-

trial or professional use. It is not intended to be used 
by guests in hospitality environments such as bed and 
breakfast, hotels, motels, and other types of residential 
environments, even in farm houses, areas of the kitchen 
staff in shops, offices and other work environments.

2.2.4. This appliance is not intended for use by persons 

(including children) with reduced physical, sen-
sory or mental capabilities, or lack of experience and 
knowledge, unless they have been given supervision or 
instruction concerning use of the appliance by a person 
responsible for their safety. 

2.2.5. This appliance is not a toy. Children should be super-

vised to ensure that they do not play with the appliance.

2.3.    Use and care:

2.3.1. Fully unroll the appliance’s power cable before 

each use.

2.3.2. Do not use the appliance if the parts or acces-

sories are not properly fitted.

2. 3. 3. Do not use the appliance when empty.

1

2

5

3

4

10

6

7

8

9

Summary of Contents for LENTO CUINA

Page 1: ...Model 968210 320W complies with INTERNATIONAL IEC60335 SAFETY SPECIFICATIONS PLEASE READ ALL INSTRUCTIONS BEFORE USE LENTO CUINA ENGLISH AFRIKAANS SPANISH FRENCH PORTUGUESE...

Page 2: ...a multi plug check ratings carefully as the current used by several appliances could easily exceed the rating of the multi plug 2 1 14 If any of the appliance casings breaks immediately disconnect the...

Page 3: ...set the cooking time in 30 minute increments after the time is set press the Timer button again to confirm Note The cooking time is based on your recipe The HIGH LOW WARM setting has a time range of 2...

Page 4: ...for slow cooking Pasta seafood milk and cream should be added towards the end of the cooking time Many things can affect how quickly a recipe will cook water and fat content initial temperature of th...

Page 5: ...ka dig isnie of enige sigbare skade aan die omhulsel is nie 2 1 15 Moenie die toestel gebruik as dit op die vloer geval het en daar is sigbare skade 2 1 16 Moenie die koord gebruik om die toestel te d...

Page 6: ...dskoene om te hanteer 3 3 Stadig Kook 3 3 1 Stadig kook was nog altyd die beste manier vir n voedsame warm maaltyd met minimum voorbereiding en baie vrye tyd weg van die kombuis 3 3 2 Die prutpot was...

Page 7: ...Moenie in water druk of onder lopende water hou nie 5 Anomalies and herstel 5 1 Neem die toestel na gemagtigde tegniese sentrum as toestel beskadig is of probleme ontstaan 5 2 As koneksie na die muur...

Page 8: ...el aparato debe encajar correctamente en la toma de corriente No altere el enchufe 2 1 13 Si se utiliza un multi enchufe comprobar las califi caciones con cuidado como la corriente utilizada por vario...

Page 9: ...eterminado de 06 00 6 horas Al mismo tiempo el indicador HIGH se ilumina en la pantalla el modo predeterminado es alto 3 2 2 Ajuste el modo de operaci n Presione el bot n MODE para ajustar el modo de...

Page 10: ...superficie del alimento para permitir que hierva a fuego lento 3 5 4 Muchas recetas exigen cocinar durante todo el d a si no tienes tiempo para preparar los alimentos esa ma ana prepararlo la noche a...

Page 11: ...reparaci n 5 1 Lleve el aparato a un servicio de asistencia t cnica autor izado si el producto est da ado o si surgen otros problemas 5 2 Si la conexi n a la red ha sido da ada debe ser reem plazada y...

Page 12: ...ement la prise secteur Ne modifiez pas la fiche 2 1 13 Si vous utilisez une v rification multiple v rifiez bien les notes car le courant utilis par plusieurs appareils pourrait facilement d passer la...

Page 13: ...anch mais que les l ments chauffants ne sont pas al lum s L affichage de la fonction s allume et affiche le r glage de l heure par d faut de 06h00 6 heures En m me temps l indicateur HIGH s allume sur...

Page 14: ...upes laissez un espace de 5 cm entre le dessus du pot de cuisson et la surface de l aliment pour permettre de faire mijoter 3 5 4 De nombreuses recettes exigent toute la journ e de cuisson si vous n a...

Page 15: ...immerger l appareil dans de l eau ou tout autre liquide ou le placer sous l eau courante 5 Anomalies et r paration 5 1 Prenez l appareil dans un service de support technique autoris si le produit est...

Page 16: ...te na tomada de corrente N o altere a ficha 2 1 13 Se estiver usando um multi plug verificar avalia es cuidadosamente como a corrente utilizada por v rios aparel hos poderia facilmente exceder a class...

Page 17: ...st o ligados O visor de fun o se iluminar e exibir o ajuste de tempo padr o de 06 00 6 horas Ao mesmo tempo o indicador HIGH acende no visor o modo padr o High 3 2 2 Ajuste o modo de opera o Pressione...

Page 18: ...er necess rio reduzir a quantidade de l quido utilizado L quido n o vai evaporar a partir do fog o lento na mesma medida que com a cozedura convencional 3 4 4 Nunca deixe alimentos n o cozidos tempera...

Page 19: ...Se for necess rio corte em duas pe as O peso da articula o deve ser mantido dentro do limite m ximo 3 6 Depois de terminar de usar o aparelho 3 6 1 Desligue o aparelho da corrente el ctrica 3 6 2 Lim...

Page 20: ...ith all accessories parts and packaging Missing parts will render the guarantee void 3 Upon receipt of your appliance check it for any trans port damage to ensure it is safe for use Return it to the s...

Page 21: ...heck that your receipt has been uploaded correctly Creative Housewares cannot be held responsible for faxes or files not received 6 For assistance with registration please email marketing creativehous...

Page 22: ...Toebehore wat weg is sal die waarborg nietig maak 3 Met ontvangs van u toestel gaan dit na vir enige vervoer skade om te verseker dat dit veilig is vir gebruik Stuur dit so gou as moontlik terug na d...

Page 23: ...oet seker maak dat u kwitansie korrek op gelaai is Creative Housewares kan nie verantwoordelik gehou word vir fakse of l ers nie ontvang nie 6 Vir hulp met registrasie e pos asseblief marketing creati...

Page 24: ...an 35 Adrain Road Windermere Durban South Africa 4001 Tell 27 31 303 3465 Fax 27 31 303 8259 Johannesburg Unit 25 26 San Croy Office Park Die Agora Road Croydon 1619 Tell 27 11 392 5652 Fax 27 11 392...

Reviews: