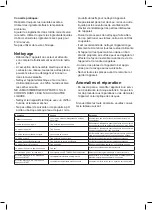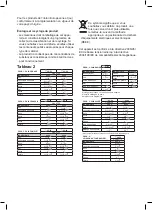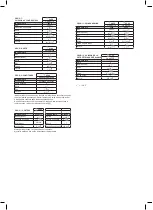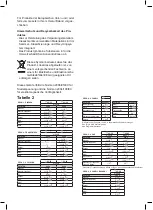
- Add the ingredients (Table 2)
- Put the bowl in place until it fits in correctly,
moving handle clock-wise.
- Lower lid.
- Unroll the cable completely before plugging it in.
- Connect the appliance to the mains.
- After the beep the visualization screen will show
program 1.
- Press the program selector button (B2) to select
the desired program (Table 2)
- Press the browning selector button (B3) to se-
lect the desired browning level (light, medium,
dark) (Fig. 3)
- Press the weight selector button (B4) to select
the weight of bread desired (600 g, 900g)
- Switch the appliance on pressing the on/off
button (B5) for 1 second. A short beep is heard
and the two dots in the time display begin to
flash as the program starts. In order to stop a
program, press the on/off button for 2 seconds
until a beep confirms that the program has been
switched off.
- The remaining cooking time will appear on the
visualization screen.
- After the cooking time is over, unplug the
appliance from the mains.
- Remove the bowl pulling on the handle anti-
clockwise, using a cloth as it will be hot.
- Remove the bread from the bowl with the help
of a wooden spatula or similar heat resistant im-
plement, do not use utensils that could damage
the non-stick coating.
- Allow to cool for 15 minutes before cutting.
- Unplug the appliance to turn it off.
Timer function:
- Using the adjustments buttons you will be able
to program the cooking to start within up to 13
hours.
- Use the adjustments buttons to advance the
time in 10 minute increments. If necessary,
use them to decrease the time. When the delay
timer is set where you want, make sure to
press the on/off button to confirm the program
selected for the time selected. The two dots in
the time will flash and your bread will be ready
when you planned.
- The time which appears on the clock after it
switches on automatically is the remaining
baking time. Therefore ensure you set the time
for when you would like the bread ready.
- The maximum delay is 13 hours.
- If you work with the delay timer function, do not
use any easily perishable ingredients such as
eggs, fresh milk, etc.
Once you have finished using the appliance:
- Unplug the appliance from the mains.
- Clean the appliance.
Accessories:
Measuring cup accessory (E):
- This accessory is used for measuring quantities.
Measuring cup accessory (F):
- This accessory is used for measuring quantities.
One side is for soup spoon measure, the other
side for tea or coffee spoon measure.
Practical recommendations:
Use exact amounts.
Add fresh ingredients at room temperature.
Add the ingredients in the correct order according
to the recipe. Always use liquid ingredients first,
then the dry ingredients and lastly the baking
powder.
Do not use chemical baking powder.
Cleaning
- Disconnect the appliance from the mains and
allow it to cool before undertaking any cleaning
task.
- Except for the power unit and the mains con-
nection, all the parts can be cleaned with deter-
gent and water or in washing up liquid. Rinse
thoroughly to remove all traces of detergent.
- Clean the electrical equipment and the mains
connection with a damp cloth and dry. DO
NOT IMMERSE IN WATER OR ANY OTHER
LIQUID.
- Clean the equipment with a damp cloth with a
few drops of washing-up liquid and then dry.
- Do not use solvents, or products with an acid or
base pH such as bleach, or abrasive products,
for cleaning the appliance.
- Do not let water or any other liquid get into the
air vents to avoid damage to the inner parts of
the appliance
- During the cleaning process, take special care
with the blades, as they are very sharp.
- It is advisable to clean the appliance regularly
and remove any food remains.
- If the appliance is not in good condition of
cleanliness, its surface may degrade and
inexorably affect the duration of the appliance’s
Summary of Contents for My Bread
Page 2: ...A C D B B1 B4 B5 B6 B2 B3 E F F2 F1 Fig 1...
Page 51: ...My Bread TAURUS A B B1 B2 B3 B4 B5 B6 On off C D E F F1 F2 8 8 8...
Page 52: ...10 30mA 2...
Page 53: ...C 1 2 1 B2 2 3 3 4 600 900 on off B5 1 2 on off 2 15 13 10 on off...
Page 54: ...13 E F ph...
Page 57: ...My Bread TAURUS A B B1 B2 B3 B4 B5 B6 C D E F F1 F2 TAURUS 8 8 8...
Page 58: ...10 30 2...
Page 59: ...C 1 2 1 B2 2 B3 3 B4 600 900 B5 1 2 15 13...
Page 60: ...10 13 F...
Page 61: ...1 4 1 2 H HH START STOP 10 20 E EE START RAEE 2006 95 EC 2004 108 EC...
Page 70: ...My Bread TAURUS A B B1 B2 B3 B4 B5 B6 C D E F F1 F2 8 8 8...
Page 71: ...c 10 c a a pa o a a e c po c a epe c 30mA ce c c 2...
Page 72: ...C 1 2 1 B2 2 B3 3 B4 600 900 B5 1 2 15 13 10 13...
Page 73: ...E F a a pH c 1 4 1 2...
Page 78: ...2 C 1 2 1 2 B2 3 B3 600 900 B4 B5 15 13 10 13 E F...
Page 80: ...Avda Barcelona s n E 25790 Oliana Spain Net weight 4 80 Kg Aprox Gross weight 5 20 Kg Aprox...


