SET button will flash.
- Press the time selection button (Q or R) to
select the time within which you want the food
to start cooking (from 0 minutes to 24 hours in
1-minute intervals).
- Once you have selected the function, time and
program, open the lid and put the food in the
pot.
- Press start button (S).
- Note: The keep warm function has a 12-hour
limit.
ONCE YOU HAVE FINISHED USING THE
APPLIANCE:
- Turn the appliance off, using the on/off switch.
- Unplug the appliance from the mains.
- Clean the appliance
CARRY HANDLE/S:
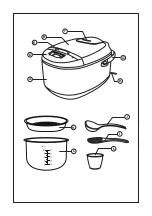
- This appliance has a handle at the top to make it
easy and convenient to carry (G).
HANDY TIPS:
- The lid can be opened during cooking, allowing
you to stir the food or to see how it is going. As
the appliance carries on working while the lid’s
open, we would recommend opening it as little
as possible and closing it as soon as possible.
- Take particular care when opening the lid, to
avoid burns, as the inner temperature could be
high.
CLEANING
- Disconnect the appliance from the mains and
allow it to cool before undertaking any cleaning
task.
- Disassemble the appliance as follows:
- Remove the pot.
- To clean the steam valve (F), remove it from
the appliance by pulling upwards. Turn it over
and remove the cover by turning this clockwi-
se. Make regular checks to ensure that the
parts are clean and to prevent the valve from
becoming blocked.
- Except for the power unit and the mains connec-
tion, all the parts can be cleaned with detergent
and water or in washing up liquid. Rinse tho-
roughly to remove all traces of detergent
- Clean the electrical equipment and the mains
connection with a damp cloth and dry. DO NOT
IMMERSE IN WATER OR ANY OTHER LIQUID.
- Clean the equipment with a damp cloth with a
few drops of washing-up liquid and then dry.
- Do not use solvents, or products with an acid or
base pH such as bleach, or abrasive products,
for cleaning the appliance.
- Do not let water or any other liquid get into the
steam vents to avoid damage to the inner parts
of the appliance.
- Never submerge the appliance in water or any
other liquid or place it under running water.
- It is advisable to clean the appliance regularly
and remove any remains of food.
- If the appliance is not kept clean, its surface
may become damaged, inevitably affecting the
duration of its useful life and leading to a hazar-
dous situation.
- The following parts can be cleaned in hot soapy
water or in a dishwasher (using a gentle dis-
hwashing program):
- Inner pot
- Steam basket
- Spatula
- Ladle
- Measuring cup
- The draining/drying position of the parts that can
be washed in the dishwasher or sink, must allow
the water to easily drain away.
- Then dry all the parts before assembling and
storing them.
FAULTS AND REPAIR
- In case of detecting any anomaly, check the
following table:
Anomalies Causes
Solutions
Error E1
Temperature sensor on bottom is disconnected. Take the appliance to the Technical
Assistance Service.
Error E2
Temperature sensor on top is disconnected.
Take the appliance to the Technical
Assistance Service.
Error E3
Temperature sensor on bottom is short circuit.
Take the appliance to the Technical
Assistance Service.
Error E4
Temperature sensor on top is short circuit.
Take the appliance to the Technical
Assistance Service.


