background image

22

X71

3.4 

Programmes

In the main menu you can choose from the different programmes: 


+

MANUAL (Target programmes)


+

PROGRAM (Profile programmes)


+

PERSONAL (User defined programme)


+

H.R.C (Heart rate controlled programmes)


+

WATT (Watt programme)

Use the encoder to select one of the programmes: Manual, Program

Fitness, Watt, Personal or H.R.C. 

Confirm the programme with the MODE button. 


L

NOTICE

For the Quick start programme you can skip setting the parameters by pressing START/STOP to 

begin the workout.

3.4.1 

Manual Programme (MANUAL)

1.  In the main menu select MANUAL and confirm the selection by pressing the MODE button.


L

NOTICE

To skip setting the parameters, press START to directly begin the workout.

2.  Press MODE to set the parameters. 
3.  Set the resistance level, time, distance, calories and/or pulse with the encoder. Confirm each 

setting with MODE.

4.  Press START/STOP to begin the workout. 

During the training, the resistance level can be adjusted with the encoder. 

5.  Press START/STOP to pause the training. 
6.  Press START/STOP to continue the training.
7.  Press RESET, to end the training and return to the main menu.

Summary of Contents for X71

Page 1: ...TFX71 02 01 TF max 120 kg 80 Min C M 33 kg Assembly and Operating Instructions L 166 W 56 H 163 Elliptical trainer X71...

Page 2: ...2 X71...

Page 3: ...Programmes 22 3 4 1 Manual Programme MANUAL 22 3 4 2 Pre Set Profile Programmes PROGRAM 23 3 4 3 Watt controlled Programmes WATT 23 3 4 4 User defined Programme PERSONAL 24 3 4 5 Heart rate oriented...

Page 4: ...4 X71 8 ORDERING SPARE PARTS 29 8 1 Serial Number and Model Name 29 8 2 Parts List 30 8 3 Exploded Drawing 32 9 WARRANTY 33 10 CONTACT 35...

Page 5: ...home fitness International Headquarters Flensburger Stra e 55 24837 Schleswig Germany Management Christian Grau Sebastian Campmann Dr Bernhard Schenkel No HRB 1000 SL Local Court Flensburg European VA...

Page 6: ...llow the instructions and that all parts are securely in place If required read through the instructions again to correct any mistakes Please pay close attention to the safety and maintenance instruct...

Page 7: ...rammes 1 Default programmes 12 Manual programme 5 User defined programmes 5 Heart rate controlled programmes 4 Watt controlled programme 1 Flywheel weight 6 kg Running wheel weight 3 5 kg Handlebars w...

Page 8: ...ave a medical license and must be under strict observation when using the equipment Remember that your device does not have a freewheel function Therefore moving parts cannot be stopped immediately No...

Page 9: ...hed socket using the supplied mains cable Extension cables must conform to VDE guidelines Always completely unwind the mains cable The socket must be protected by a fuse with a minimum fuse rating of...

Page 10: ...that there is enough free space clearance to the front the rear and to the sides of the equipment The set up and mounting surface of the equipment should be flat loadable and solid ATTENTION The devi...

Page 11: ...he risk of injuries CAUTION Ensure to have sufficient room for movement in each direction during assembly The assembly of the equipment must be carried out by at least two adults If in doubt seek the...

Page 12: ...f delivery and whether damage has occurred In the event of complaints the contractual partner must be contacted directly CAUTION If parts of the scope of delivery are missing or damaged the assembly m...

Page 13: ...3 x 1 5T washer 97 2x 5 16 x 15mm hexagon screw 70 2x 17 wavy washer 101 2x 5 16 x 32mm hexagon screw 71 2x 5 16 x 7T nylon nut 105 2x 3 8 x 7T nylon nut 89 2x 3 8 x 19 x 1 5T washer 94 2x 5 16 x 20 x...

Page 14: ...hat the Adobe Acrobat Reader programme must be installed on your end device in order to open the file The assembly can also be found as a video under the following link https www sport tiedje co uk ta...

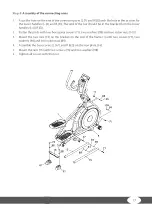
Page 15: ...70 four washers 97 two hexagon bolts 70 and two spring washers 102 ATTENTION Be careful not to pinch the cables in the following step 4 Mount the console 31 on the console mast 10 with the four screw...

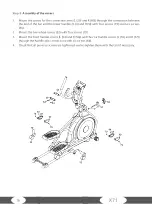
Page 16: ...d right side of the handles 4 and 5 on the corresponding side of the axle 3 Place the two flat washers 97 on the two hexagonal screws 70 and fasten them on the thread holes on the end of the axle 4 Fa...

Page 17: ...bracket from the lower handles L 4 R 5 2 Fasten the parts with two hexagonal screws 71 two washers 98 and two nylon nuts 105 3 Mount the two rails 15 on the bracket on the end of the frame 1 with two...

Page 18: ...lower handles L 4 and R 5 with four screws 79 and two screws 84 2 Mount the two wheel covers 52 with four screws 79 3 Mount the front handle covers L 54 and R 56 and the rear handle covers L 55 and R...

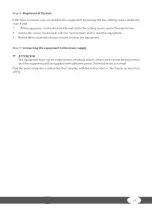
Page 19: ...in order to remove them and to raise the equipment 3 Rotate them counterclockwise in order to lower the equipment Step 7 Connecting the equipment to the mains supply ATTENTION The equipment must not b...

Page 20: ...nsole Display CALORIES Display of the calories burned 0 999 TIME Display of training time in minutes 00 00 99 59 SPEED Display of the current speed 00 0 99 9 RPM Display of rotations per minute 0 999...

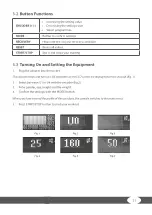
Page 21: ...aining 3 3 Turning On and Setting the Equipment 1 Plug the adapter into the socket The console beeps and turns on All segments on the LCD screen are displayed for two seconds fig 1 2 Select between U1...

Page 22: ...essing START STOP to begin the workout 3 4 1 Manual Programme MANUAL 1 In the main menu select MANUAL and confirm the selection by pressing the MODE button L NOTICE To skip setting the parameters pres...

Page 23: ...se the training 6 Press START STOP to continue the training 7 Press RESET to end the training and return to the main menu 3 4 3 Watt controlled Programmes WATT 1 In the main menu select WATT and confi...

Page 24: ...The heart rate measurement serves only as a training aid You have four heart rate programmes to choose from Either select one of the three target heart rates 55 75 or 90 of your maximum heart rate or...

Page 25: ...portation wheels the equipment must be disassembled before transportation ATTENTION Make sure that the equipment is protected from moisture dust and dirt in the selected storage location The storage l...

Page 26: ...ction Nevertheless faults or malfunctions may occur Frequently individual parts are responsible for these disturbances an exchange is usually sufficient Please refer to the following overview for the...

Page 27: ...lowing routine tasks must be performed at the specified intervals Part Weekly Monthly Quarterly Display console C I Slide rails C Lubrication of slide rails and moving parts I Plastic covers C I Screw...

Page 28: ...or mat which makes your fitness equipment stand more securely and also protects the floor from sweat or silicone spray to keep moving parts in good shape If you have purchased a fitness machine with p...

Page 29: ...mber serial number exploded drawing and parts list ready The corresponding contact options can be found in chapter 10 of this operating manual L NOTICE The serial number of your equipment is unique It...

Page 30: ...1 32 1050m m_Computer Cable 1 33 600m m_DC Power Cable 1 34 Gear Motor 1 35 350m m_Sensor W Cable 1 37 850m m_Handpulse W Cable Assembly 2 37 4 3 20m m_Tapping Screw 4 38 Power Adaptor 1 39 Slide Whe...

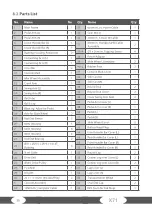
Page 31: ...Nyloc Nut 4 89 3 8 7T_Nyloc Nut 2 90 3 8 UNF26 4T_Nut 1 91 3 8 UNF26 11T_Nut 2 94 3 8 19 1 5T_Flat Washer 7 96 5 16 35 1 5T_Flat Washer 2 97 5 16 23 1 5T_Flat Washer 10 98 5 16 20 1 5T_Flat Washer 4 9...

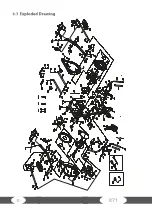
Page 32: ...32 X71 8 3 Exploded Drawing...

Page 33: ...33 9 WARRANTY...

Page 34: ...34 X71...

Page 35: ...arcia mo na znale na stronie g wnej 02 732 46 77 49 4621 42 10 932 info fitshop be Vous trouverez les heures d ouverture sur notre site Internet UK NL INT CUSTOMER CARE TECHNISCHE DIENST SERVICE TECHN...

Page 36: ...36 X71...

Page 37: ...37 Notes...

Page 38: ...38 X71 Notes...

Page 39: ...39...

Page 40: ...Elliptical trainer X71...

Reviews: