SAFETY RULES AND OPERATING INSTRUCTIONS
Safety Rules
Page 6
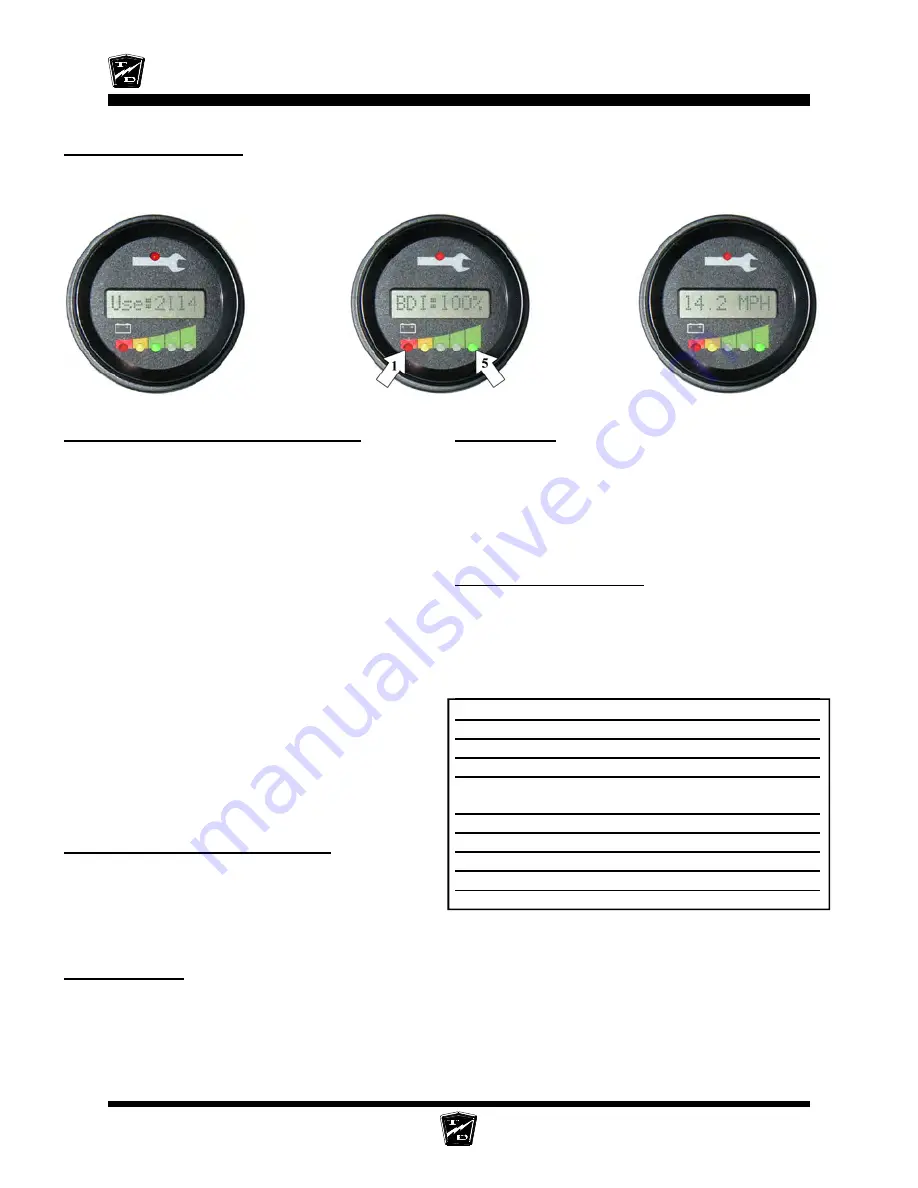
Combination Display
The gauge on the dash has many functions. The display will cycle through the functions while the vehicle is in
operation. Some functions may not be displayed depending on the current situation of the vehicle.
Battery Status Indicator-bar graph:
There are five LED’s at the bottom of the gauge.
Each LED represents an approximate state of charge
as listed below:
#5 (far right) LED (green)
: When on
represents 84% to 100% charge remaining.
#4 LED (green)
: When on represents 68%-
84% charge remaining.
#3 LED (green)
: When on represents 52%-
67% charge remaining.
#2 LED (yellow)
: When on represents 36%-
52% charge remaining.
#1 LED (red)
: When on represents charge
20%-36% remaining. When flashing
represents 0%-20% charge remaining.
If the #1 LED is flashing, the vehicle or battery should
be immediately removed from service to be
recharged. Discharging beyond 20% will damage the
battery.
Battery Status Indicator-digital:
Displays total charge remaining in percent. The
example to the right indicates that the vehicle has
100% charge remaining (fully charged).
Speedometer:
Indicates the vehicles current rate of travel in miles
per hour.
Hour Meter:
Displays total time (whole hours) vehicle has been
in operation. Time is accumulated only while the
vehicle is moving. The example to the right indicates
that the vehicle has been in operation for 2,114 hours.
System Fault Monitor:
The gauge has an alpha numeric display that
monitors the system status. If the system detects a
fault, an abbreviated fault message will be displayed.
Refer to the table below for the abbreviated fault
message and description.
Fault Code
Description
Note
CNTL TEMP
Speed controller overheated
3
LOW V
Low battery voltage
HIGH V
High battery voltage
CNTL FLT
Speed controller internal fault 1
or wiring fault
MOTORTEMP
Motor overheated
3
MOTR FLT
Faulty motor or wiring
1
EB FAULT
Electric brake fault
1
SRO
Operator error
2
STALL
Motor stalled
4
1: Refer repair to a qualified technician.
2: Switched used to operate vehicle may have been selected in
the incorrect sequence. Refer to operator instructions in this
section.
3: Wait for component to cool. Vehicle may be overloaded.
4: Vehicle overloaded, faulty motor, or possible locked up brakes
or transmission. If vehicle is not overloaded, Refer repair to a
qualified technician.
Hour Meter
Battery Status
Speedometer
Summary of Contents for B0-T48-48 Taylor Truck T48
Page 2: ......
Page 14: ...TAYLOR DUNN...
Page 30: ...TAYLOR DUNN...
Page 68: ...Maintenance Service and Repair Steering Page 22 Exploded View of Steering Gear...
Page 86: ...TAYLOR DUNN...
Page 112: ...TAYLOR DUNN...
Page 118: ...TAYLOR DUNN...
Page 130: ...TAYLOR DUNN...
Page 140: ...TAYLOR DUNN...
Page 152: ...Illustrated Parts Parts Page 2 Front Axle...
Page 154: ...Illustrated Parts Parts Page 4 Steering Knuckle...
Page 156: ...Illustrated Parts Parts Page 6 Steering Linkage...
Page 162: ...Illustrated Parts Parts Page 12 Rear Suspension View from rear...
Page 164: ...Illustrated Parts Parts Page 14 Transmission Gear Case...
Page 168: ...Illustrated Parts Parts Page 18 Rear Brakes Front Brakes...
Page 170: ...Illustrated Parts Parts Page 20 Brake Lines and Master Cylinder...
Page 172: ...Illustrated Parts Parts Page 22 Motor...
Page 174: ...Illustrated Parts Parts Page 24 Motor Mount Apply 94 421 34 grease to inside of motor coupler...
Page 186: ...Illustrated Parts Parts Page 36 Batteries FRONT OF VEHICLE...
Page 188: ...TAYLOR DUNN...


