Electrical Troubleshooting
Charger Troubleshooting
Page 10
TESTING THE INTERLOCK RELAY
Operation
The Interlock Relay disables the vehicle from running whenever the charger is connected to a working AC
power source. When the charger is plugged in, the relay contacts open and break the Key Switch connection
to the speed controller. The Interlock Relay is available for built-in chargers only. Not all built-in chargers
are equipped with this relay. To identify chargers that are equipped with the Interlock Relay:
Inspect the charger wire harness where it enters the charger cabinet for two Violet/Black
wires. If these wires are present then the charger is equipped with the Interlock Relay.
Testing
6. Disconnect the charger from the AC power source.
7. Disconnect the two Violet/Black wires at the charger harness knife connectors.
8. Set the DMM to check for continuity and connect the DMM leads to the wires
going into the charger.
•
The DMM should indicate a closed circuit. If the DMM indicates an open circuit, then the relay
or the wires to the relay have failed.
Stop here and repair the problem.
9. Connect the charger to a working AC power source.
•
The charger should turn on. If the charger does not turn on then their may be a problem with the
AC power source or the AC wiring to the charger. Refer to the beginning of this section for
charger troubleshooting. DO NOT continue until you have confirmed that the AC power source is
working.
•
The DMM should indicate an open circuit. If it still indicates a closed circuit, then the relay or the
wires to the relay have failed.
Stop here and repair the problem.
•
If the DMM indicates an open circuit then the interlock relay is functioning normally.
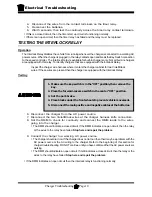
1. Make sure the key-switch is in the “OFF” position, then remove the
key.
2. Place the forward-reverse switch in the center “OFF” position.
3. Set the park brake.
4. Place blocks under the front wheels to prevent vehicle movement.
5. Disconnect the main positive and negative cables at the batteries.
4. Disconnect the wires from the contact terminals on the timer relay.
5. Reconnect the batteries.
6. Wait 5 seconds, then test the continuity across the timer relay contact terminals.
•
If this is a closed circuit, then the timer start up circuit is functioning normally.
•
If there is an open circuit, then the timer relay has failed and the relay must be replaced.
Summary of Contents for RE-380-36
Page 12: ...TAYLOR DUNN...
Page 30: ...TAYLOR DUNN...
Page 50: ...TAYLOR DUNN...
Page 64: ...Maintenance Service and Repair Steering Page 14 Exploded View of Steering Gear...
Page 90: ...TAYLOR DUNN...
Page 128: ...TAYLOR DUNN...
Page 143: ...Sevcon Troubleshooting Page 3 Electrical Troubleshooting Identifying Your Controller...
Page 162: ...TAYLOR DUNN...
Page 185: ...Wire Diagrams...
Page 190: ...Illustrated Parts Parts Page 4 Steering Linkage...
Page 192: ...Illustrated Parts Parts Page 6 Steering Gear 4 1 6 8 7 5 9 10 2 3 14 17 12 11 13 15 16...
Page 194: ...Illustrated Parts Parts Page 8 Front Suspension...
Page 196: ...Illustrated Parts Parts Page 10 Transmission primary reduction...
Page 198: ...Illustrated Parts Parts Page 12 Transmission secondary reduction Rear Axle...
Page 200: ...Illustrated Parts Parts Page 14 Rear Brakes Front Brakes optional Brake Body...
Page 202: ...Illustrated Parts Parts Page 16 Rear Suspension...
Page 204: ...Illustrated Parts Parts Page 18 Motor...
Page 206: ...Illustrated Parts Parts Page 20 Deadman Seat Brake...
Page 214: ...Illustrated Parts Parts Page 28 Wheels and Tires Ref wheel hub 1 2 5 assembly 4 3 6 7 8 9 10...
Page 218: ...Illustrated Parts Parts Page 32 Speed Control Panel R 3 80 36 1 2 4 5 6 6 7 8 3 9 10 11 12 13...
Page 220: ...Illustrated Parts Parts Page 34 Miscellaneous Electrical Miscellaneous Frame...
Page 222: ...Illustrated Parts Parts Page 36 Seat Cushions and Lights 1 2 3 4 5 6 7 8 9...
Page 230: ...Illustrated Parts Parts Page 44 Batteries 36 Volt 48 Volt...
Page 232: ...Illustrated Parts Parts Page 46 Decals Front Cowl Tray Battery Compartment...
Page 234: ...Illustrated Parts Parts Page 48 Trailer Hitch...
Page 236: ...Illustrated Parts Parts Page 50 Strobe Light Other Front End Options...
Page 238: ...Illustrated Parts Parts Page 52 Cab Cowl With Windshield Options...
Page 240: ...Illustrated Parts Parts Page 54 Optional Cab Accessories...
Page 242: ...Illustrated Parts Parts Page 56 Cab Door Options...
Page 244: ...Illustrated Parts Parts Page 58 Optional Top Cover...
Page 246: ...Illustrated Parts Parts Page 60 Rear Seat Rear Gate and Rear Deck...
Page 248: ...Illustrated Parts Parts Page 62 9 Side Panels...
Page 250: ...Illustrated Parts Parts Page 64 Front Bumper and Splash Pan...
Page 252: ...TAYLOR DUNN...


