Maintenance, Service, and Repair
Motor Service
Page 4
Assembly
1. Press a new bearing into the motor housing and
install the circlip.
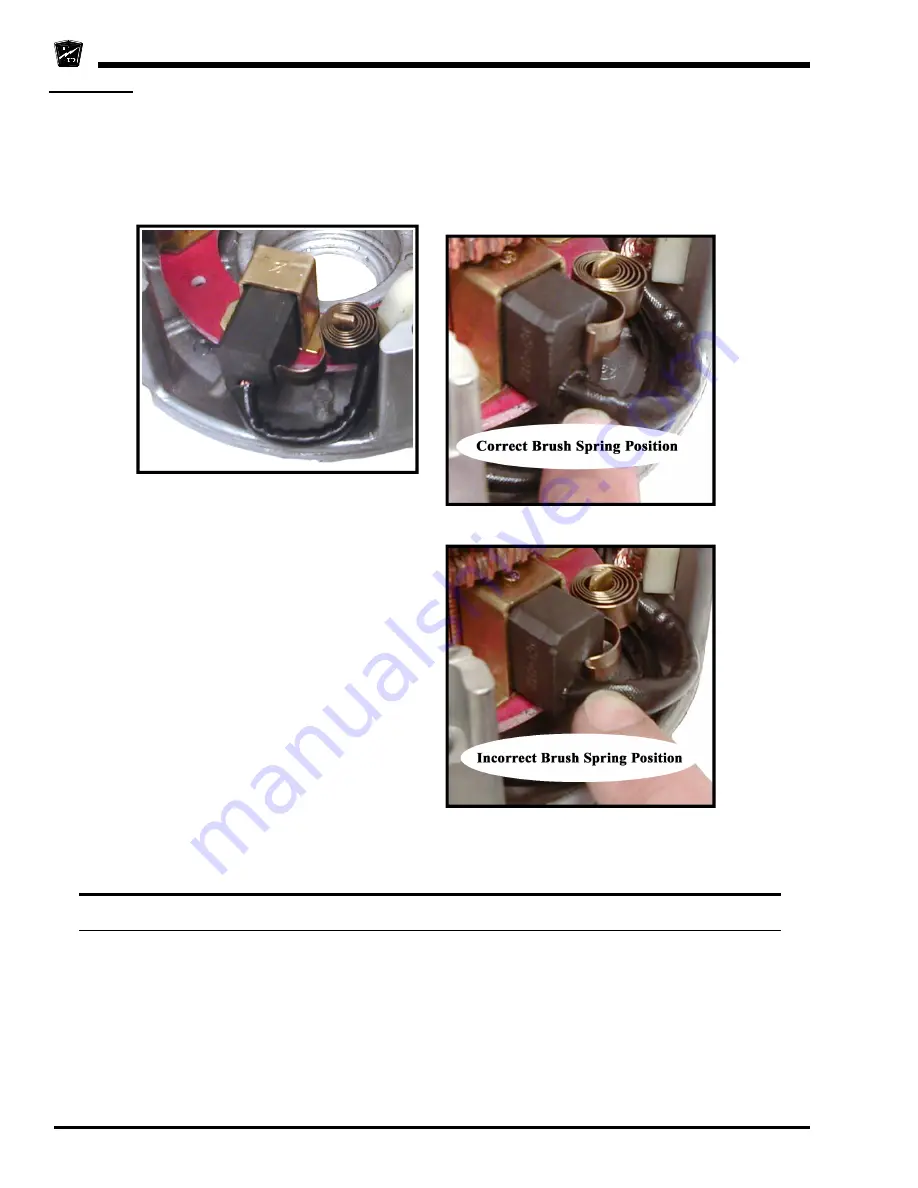
2. Install the two brush assemblies so that the brushes
are just far enough out of the brush holder so that
the brush springs hold them in place away from
the commutator. See the illustration to the right.
3. Install the rear motor housing to the stator housing.
4. Lightly grease the inside diameter of the armature
bearing.
5. Carefully insert the armature through the stator
housing and onto the motor bearing in the rear
housing.
6. While supporting the inner race of the bearing,
press the armature into the bearing.
7. Push the motor brushes into the brush holder until
the brush spring snaps into place. Be certain that
the spring does not rest up against the brush wire.
See the illustrations below.
8. Install the brush cover.
REPLACING THE BRUSHES OR ARMATURE BEARING
NOTE: It is recommended that all four brushes be replaced as a set.
NOTE: The motor must be disassembled to replace the brushes or the bearing. Refer to
Motor
Inspection-Disassembly
section for information on taking the motor apart.
NOTE: The motor must be removed from the vehicle for this procedure. Refer to
Transmission Service
section for information on removing the motor.
Summary of Contents for TT-316-36
Page 2: ......
Page 6: ...TAYLOR DUNN...
Page 12: ...TAYLOR DUNN...
Page 28: ...TAYLOR DUNN...
Page 76: ...TAYLOR DUNN...
Page 82: ...TAYLOR DUNN...
Page 96: ...TAYLOR DUNN...
Page 99: ...Sevcon Troubleshooting Page 3 Electrical Troubleshooting Identifying Your Controller...
Page 120: ...TAYLOR DUNN...
Page 134: ...TAYLOR DUNN...
Page 138: ...Illustrated Parts Page 2 Front Fork...
Page 140: ...Illustrated Parts Page 4 Front Brakes...
Page 142: ...Illustrated Parts Page 6 Tilt Steering Column and Gear...
Page 146: ...Illustrated Parts Page 10 Transmission Differential Case Rear Axle...
Page 148: ...Illustrated Parts Page 12 Rear Brakes Master Cylinder 8 Brake Body...
Page 150: ...Illustrated Parts Page 14 Rear Suspension...
Page 152: ...Illustrated Parts Page 16 Motor...
Page 156: ...Illustrated Parts Page 20 Brake Lines...
Page 158: ...Illustrated Parts Page 22 Wheels and Tires Ref wheel hub 1 2 5 assembly 4 3 6 7 8 9 10...
Page 164: ...Illustrated Parts Page 28 Miscellaneous Frame and Body...
Page 168: ...Illustrated Parts Page 32 Decals...
Page 172: ...TAYLOR DUNN...


