background image

28

Model C300

Operating Procedures

Draining Product From the

Freezing Cylinder

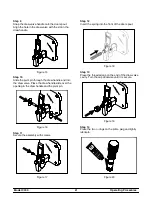
Step 1

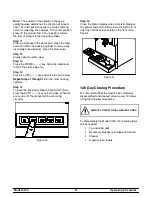
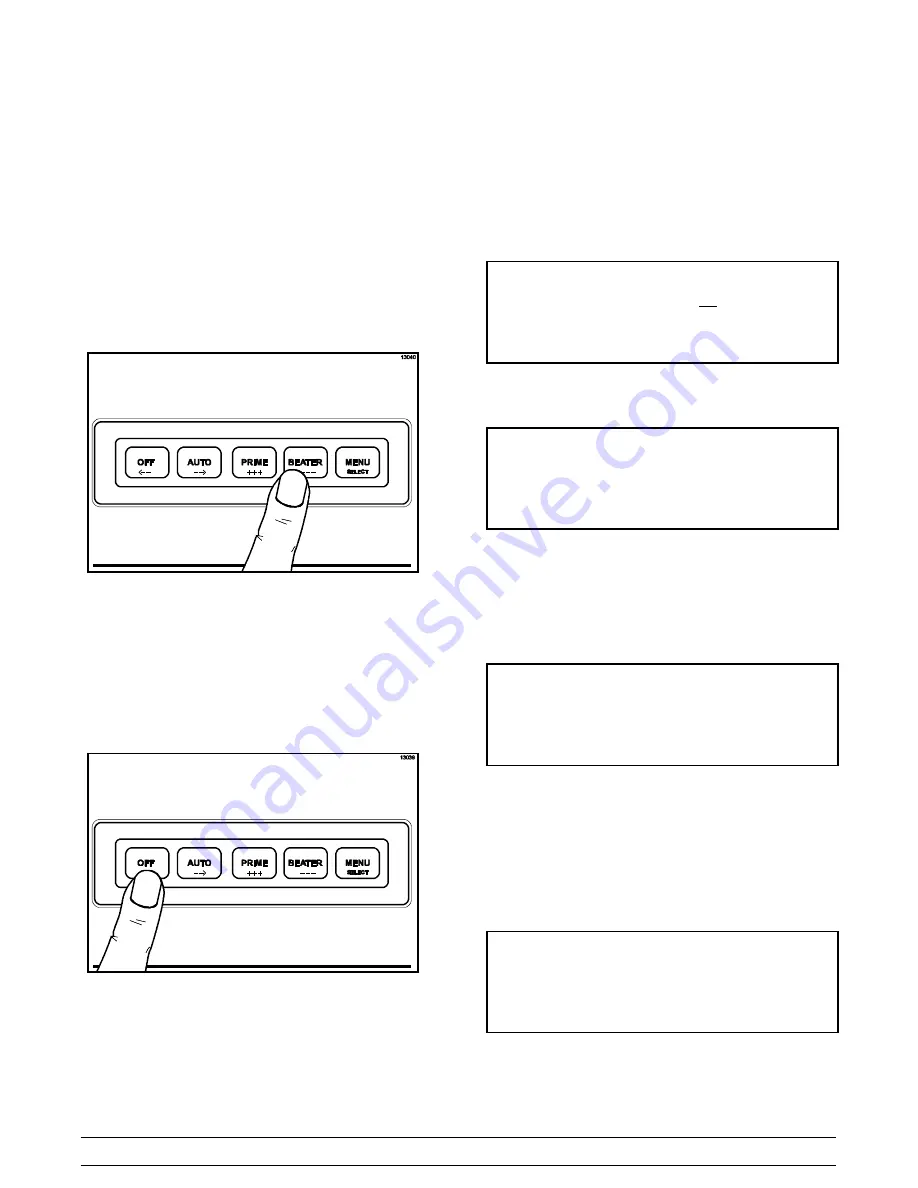
With a pail beneath the door spout, press the

BEATER (-- -- --) key. This will allow the beater to

operate and CO

2

pressure will be maintained to

push the product from the freezing cylinder. Open

the draw valve and drain the product from the

machine until the CO

2

begins to jet.

Figure 42

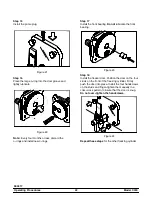
Step 2

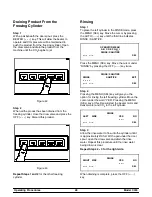
When all the product has been drained from the

freezing cylinder, close the draw valve and press the

OFF (<-- --) key. Discard this product.

Figure 43

Repeat Steps 1 and 2

for the other freezing

cylinder.

Rinsing

Step 1

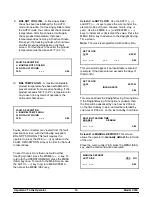
To place the left cylinder in the RINSE mode, press

the MENU (SEL) key. Move the cursor by pressing

the AUTO (-- -->) key until the third line indicates

RINSE / SANITIZE.

OPERATOR MENU

A B C D E F G H I

RINSE / SANITIZE

<-- -- -- -->

SEL

Press the MENU (SEL) key. Move the cursor under

“RINSE” by pressing the OFF (<-- --) key twice.

RINSE / SANITIZE

RINSE

SANITIZE

EXIT

-- -- -- --

<-- -- -- -->

SEL

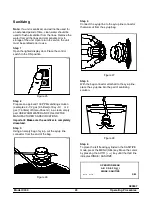
Step 2

Pressing the MENU (SEL) key will give you the

option for rinsing the left freezing cylinder. Move the

cursor under the word “YES”. Pressing the MENU

(SEL) key at this time will start the beater motor and

deliver water and CO

2

to the left cylinder.

RINSE

LEFT

SIDE

YES

NO

-- -- --

<-- -- -- -->

SEL

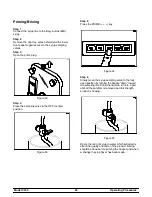
Step 3

Allow the rinse water to flow into the cylinder until it

is approximately 2/3 full. With a pail under the door

spout, open the draw valve and drain the rinse

water. Repeat this procedure until the rinse water

being drawn is clear.

Repeat Steps 2 -- 3 for the right side.

RINSE

RIGHT SIDE

YES

NO

-- -- --

<-- -- -- -->

SEL

When draining is complete, press the OFF (<-- --)

key.

Summary of Contents for C300 NP

Page 1: ...Model C300 Slush Freezer Original Operating Instructions 055072 M 9 26 08 Original Publicaton Updated 10 11 11...

Page 2: ...nd on the data label Model Number Serial Number Electrical Specs Voltage Cycle Phase Maximum Fuse Size A Minimum Wire Ampacity A E September 2008 Taylor All rights reserved 055072 M The word Taylor an...

Page 3: ...nt To the Operator 11 Control Switch 11 Liquid Crystal Display 11 Operational Mode Display 11 Operator Menu Display 12 Syrup Out Indicator 17 CO2 Out Indicator 17 Water Out Indicator 17 Audio Alarm Si...

Page 4: ...iring Diagrams 47 Note Continuing research results in steady improvements therefore information in this manual is subject to change without notice Note Only instructions originating from the factory o...

Page 5: ...l repairs must be performed by an authorized Taylor Service Technician This unit has many sharp edges that can cause severe injuries Site Preparation Review the area where the unit will be installed b...

Page 6: ...cable National State and local codes for determining the proper configuration Water Connections An adequate cold water supply must be provided with a hand shut off valve On the back of the unit a 3 8...

Page 7: ...e by the authorized installer The installation location is marked by the equipotential bonding symbol 5021 of IEC 60417 1 on both the removable panel and the equipments frame Stationary appliances whi...

Page 8: ...ith an Ozone Depleting Potential ODP of zero 0 However any gas under pressure is potentially hazardous and must be handled with caution NEVER fill any refrigerant cylinder completely with liquid Filli...

Page 9: ...it must be collected separately after its use is completed and cannot be disposed as unsorted municipal waste The user is responsible for returning the product to the appropriate collection facility a...

Page 10: ...able panel and the equipments frame DO NOT use a water jet to clean or rinse the freezer Failure to follow these instructions may result in serious electrical shock S DO NOT operate the freezer unless...

Page 11: ...dure to clean this unit CAUTION This unit is pressurized when in operation The control switch must be in the OFF position until the unit is completely assembled No part should ever be removed from the...

Page 12: ...LEFT C300 X54676 SER 2 PANEL REAR 054672 3 PANEL SIDE RIGHT 054671 4 DISPLAY LIGHTED 054683 27 5 PANEL FRONT UPPER 054669 6 PANEL FRONT SHELL 054668 ITEM DESCRIPTION PART NO 7 PANEL FRONT LOWER 054670...

Page 13: ...OOR 039321 1h SLIDE HANDLE DOOR BLK 046193 BLA 1i SCREW 10 32X3 8PHL 053869 1j O RING 9 32 OD X 1 16 WALL 029751 1k PLUG PRIME SLUSH PRESS 039568 1l DOOR FREEZER SLUSH PRES 039573 ITEM DESCRIPTION PAR...

Page 14: ...L MIX 10 QT 013163 2 BRUSH A PACKAGE X64275 2a BRUSH MIX PUMP BODY 3 X7 023316 2b BRUSH DOUBLE ENDED 013072 2c BRUSH REAR BRG 1 DX2 L 013071 ITEM DESCRIPTION PART NO 2d BRUSH DRAW VALVE 1 1 2 OD 01475...

Page 15: ...nders The LCD also indicates whether there is enough syrup CO2 and water being supplied to the freezer If an error in the machine operation occurs a warning tone will sound and the word FAULT will fla...

Page 16: ...If the display is left in the operator menu or any of the operator menu selections except for Current Conditions the display will return to the system mode screen 60 seconds after the last keypress Th...

Page 17: ...OLD mode At this time no refrigeration or product flow from the flow control will be allowed Only the beater will operate When the syrup is satisfied the unit will refill the product tank and then aut...

Page 18: ...for the fault to discontinue To see if there is more than one fault in either freezing cylinder press the PRIME key To return to the OPERATOR MENU press the MENU SEL key once To return to the Main Scr...

Page 19: ...is equipped with a water pressure switch B O M C30027C000 S N K0000000 WITH H20 PRESS SW SEL The third feature indicates the version number of the language and text SYSTEM INFORMATION LANGUAGE VERSION...

Page 20: ...he display The most recently recorded fault will appear on page 1 The fault description is listed on the third line of the fault page FAULT HISTORY 2 06 25 01 R SYRUP PRESS LOW 08 33 SEL Press the AUT...

Page 21: ...CO2 OK WATER OUT On the LCD if the word OUT appears next to the word WATER it indicates a lack of water being supplied to the freezer In addition the product light will illuminate and a warning tone w...

Page 22: ...plied after the flow control to carbonate the product and aid in dispensing We begin our instructions at the point where the parts are disassembled and laid out to air dry The following procedures wil...

Page 23: ...rear shell bearing Figure 8 Step 4 Insert the beater drive shaft into the freezing cylinder hex end first and into the rear shell bearing until the seal fits securely over the rear shell bearing Be c...

Page 24: ...ilure to properly seat the beater may cause damage to the beater and the door Figure 11 Note The scraper blades on the beater assembly should be in the 6 and 12 o clock positions This will enable free...

Page 25: ...the draw valve Place the draw handle slide over the opening in the draw handle and the pivot pin Figure 16 Step 11 Secure the assembly with screws Figure 17 Step 12 Insert the spring into the front o...

Page 26: ...tep 17 Install the front bearing Do not lubricate the front bearing Figure 23 Step 18 Install the freezer door Position the door on the four studs on the front of the freezing cylinder Firmly push the...

Page 27: ...R or 2 gal 7 6 liters of Stera SheenR in a clean empty pail USE WARM WATER AND FOLLOW THE MANUFACTURER S SPECIFICATIONS Important Make sure the sanitizer is completely dissolved Step 3 Using an empty...

Page 28: ...SIDE YES NO SEL Step 8 Open the prime plugs When sanitizing solution fills the freezing cylinders approximately 2 3 full close the prime plugs Figure 29 Step 9 Continue filling the freezing cylinders...

Page 29: ...center position Figure 33 Step 5 Press the PRIME key Figure 34 Step 6 Slowly move the syrup sampling valve to the fully open position by turning the handle down toward the sampling line Allow the liqu...

Page 30: ...run longer to freeze the excess syrup A reading lower than this could cause a freeze up in the freezing cylinder because of the excess water Figure 37 Step 9 To adjust the brix turn the adjustment scr...

Page 31: ...le Step 14 Press the OFF key and close the prime plug Repeat Steps 1 through 14 for the other freezing cylinder Step 15 To place the freezing cylinders in the AUTO mode press the AUTO key on both side...

Page 32: ...by pressing the AUTO key until the third line indicates RINSE SANITIZE OPERATOR MENU A B C D E F G H I RINSE SANITIZE SEL Press the MENU SEL key Move the cursor under RINSE by pressing the OFF key tw...

Page 33: ...s procedure for the right side freezing cylinder Step 4 Open the prime plugs Allow each cylinder to fill approximately 2 3 full Close each prime plug Step 5 Continue filling the freezing cylinders wit...

Page 34: ...s S screws and draw handle slides from freezer doors S pivot pins from draw valves S draw valve handles from freezer doors S draw valves from freezer doors S o rings from draw valves S prime plugs fro...

Page 35: ...e of lubricant and product deposits j 5 Properly prepare the cleaning and sanitizing solutions Read and follow the label directions carefully Too strong of a solution may damage the parts and too weak...

Page 36: ...can perform this service for you Wrap detachable parts of the freezer such as the beater the scraper blades the drive shaft and the freezer door Place these parts in a protected dry place Rubber trim...

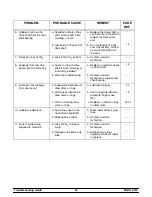
Page 37: ...s being dispensed a Product frozen up in freezing cylinder a See problem No 1 4 Freezer will not operate in the BEATER or AUTO mode a Unit is unplugged a Check the plug at wall receptacle b Blown fuse...

Page 38: ...correctly installed a Replace or install correctly on drive shaft 18 b Worn rear shell bearing b Contact a service technician to replace rear shell bearing 9 Excessive mix leakage from door spout a In...

Page 39: ...Drive Shaft O Ring X Freezer Door O Ring X Draw Valve O Ring X Door Spout O Ring X Front Bearing X Prime Plug O Ring X Black Bristle Brush 1 x 2 Inspect Replace if Necessary Minimum Double Ended Brus...

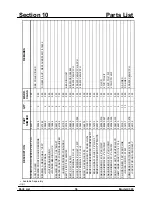
Page 40: ...30V 60HZ 1PH BLOCK TERMINAL PLUG 6P 2 SIP 040322 002 1 103 208 230V 60HZ 1PH 3PH BLOCK TERMINAL 3P L1 L2 L3 039423 1 103 208 230V 60HZ 3PH BRUSH A PACKAGE C300 X64275 1 000 BRUSH REAR BRG 1IN DX2IN LG...

Page 41: ...3 6 103 SCREW 5 16 18X3 8 ALLEN SET 025376 4 000 SCREW SHOULDER 3 16DX1 2L SS 039455 6 000 SPRING 3 8 ODX3 16 IDX1L RED 039734 6 103 DECAL CONTROL 355 LEFT 052898 1 000 DECAL CONTROL FCB RIGHT 043636...

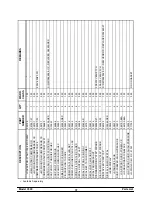
Page 42: ...068601 2 103 ADA SCREW 10 32X1 PHIL TRUSS 069069 2 000 ADA DRYER FILTER 3 8 X 3 8SOL HP62 049154 1 000 DVD OPS TRAIN VIDEO C300 C302 064416 DVD 1 000 FASTENER DOOR LATCH 030787 1 000 POP UNIT SIDE FA...

Page 43: ...RING 3 437 ID X 275 W 016037 2 000 O RING 5 1 4O D X 210W 017003 2 000 O RING 7 8 OD X 139W 025307 2 000 USED WITH 032511 RSB NO LONGER USED W X67222 O RING 9 16 OD X 103W 016369 4 000 O RING 9 32 OD...

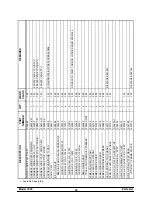
Page 44: ...O RING 3 8 OD X 070W 016137 2 000 ADAPTOR SWV 1 4F 1 4BARB SS 016715 1 103 TUBE NYLOBRADE 1 4ID X 7 16OD 020568 6 1 000 R30317 FERRULE 475 ID NP BRASS 021082 1 000 CLAMP HOSE 1 2 STEPLESS EAR 053960...

Page 45: ...FOR X 1 8 MPT SS 054913 1 103 MANIFOLD CO2 2REG 2SOL 345 6 051835 27 1 103 COIL SERVICE CO2 MANIFOLD 051835 2 103 REGULATOR SERVICE 20PSI CO2 051835 3 103 REGULATOR SERVICE 120 PSI CO2 051835 4 103 T...

Page 46: ...OL C300 UVC2 X56020 SER 1 212 CHIP SOFTWARE 300 UVC2 X40818 SER 1 103 PCB A UVC2 X51169 SER 1 212 PCB A BROWN OUT PROTECT SLUSH X47299 SER S N M1066645 PRIOR PROBE A THERMISTOR 345 6 X45708 1 103 PROB...

Page 47: ...18X5 16 18 020445 4 SHELL A INSULATED C300 R NP X56813 SER 1 S N K5012253 UP STUD NOSE CONE 5 16 18X5 16 18 020445 4 SHELL A INSULATED C300 X54643 SER 1 512 S N K5012252 PRIOR STUD NOSE CONE 5 16 18X...

Page 48: ...103 SWITCH FLOAT C300 TANK MIX 055539 1 NNN O RING 563 OD X 070W 013 043758 1 000 TANK MIX SS 4 MOLDED CAPS 063840 1 103 TUBE FEED MIX 056807 5 1 103 TRANS CONT 40VA 120 200 240V 045754 1 103 TRAY DRI...

Page 49: ...RACKET CONDENSER C300 WC 056358 1 NNN BRACKET VALVE ACCESS C300 056360 2 NNN BRACKET VALVE WATER C300 056359 1 NNN CLAMP HOSE ADJ 7 16 X 25 010031 6 000 CONDENSER WC COAX 047540 1 103 COUPLING 5 8FS X...

Page 50: ...D 238 052397 58 1 512 380 415V 50HZ 3N DIAGRAM WIRING C300 059540 37 1 000 200V 50HZ 3PH DIAGRAM WIRING C300 059540 40 1 000 220 240V 50HZ 1PH DIAGRAM WIRING C300 W CARB 059540 58 1 000 380 415V 50HZ...

Page 51: ...Model C300 059540 27 4 11...

Page 52: ...Model C300 059540 33 4 11...

Page 53: ...Model C300 059540 40 4 11...

Page 54: ...Model C300 059540 58 4 11...

Reviews: