Section 8
8-1
Model C300
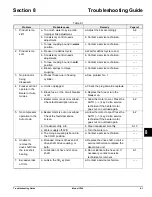
Troubleshooting Guide
8
Troubleshooting Guide
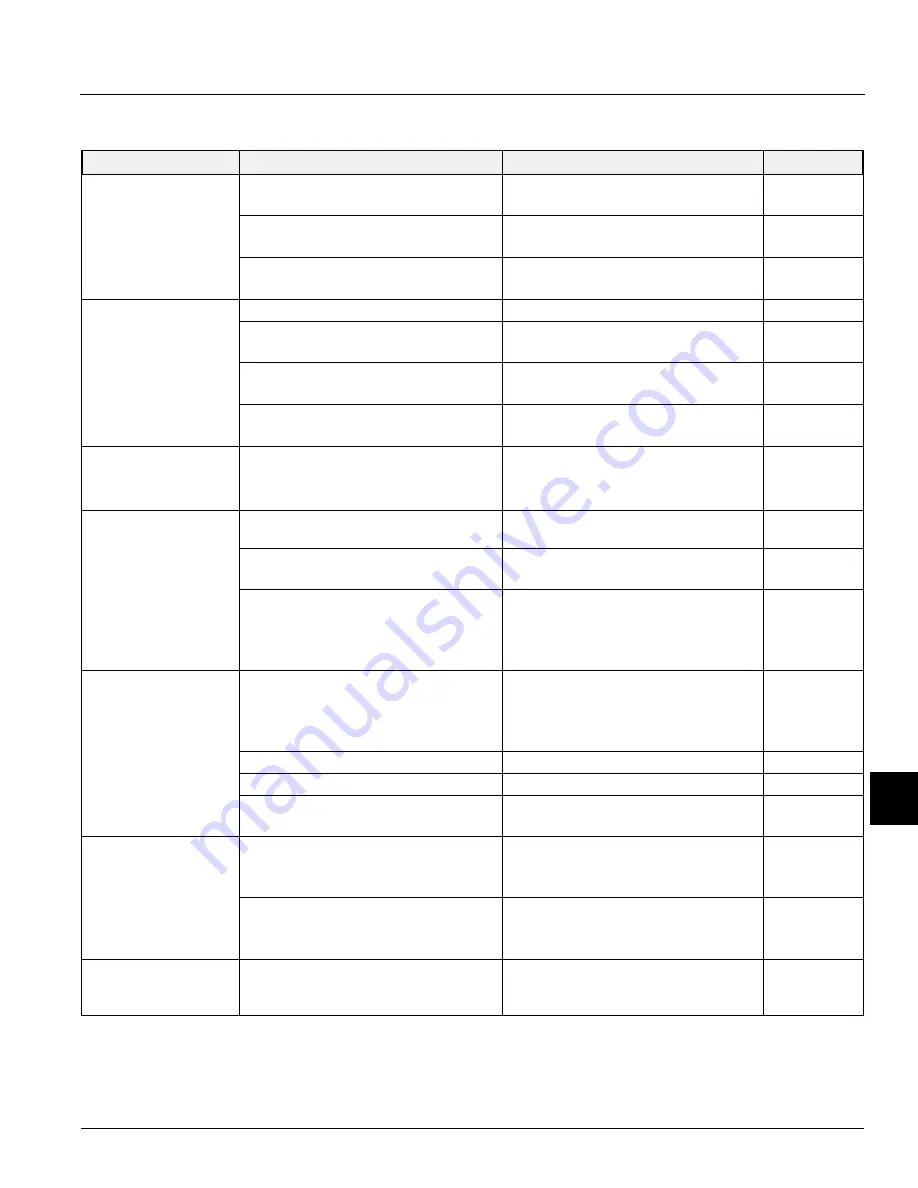
Table 8-1
Problem
Probable cause
Remedy
Page ref
1. Product is too
stiff.
a. Too much water to syrup ratio.
Improper brix adjustment.
a. Adjust the brix accordingly.
b. Consistency control needs
adjustment.
b. Contact a service technician.
- - -
c. Torque coupling bound in
warm
position.
c. Contact a service technician.
- - -
2. Product is too
soft.
a. Freezer in a defrost cycle.
a. Wait for defrost cycle to end.
- - -
b. Consistency control needs
adjustment.
b. Contact a service technician.
- - -
c. Torque coupling bound in
cold
position.
c. Contact a service technician.
- - -
d. Broken springs in torque
coupling.
d. Contact a service technician.
- - -
3. No product is
being
dispensed.
a. Product frozen-up in freezing
cylinder.
a. See problem No. 1.
- - -
4. Freezer will not
operate in the
Beater or Auto
modes.
a. Unit is unplugged.
a. Check the plug at wall receptacle.
- - -
b. Blown fuse, or the circuit breaker
is off.
b. Replace the fuse or turn the
breaker on.
- - -
c. Beater motor is out on overload.
Check fault description screen.
c. Allow the motor to cool. Press the
AUTO (- ->) key. Call a service
technician if the beater motor
goes out on overload again.
5. No compressor
operation in the
Auto mode.
a. Beater motor is out on overload.
Check the fault description
screen.
a. Allow the motor to cool. Press the
AUTO (- ->) key. Call a service
technician if the beater motor
goes out on overload again.
b. Condenser dirty, A/C.
b. Clean condenser monthly.
c. Water supply off, W/C.
c. Turn the water on.
- - -
d. The torque coupling is bound in
the COLD position.
d. Contact a service technician.
- - -
6. Unable to
remove the
drive shaft from
the rear shell
bearing.
a. Rounded corners of hex end of
drive shaft, drive coupling, or
both.
a. Replace the drive shaft, or call a
service technician to replace the
direct drive unit.
- - -
b. Lubrication of hex end of drive
shaft.
b. Do not lubricate the hex end. If
necessary, contact a service
technician for removal.
7. Excessive loss
of CO
2
.
a. Leak in the CO
2
system.
a. Contact a service technician.
- - -
Summary of Contents for C300 NP
Page 14: ...3 4 SAFETY Model C300 Safety 3 Notes...
Page 18: ...4 4 OPERATOR PARTS IDENTIFICATION Model C300 Operator Parts Identification 4 Notes...
Page 26: ...5 8 USER INTERFACE Model C300 User Interface 5 Notes...
Page 40: ...6 14 OPERATING PROCEDURES Model C300 Operating Procedures 6 Notes...
Page 42: ...7 2 OPERATOR CHECKLIST Model C300 Operator Checklist 7 Notes...
Page 46: ...9 2 Model C300 Parts Replacement Schedule PARTS REPLACEMENT SCHEDULE 9 Notes...
Page 52: ...LIMITED WARRANTY ON PARTS 11 4 Model C300 Limited Warranty on Parts 11 Notes...

