background image

6-12  

OPERATING PROCEDURES

Model 8756

Operating Procedures 

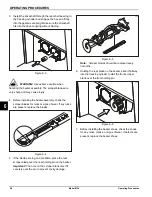
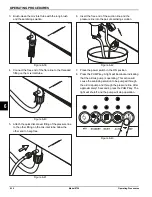
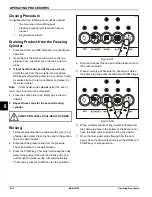
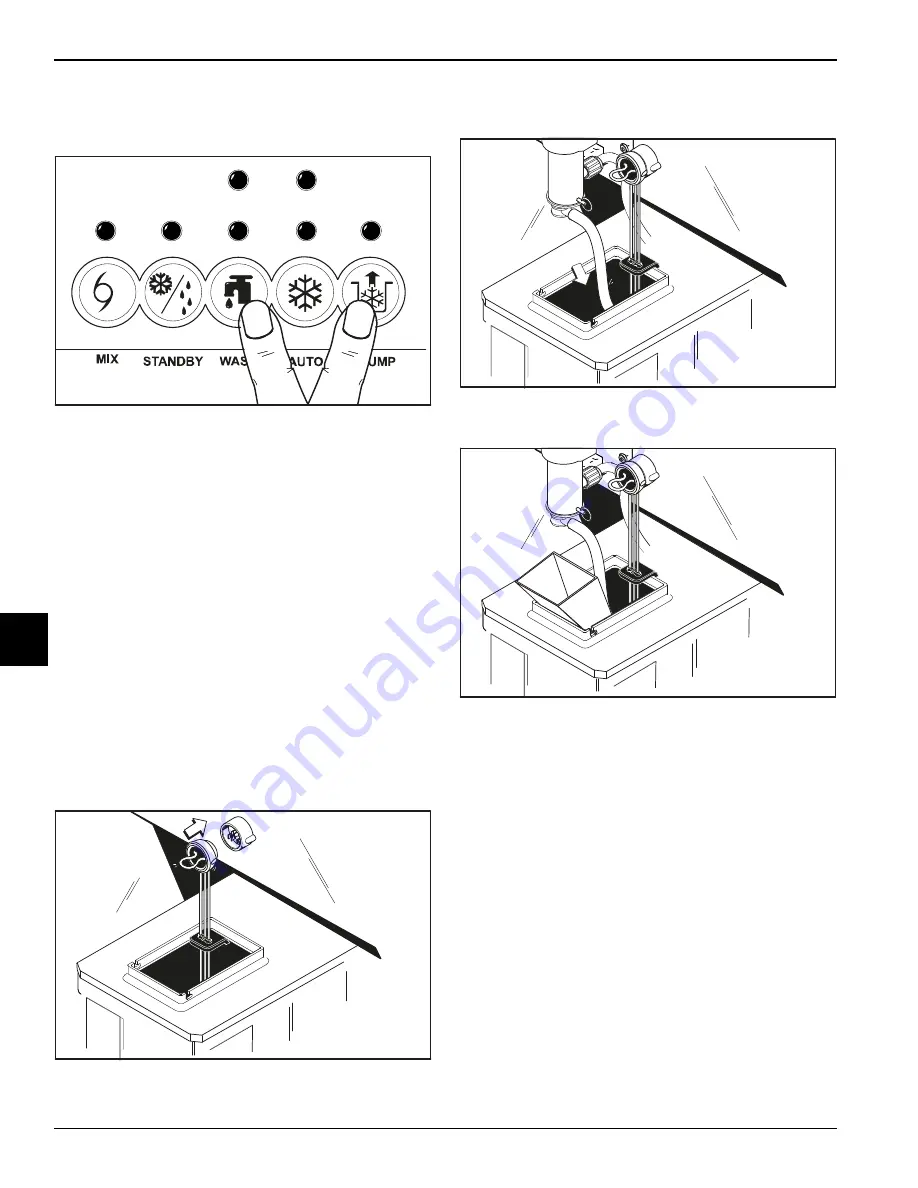
14. When the sanitizer stops flowing from the door spout, 

close the draw valve. Press the WASH and PUMP 
keys to stop the operation.

Figure 6-49

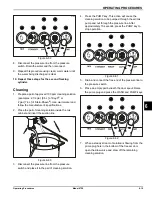
15. Disconnect the pressure line from the pressure 

switch. Drain the sanitizer. Reconnect the pressure 
line to the pressure switch.

16.

Repeat these steps for the second freezing 
cylinder

.

17. Prepare a sink with an approved sanitizing solution 

(examples: Stera-Sheen

®

 or Kay-5

®

). Use warm 

water and follow the manufacturer's specifications.

18. Take the following parts to the sink and sanitize: mix 

tanks, mix tank covers, mix probes, mix storage 
covers, and funnels.

Priming

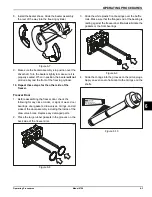
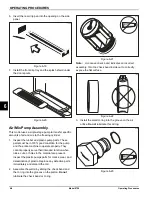
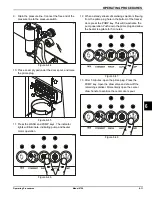
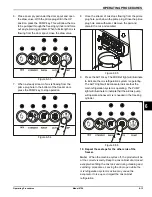
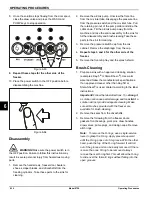
1. Place the mix tank and the cover in the mix cabinet.

2. Insert the prongs of the mix probe inside the mix 

tank. Connect the mix probe in the socket receptacle.

Figure 6-50

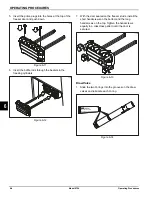
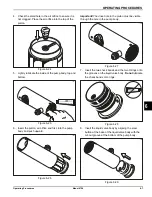
3. Place the free end of the suction line into the mix 

tank.

Figure 6-51

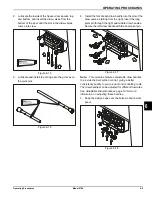
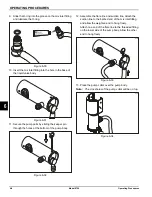
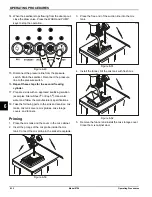
4. Install the funnel. Fill the mix tank with


fresh mix.

Figure 6-52

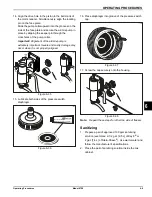
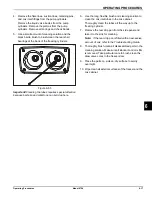
5. Remove the funnel and install the mix storage cover. 

Close the mix cabinet door.

13038wp

15064

15065

15066

Summary of Contents for Horizon 8756

Page 1: ...OPERATOR S MANUAL Model 8756 Single Stage Pump Soft Serve Freezer 11 15 10 Original Publication Updated 8 13 2020 Original Operating Instructions 069071 M ...

Page 2: ..._____ Phase__________________________________ Maximum Fuse Size ______________________________________________________ A Minimum Wire Ampacity ___________________________________________________ A Note Continuing research results in steady improvements therefore information in this manual is subject to change without notice Note Only instructions originating from the factory or its authorized tran...

Page 3: ...tion Beater Door Assembly 4 3 Air Mix Pump Assembly 4 4 Accessories 4 5 Section 5 User Interface Symbol Definitions 5 2 Power Switch 5 2 Indicator Lights 5 2 RESET Button 5 2 MIX Ref 5 2 STANDBY 5 3 WASH 5 3 AUTO 5 3 PUMP 5 3 Adjustable Draw Handle 5 3 Section 6 Operating Procedures Assembly 6 1 Air Mix Pump Assembly 6 6 Sanitizing 6 9 Priming 6 12 Closing Procedure 6 14 Draining Product from the ...

Page 4: ...and Sanitizing 7 1 Troubleshooting Bacterial Count 7 1 Regular Maintenance Checks 7 1 Air Mix Pump 7 2 Section 8 Troubleshooting Guide Section 9 Parts Replacement Schedule Section 10 Limited Warranty on Equipment Section 11 Limited Warranty on Parts Section 12 Wiring Diagrams ...

Page 5: ...t in personal injury or death from electrical shock or hazardous moving parts as well as poor performance or damage to the machine Note All repairs must be performed by a Taylor service technician WARNING This machine has many sharp edges that can cause severe injuries Site Preparation Review the area where the machine will be installed before uncrating it Make sure all possible hazards to the use...

Page 6: ...icable national state and local codes for determining the proper configuration Water pressure to the unit must not exceed 150 psi 1034 kPa Electrical Connections IMPORTANT In the United States this machine is intended to be installed in accordance with the National Electrical Code NEC ANSI NFPA 701987 The purpose of the NEC code is the practical safeguarding of persons and property from hazards ar...

Page 7: ... can break loose Failure to follow these instructions may result in electrocution Contact your local authorized Taylor distributor for service Beater Rotation NOTICE Beater rotation must be clockwise as viewed looking into the freezing cylinder To correct the rotation on a three phase machine interchange any two incoming power supply lines at the freezer main terminal block only To correct rotatio...

Page 8: ...eclaiming systems For information regarding applicable local laws please contact your local authorized Taylor distributor IMPORTANT Refrigerants and their associated lubricants may be extremely moisture absorbent When opening a refrigeration system the maximum time the system is open must not exceed 15 minutes Cap all open tubing to prevent humid air or water from being absorbed by the oil ...

Page 9: ...s valid only if the parts are authorized Taylor parts purchased from the local authorized Taylor distributor and only if all required service work is provided by an authorized Taylor service technician Taylor reserves the right to deny warranty claims on machines or parts if unapproved parts or incorrect refrigerant were installed in the machine system modifications were performed beyond factory r...

Page 10: ...mploys It should also be noted that Taylor does not warrant the refrigerant used in its machine For example if the refrigerant is lost during the course of ordinary service to this machine Taylor has no obligation to either supply or provide replacement refrigerant either at billable or unbillable terms Taylor will recommend a suitable replacement if the original refrigerant is banned obsoleted or...

Page 11: ...ible for their safety Children should be supervised to ensure that they do not play with the machine WARNING Avoid injury DO NOT operate the machine unless it is properly grounded DO NOT operate the machine with fuses larger than specified on the machine s data label All repairs should be performed by an authorized Taylor service technician The main power supplies to the machine must be disconnect...

Page 12: ...p over and result in personal injury WARNING Only install this machine in a location where its use and maintenance is restricted to trained personnel Failure to comply may result in personal injury NOTICE Cleaning and sanitizing schedules are governed by your federal state or local regulatory agencies and must be followed accordingly Please refer to the cleaning section of this manual for the prop...

Page 13: ...Section 4 4 1 Model 8756 Operator Parts Identification 4 Operator Parts Identification Model 8756 Figure 4 1 22 7 23 9 10 8 4 22 11 12 27 29 13 28 24 25 1 18 19 14 20 21 15 17 5 2 16 6 26 3 ...

Page 14: ... 10 3 WHL 021279 12 Gasket Cabinet Mix Door 024629 13 Probe A Mix 2 X35981 14 Boot Mix Cover 037200 15 Tank A Mix W Decals X38755 15a Tank Only 034928 Item Description Part No 16 Cover Mix Tank 024590 17 Funnel Mix 036637 18 Tray Drip 22 7 8 X 5 1 8 014533 19 Shield Splash 23 Long 022766 20 Cover Left Mix Storage 037138 21 Cover Right Mix Storage 037139 22 Trim Corner Left Right 022013 23 Trim A S...

Page 15: ...388 3 O ring 3 8 OD X 070W 016137 4 Plug Prime 028805 5 Gasket Door HT 4 Double 048926 6 Kit A Beater Front Shoes X50350 6a Shoe Front Helix Rear 050346 6b Bearing Front Shoe 050348 6c Shoe Front Helix Front 050347 Item Description Part No 7 Beater A 3 4 qt 1 Pin X46231 8 Shaft Beater 032564 9 Seal Driveshaft 032560 10 Blade Scraper Plastic 084350 11 O ring 5 16 OD X 070W 016272 12 Rod A Pivot Lon...

Page 16: ... Complete X22345 3a Cylinder A Pump 022345 1 3b Pin Retaining 021276 8 3c Piston 021276 2 3d Ring Check 2 OD x 1 2 020050 3e O ring 2 1 8 OD x 139 W 020051 3f Body A Valve X22345 3 3g O ring 13 16 OD x 139 W 021278 3h Elbow Inlet 90 Degree 022502 4 4 Orifice 023425 50 5 O ring 3 8 OD x 070 W 016137 6 Line A Flare 038299 7 Line A Pump Pressure X27139 8 Diaphragm Pressure Switch 020249 9 Tube Vinyl ...

Page 17: ...041082 125 packs Apply the appropriate Taylor approved food safe lubricant 1 6 7 9 8 2 3 11 10 4 5 Item Description Part No 1 Brush Mix Pump Body 023316 2 Brush Pressure Switch 027647 3 Brush Set LVB 050103 4 Brush Feed Tube 021101 5 Brush Double Ended 013072 6 Brush Rear Bearing 013071 Item Description Part No 7 Brush Draw Valve 013073 8 Sanitizer See Note 9 Lubricant Taylor 4 oz 047518 10 Kit A ...

Page 18: ...4 6 OPERATOR PARTS IDENTIFICATION Model 8756 Operator Parts Identification 4 Notes ...

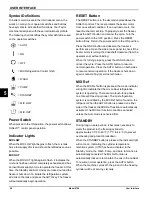
Page 19: ...face 5 User Interface Figure 5 1 4 2 8 9 7 6 5 1 3 Item Description 1 Power Switch Toggle 2 RESET Button 3 MIX Refrigeration Control 4 STANDBY Key 5 WASH Key Item Description 6 AUTO Key 7 PUMP Key 8 MIX LOW Indicator 9 MIX OUT Indicator ...

Page 20: ... Return the power switch to the ON position Press the WASH button and observe the freezer s performance Open the side access panel to check if the beater motor is turning the driveshaft clockwise from the operator end without binding When it s turning properly press the WASH button to cancel the cycle Press the AUTO button to resume normal operation Press the AUTO button on both sides to resume no...

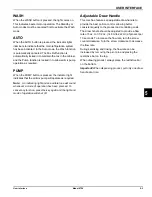
Page 21: ...required Note An indicating light and an audible tone will sound whenever a mode of operation has been pressed To cancel any function press the key again and the light and mode of operation will shut off Adjustable Draw Handle This machine features an adjustable draw handle to provide the best portion control allowing better consistent quality to the product and controlling costs The draw handle s...

Page 22: ...5 4 USER INTERFACE Model 8756 User Interface 5 Notes ...

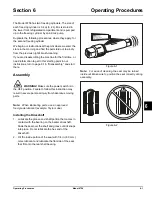
Page 23: ...embly and start there Assembly WARNING Make sure the power switch is in the OFF position Failure to follow this instruction may result in severe personal injury from hazardous moving parts Note When lubricating parts use an approved food grade lubricant example Taylor Lube Installing the Driveshaft 1 Lubricate the groove and shaft portion that comes in contact with the bearing on the beater drives...

Page 24: ...r nicks or signs of wear If any nicks are present replace the blades Figure 6 4 5 If the blades are in good condition place the rear scraper blade over the rear holding pin on the beater Important The hole on the scraper blade must fit securely over the pin to prevent costly damage Figure 6 5 Note Scraper blades should be replaced every 3 months 6 Holding the rear blade on the beater slide it half...

Page 25: ...ing for any nicks cracks or signs of wear door bearings door gaskets draw valves O rings and all sides of the door assembly including the inside of the draw valve bores Replace any damaged parts 2 Place the large rubber gaskets in the grooves on the back side of the freezer door Figure 6 8 3 Slide the white plastic front bearings over the baffle rods Make sure that the flanged end of the bearing i...

Page 26: ...ders Figure 6 12 7 With the door seated on the freezer studs install the short handscrews on the bottom and the long handscrews on the top Tighten the handscrews equally in a crisscross pattern until the door is secured Figure 6 13 Draw Valve 1 Slide the two O rings into the grooves on the draw valves and lubricate each O ring Figure 6 14 11431 11432 101180 11428 Apply the appropriate Taylor appro...

Page 27: ...ng pivot pin through the right and middle draw handles Secure the left draw handle with the short pivot pin Figure 6 17 Note This machine features adjustable draw handles to provide the best portion control giving a better consistency quality to your product and controlling costs The draw handles can be adjusted for different flow rates See Adjustable Draw Handle on page 5 3 for more information o...

Page 28: ...unction when nicks cuts or holes in the material are present Inspect the plastic pumps parts for cracks wear and delamination of plastic Replace any defective parts immediately and discard the old 2 Assemble the piston by sliding the check band and the O ring into the grooves on the piston Do not lubricate the check band or O ring Figure 6 21 Note A concave check band indicates an incorrect assemb...

Page 29: ...rtant The drive hole in the piston must be visible through the hole in the pump body Figure 6 27 7 Insert the two check bands and the two O rings onto the grooves on the liquid valve body Do not lubricate the check bands or O rings Figure 6 28 8 Insert the liquid valve body by aligning the steel button at the base of the liquid valve body with the cut out groove at the bottom of the pump body Figu...

Page 30: ...e bottom of the pump body Figure 6 32 12 Assemble the flare line and suction line Attach the suction line to the barbed end of the mix inlet fitting and allow the weighted end to hang freely Attach one end of the flare line to the threaded fitting on the lower side of the pump body Allow the other end to hang freely Figure 6 33 13 Place the pump collar over the pump body Note The crossholes of the...

Page 31: ...ostly damage may occur when it is not properly aligned Figure 6 35 15 Lubricate both sides of the pressure switch diaphragm Figure 6 36 16 Place diaphragm into groove of the pressure switch cap Figure 6 37 17 Screw the cap securely onto the housing Figure 6 38 Note Repeat these steps for other the side of freezer Sanitizing 1 Prepare a pail of approved 100 ppm sanitizing solution examples 2 1 2 ga...

Page 32: ...Allow the other end to hang free Figure 6 41 6 Insert the free end of the suction line and the pressure line into the pail of sanitizing solution Figure 6 42 7 Place the power switch in the ON position 8 Press the PUMP key A light will illuminate indicating that the air mix pump is operating This action will cause the sanitizing solution to be pumped through the air mix pump and through the pressu...

Page 33: ...nd beater motor operation Figure 6 46 12 When a steady stream of sanitizing solution is flowing from the prime plug hole in the bottom of the freezer door press the PUMP key This will de activate the pump operation Push down the prime plug and allow the beater to agitate for 5 minutes Figure 6 47 13 After 5 minutes open the prime plug Press the PUMP key Open the draw valve and draw off the remaini...

Page 34: ...ion examples Stera Sheen or Kay 5 Use warm water and follow the manufacturer s specifications 18 Take the following parts to the sink and sanitize mix tanks mix tank covers mix probes mix storage covers and funnels Priming 1 Place the mix tank and the cover in the mix cabinet 2 Insert the prongs of the mix probe inside the mix tank Connect the mix probe in the socket receptacle Figure 6 50 3 Place...

Page 35: ...lug hole area with water Remove the pail and discard the mix and sanitizer Figure 6 55 9 Press the AUTO key The MIX Ref light will illuminate to indicate the mix refrigeration system is operating The AUTO light will illuminate to indicate that the main refrigeration system is operating The PUMP light will illuminate to indicate that the air mix pump will operate whenever mix is needed in the freez...

Page 36: ... these steps for the second freezing cylinder Rinsing 1 Fill the empty pail in the mix cabinet with 2 gal 7 6 L of cool clean water Place the free end of the suction line in the pail of water 2 Disconnect the pressure line from the pressure switch and place it in the pail of water 3 Press the PUMP key This action will cause the rinse water to be pumped through the air mix pump and out through the ...

Page 37: ...binet and insert the suction line Figure 6 60 3 Disconnect the pressure line from the pressure switch and place it in the pail of cleaning solution 4 Press the PUMP key This action will cause the cleaning solution to be pumped through the air mix pump and out through the pressure line After approximately 15 seconds press the PUMP key to stop operation Figure 6 61 5 Drain and connect the free end o...

Page 38: ...from the mix cabinet Remove the diaphragm from the cap 4 Repeat steps 3 and 4 for the other side of the freezer 5 Remove the front drip tray and the splash shield Brush Cleaning 1 Prepare a sink with an approved cleaning solution examples Kay 5 or Stera Sheen Use warm water and follow the manufacturer s specifications If an approved cleaner other than Kay 5 or Stera Sheen is used dilute it accordi...

Page 39: ...ia and milkstone can build up here 6 Use the long flexible brush and cleaning solution to clean the mix inlet tubes in the mix cabinet Thoroughly clean the tubes all the way up to the freezing cylinder 7 Remove the rear drip pan from the side panel and take it to the sink for cleaning Note If the rear drip pan is filled with an excessive amount of mix refer to the Troubleshooting Guide 8 Thoroughl...

Page 40: ...6 18 OPERATING PROCEDURES Model 8756 Operating Procedures 6 Notes ...

Page 41: ...freezing cylinder for 5 minutes The temperature of the mix in the mix cabinet and the walk in cooler should be below 38 F 3 3 C Regular Maintenance Checks Replace scraper blades that are bent damaged or worn Before installing the beater make sure that the scraper blades are properly attached over the pins and the beater assembly is straight Check the rear shell bearing for signs of wear excessive ...

Page 42: ...es Follow lubricating procedures carefully Never lubricate check bands Handle plastic pump parts with care to avoid nicks and cracks Make sure the pressure line is securely attached to the pressure switch Clean sanitize and lubricate the pressure switch diaphragm daily Make sure the air mix pump is properly aligned with the face plate of the motor reducer or severe and costly damage may occur ...

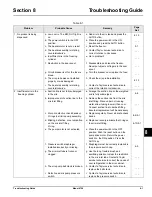
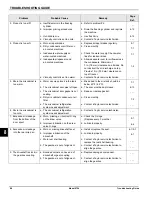
Page 43: ...on line so the weighted end is fully submerged 6 6 b Improper seal of suction line to the mix inlet fitting b Remove the suction line from the mix inlet fitting Place under hot running water allow tubing to swell then cool Connect suction line to barbed fitting Eventual replacement will be necessary c Worn or defective check bands or O rings in air mix pump assembly c Replace regularly Never lubri...

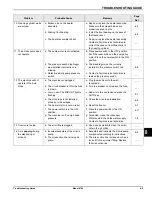
Page 44: ... door was left open b The door must be kept closed 6 13 c The mix cabinet door gasket is not sealing c Repair or replace gasket d Dirty mix cabinet condenser or air filter d Clean monthly 7 2 e The mix cabinet refrigeration system needs adjustment e Contact a Taylor service technician 6 Mix in the mix cabinet is too cold a The mix cabinet refrigeration system needs adjustment a Contact a Taylor se...

Page 45: ... will not operate in the Auto mode a The machine is unplugged a Plug the machine into the wall receptacle b The circuit breaker is off or the fuse is blown b Turn the breaker on or replace the fuse c Low on mix The MIX OUT light is flashing c Add mix to the mix tank and press the AUTO key 5 1 d The mix probe is not installed properly or is damaged d Check the mix probe installation 6 6 e The beate...

Page 46: ...8 4 TROUBLESHOOTING GUIDE Model 8756 Troubleshooting Guide 8 Notes ...

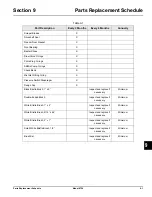
Page 47: ... Inlet Fitting O ring X Pressure Switch Diaphragm X Design Cap X Black Bristle Brush 1 x 2 Inspect and replace if necessary Minimum Double Ended Brush Inspect and replace if necessary Minimum White Bristle Brush 1 x 2 Inspect and replace if necessary Minimum White Bristle Brush 9 16 x 44 Inspect and replace if necessary Minimum White Bristle Brush 3 x 7 Inspect and replace if necessary Minimum Sma...

Page 48: ...9 2 PARTS REPLACEMENT SCHEDULE Model 8756 Parts Replacement Schedule 9 Notes ...

Page 49: ... WARRANTY CONDITIONS 1 If the date of original installation of the Product cannot be verified then the limited warranty period begins ninety 90 days from the date of Product manufacture as indicated by the Product serial number Proof of purchase may be required at time of service 2 This limited warranty is valid only if the Product is installed and all required service work on the Product is perfo...

Page 50: ...s due to theft vandalism wind rain flood high water water lightning earthquake or any other natural disaster fire corrosive environments insect or rodent infestation or other casualty accident or condition beyond the reasonable control of Taylor operation above or below the electrical or water supply specification of the Product or components repaired or altered in any way so as in the judgment of...

Page 51: ... OR INCIDENTAL DAMAGES INCLUDING CLAIMS FOR LOST SALES LOST PROFITS PRODUCT LOSS PROPERTY DAMAGES OR SERVICE EXPENSES ARE EXPRESSLY EXCLUDED THE EXPRESS WARRANTIES MADE IN THIS LIMITED WARRANTY MAY NOT BE ALTERED ENLARGED OR CHANGED BY ANY DISTRIBUTOR DEALER OR OTHER PERSON WHATSOEVER LEGAL REMEDIES The owner must notify Taylor in writing by certified or registered letter to the following address ...

Page 52: ...10 4 LIMITED WARRANTY ON EQUIPMENT Model 8756 Limited Warranty on Equipment 10 Notes ...

Page 53: ...ed proof of purchase may be required at time of service 2 This limited warranty is valid only if the Part is installed and all required service work in connection with the Part is performed by an authorized Taylor distributor or service agency 3 The limited warranty applies only to Parts remaining in use by their original owner at their original installation location in the machine of original ins...

Page 54: ...nty service work promptly upon arrival 9 Failure damage or repairs due to faulty installation misapplication abuse no or improper servicing unauthorized alteration or improper operation or use as indicated in the Taylor Operator s Manual including but not limited to the failure to use proper assembly and cleaning techniques tools or approved cleaning supplies 10 Failure damage or repairs due to th...

Page 55: ...INCIDENTAL DAMAGES INCLUDING CLAIMS FOR LOST SALES LOST PROFITS PRODUCT LOSS PROPERTY DAMAGES OR SERVICE EXPENSES ARE EXPRESSLY EXCLUDED THE EXPRESS WARRANTIES MADE IN THIS LIMITED WARRANTY MAY NOT BE ALTERED ENLARGED OR CHANGED BY ANY DISTRIBUTOR DEALER OR OTHER PERSON WHATSOEVER LEGAL REMEDIES The owner must notify Taylor in writing by certified or registered letter to the following address of a...

Page 56: ...11 4 LIMITED WARRANTY ON PARTS Model 8756 Limited Warranty on Parts 11 Notes ...

Page 57: ...Section 12 12 1 Model 8756 Wiring Diagrams 12 Wiring Diagrams 037807 33 4 15 2015 Taylor Company c Model 8756 ...

Page 58: ...12 2 WIRING DIAGRAMS Model 8756 Wiring Diagrams 12 Notes ...

Reviews: